Canon PIXMA iP1500 iP1500 Quick Start Guide
Canon PIXMA iP1500 Manual
 |
View all Canon PIXMA iP1500 manuals
Add to My Manuals
Save this manual to your list of manuals |
Canon PIXMA iP1500 manual content summary:
- Canon PIXMA iP1500 | iP1500 Quick Start Guide - Page 1
Photo Printer Quick Start Guide - Canon PIXMA iP1500 | iP1500 Quick Start Guide - Page 2
self-help in an intuitively guided interactive troubleshooting environment, the place to start is our helpful tech support web site. In addition, the latest driver downloads, answers to frequently asked questions, product information, and "where to buy" instructions are found here. 2. Email Tech - Canon PIXMA iP1500 | iP1500 Quick Start Guide - Page 3
Photo Printer Quick Start Guide - Canon PIXMA iP1500 | iP1500 Quick Start Guide - Page 4
form, in whole or in part, without the prior written consent of Canon U.S.A., Inc. © 2004 Canon U.S.A., Inc. Disclaimer Canon U.S.A., Inc. has reviewed this manual thoroughly in order that it will be an easy-to-use guide to your Canon PIXMA iP1500 Photo Printer. All statements, technical information - Canon PIXMA iP1500 | iP1500 Quick Start Guide - Page 5
the Nozzle Check Pattern 27 Print Head Cleaning 31 Print Head Deep Cleaning 34 Aligning the Print Head 37 Replacing an Ink Tank 41 Troubleshooting Cannot Install the Printer Driver 49 Print Quality is Poor or Contains Errors 50 Troubleshooting Printer Hardware 52 Paper Does Not Feed Properly - Canon PIXMA iP1500 | iP1500 Quick Start Guide - Page 6
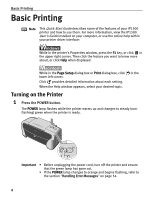
Basic Printing Note This Quick Start Guide describes some of the features of your iP1500 printer and how to use them. For more information, view the iP1500 User's Guide installed on your computer, or use the online help within your printer driver interface: While in the printer's Properties window - Canon PIXMA iP1500 | iP1500 Quick Start Guide - Page 7
to load plain paper into your printer. • For detailed information on the speciality media Canon provides for use with its various printers, refer to the section "Using Speciality Media" on page 7. • Consult "Printing Media" in the User's Guide for detailed instructions on how to load envelopes and - Canon PIXMA iP1500 | iP1500 Quick Start Guide - Page 8
2 Prepare to load paper. Open the Paper Support. Note • Place the printer on a flat surface. • Do not place any obstacles in front of the printer to secure the space for paper output. If the Paper Output Slot is stacked with printed sheets, they may be folded or jammed. 3 Load the paper. „ Loading - Canon PIXMA iP1500 | iP1500 Quick Start Guide - Page 9
at once. Printing direction (2) Pinch the Paper Guide and slide it against the left side of the envelope. (3) Select Envelope in Media Type, and then select Comm. Env. #10 or DL Env. in Page Size. For the printer driver setting, refer to "Printing with Windows" on page 9, "Printing with Macintosh - Canon PIXMA iP1500 | iP1500 Quick Start Guide - Page 10
direction. You can load a maximum of 20 papers in 4" x 6" size. (2) Pinch the Paper Guide and slide it against the left side of the stack of paper. (3) Select 4 x 6 in in Page Size. For the printer driver setting, refer to "Printing with Windows" on page 9, "Printing with Macintosh" on page 11. 6 - Canon PIXMA iP1500 | iP1500 Quick Start Guide - Page 11
Using Speciality Media Canon recommends that you use genuine Canon media to ensure optimal print quality. „ Photo Quality Media • Photo Paper Pro • Photo Paper Plus Glossy • Photo Paper Plus Double Sided • Photo Paper Plus Semi-Gloss • Matte Photo Paper • Glossy Photo Paper „ Media Suited - Canon PIXMA iP1500 | iP1500 Quick Start Guide - Page 12
Printing „ Canon Speciality Media Media Name Paper Support Load Limit Printer Driver Settings for Media Type Photo Paper Pro Letter: up to 10 sheets* Photo Paper Pro 4"×6": up to 20 sheets Photo Paper Plus Glossy Letter: up to 10 sheets* 5"×7": up to 10 sheets 4"×6": up to 20 sheets Photo - Canon PIXMA iP1500 | iP1500 Quick Start Guide - Page 13
The steps described in this section are for printing in Windows XP. 1 Create a document or open a file to print. 2 Open Printer Properties dialog box. (1) Select Print from the application software's File menu. (2) Ensure that Canon PIXMA iP1500 is selected. (3) Click Preferences or Properties. Note - Canon PIXMA iP1500 | iP1500 Quick Start Guide - Page 14
on the Main tab. You can control quality in the Set Print Quality dialog box. • For details about other printer driver functions, refer to "Printer Driver Functions" in the User's Guide or Help. • Select Preview before printing by clicking the check box. This displays a preview screen that allows - Canon PIXMA iP1500 | iP1500 Quick Start Guide - Page 15
. To show BJ Status Monitor, click Canon PIXMA iP1500 on the taskbar. BJ Status Monitor opens automatically when a printer error occurs. Printing with Macintosh Note • The menu screens and dialog boxes that appear may vary, depending on the software application you are using. • The steps described - Canon PIXMA iP1500 | iP1500 Quick Start Guide - Page 16
consisting mainly of text. Detailed Setting: You can fine-tune the Print Quality and Halftoning settings. See "Adjusting Print Quality" on page 15. • For details about other printer driver functions, refer to "Printer Driver Functions" in the User's Guide or Help. • Double-clicking the name of your - Canon PIXMA iP1500 | iP1500 Quick Start Guide - Page 17
Basic Printing Canceling Printing You can cancel a print job while printing with the RESUME/CANCEL button on the printer. 1 Press the RESUME/CANCEL button while printing. Printing is canceled and paper is fed out. 13 - Canon PIXMA iP1500 | iP1500 Quick Start Guide - Page 18
the Canon PIXMA iP1500 is selected. Then click Preferences (or Properties). The Printer Properties dialog box opens. „ Opening the Printer Properties Dialog Box Directly from the Start Menu This method is used for maintenance operations such as Print Head cleaning, or to specify printer settings - Canon PIXMA iP1500 | iP1500 Quick Start Guide - Page 19
the quality of your printouts. See inside the back cover for a list of Canon media and inks for this printer. For more detailed information, refer to "Printing Media" in the User's Guide. Printer Driver Settings The printer driver has a variety of settings that can be used to enhance the colors and - Canon PIXMA iP1500 | iP1500 Quick Start Guide - Page 20
Advanced Printing To manually adjust Print Quality settings: 1 Open the Printer Properties dialog box. See"Opening the Printer Properties Dialog Box from Your Application Program" on page 14. 2 Select Custom in Print Quality, then click Set... to open the Set Print Quality dialog box. 3 Move the - Canon PIXMA iP1500 | iP1500 Quick Start Guide - Page 21
To automatically optimize the image: Photo Optimizer PRO automatically adjusts the photographic image created with a digital camera. Use this feature to compensate for unsatisfactory color balance and over- or under-exposure before printing. 1 Open the Printer Properties dialog box. See"Opening the - Canon PIXMA iP1500 | iP1500 Quick Start Guide - Page 22
skin tones in the images. Note In Windows Me or Windows 98 If Background Printing has been disabled, the Vivid Photo function is not available. To use Vivid Photo, select the Vivid Photo check box on the Effects tab. To use Vivid Photo, select the Vivid Photo check box under Special Effects. 18 - Canon PIXMA iP1500 | iP1500 Quick Start Guide - Page 23
sky and dark portions of the images captured with your digital camera. Note In Windows Me or Windows 98 If Background Printing has been disabled, the Photo Noise Reduction function is not available. To use Photo Noise Reduction, select the Photo Noise Reduction check box on the Effects tab. To use - Canon PIXMA iP1500 | iP1500 Quick Start Guide - Page 24
Printing „ Saving and Recalling Driver Settings When you change printer driver settings for a specific print job, such as printing black and white photos, or printing documents with a special background, you can save and name these settings for future use on similar print jobs. 1 Open the Printer - Canon PIXMA iP1500 | iP1500 Quick Start Guide - Page 25
all of the necessary settings. 3 Register new printer driver settings. Advanced Printing (1) Select Save As from the popup menu. Save Preset dialog box opens. (2) Enter a name of your printer driver settings. 4 Click OK. This registers your printer driver settings. Note You can retrieve or - Canon PIXMA iP1500 | iP1500 Quick Start Guide - Page 26
camera and print them as photo-lab quality prints. Please use the application(s) suitable for your print purposes. Note • To install applications, refer to the Easy Setup Instructions. • For details about photo applications, refer to the Photo Application Guide. „ Easy-PhotoPrint (Windows*/Macintosh - Canon PIXMA iP1500 | iP1500 Quick Start Guide - Page 27
function. This chapter describes the steps used to print borderless photos with Easy-PhotoPrint under Windows XP. The steps used under Macintosh are basically the same. Easy-PhotoPrint supports Exif Print. Easy-PhotoPrint can handle only JPEG files (file name extension: .jpg and .jpeg). 1 Start - Canon PIXMA iP1500 | iP1500 Quick Start Guide - Page 28
want to print. All photographs in the selected folder are displayed. Guidance Thumbnail Folder window (2) Click [ ] on the thumbnail of the photograph you want to print and allowing you to edit and enhance the photos to be printed. For more information, refer to the Photo Application Guide. 24 - Canon PIXMA iP1500 | iP1500 Quick Start Guide - Page 29
Media Type. (1) Click the Layout/ Print tab. (2) Select Borderless (full). Note Clicking the Correct/Enhance button on the Layout/Print tab, allowing you to edit and enhance the photos to be printed. For more information, refer to the Photo Application Guide. (3) Load the media specified in the - Canon PIXMA iP1500 | iP1500 Quick Start Guide - Page 30
perform Print Head cleaning If the pattern is printed normally, click Exit. Step 2 "Print Head Cleaning" on page 31 If the problem remains after performing Print Head cleaning three times Step 3 "Print Head Deep Cleaning" on page 34 If the problem still remains Step 4 "Replacing an Ink Tank - Canon PIXMA iP1500 | iP1500 Quick Start Guide - Page 31
the Nozzle Check Pattern Print the nozzle check pattern to determine whether the ink ejects properly from the Print Head Nozzles. Use this function when printed results are blurred or the color is incorrect. „ Printing the Nozzle Check Pattern 1 With the printer on, load a sheet of Letter-sized - Canon PIXMA iP1500 | iP1500 Quick Start Guide - Page 32
the hard disk icon where the printer driver was installed, the Applications folder, and then the Utilities folder. (2) Double-click the Printer Setup Utility icon. If you are using the OS other than Mac OS X v.10.3, double-click the Print Center icon. (3) Select iP1500 from the Name list and click - Canon PIXMA iP1500 | iP1500 Quick Start Guide - Page 33
the nozzle check pattern output by the printer. When with lines missing (black ink) Lines missing or white stripes in this pattern require running Print Head cleaning. See "Print Head Cleaning" on page 31. When white stripes appear (color ink) Note If the ink level is low, the nozzle check - Canon PIXMA iP1500 | iP1500 Quick Start Guide - Page 34
Printing Maintenance If there are neither missing lines nor white stripes in the nozzle check pattern, click Exit to finish the nozzle check. If there are neither missing lines nor white stripes in the nozzle check pattern, click Quit to finish the nozzle check. 30 - Canon PIXMA iP1500 | iP1500 Quick Start Guide - Page 35
the Print Head consumes ink, so perform Print Head cleaning only when necessary. Note If you pressed the Cleaning button on the Examining the Nozzle Check Pattern screen displayed after nozzle check pattern printing, start the Print Head cleaning procedure from 3-(3). 1 Ensure that the printer is - Canon PIXMA iP1500 | iP1500 Quick Start Guide - Page 36
-click the hard disk icon where the printer driver was installed, the Applications folder, and the Utilities folder. (2) Double-click the Printer Setup Utility icon. If you are using the OS other than Mac OS X v.10.3, double-click the Print Center icon. (3) Select iP1500 from the Name list and click - Canon PIXMA iP1500 | iP1500 Quick Start Guide - Page 37
problem, clean the Print Heads again, up to three times. • After Print Head cleaning finishes, print the nozzle check pattern to verify that the Print Head Nozzles are clean. See "Printing the Nozzle Check Pattern" on page 27. • If the problem remains, try Print Head deep cleaning. See "Print Head - Canon PIXMA iP1500 | iP1500 Quick Start Guide - Page 38
Head Deep Cleaning If print quality does not improve by standard Print Head cleaning, try Print Head deep cleaning, which is a more powerful process. Print Head deep cleaning consumes more ink than standard Print Head cleaning, so perform this procedure only when necessary. 1 Ensure that the printer - Canon PIXMA iP1500 | iP1500 Quick Start Guide - Page 39
the hard disk icon where the printer driver was installed, the Applications folder, and then the Utilities folder. (2) Double-click the Printer Setup Utility icon. If you are using the OS other than Mac OS X v.10.3, double-click the Print Center icon. (3) Select iP1500 from the Name list and click - Canon PIXMA iP1500 | iP1500 Quick Start Guide - Page 40
27. If not, check that there are sufficient ink levels in all ink tanks before turning off the printer. Be sure to perform another Print Head deep cleaning 24 hours after turning off the printer. If this does not resolve the problem, the Print Head may be worn out. Contact the Customer Care Center - Canon PIXMA iP1500 | iP1500 Quick Start Guide - Page 41
If ruled lines are displaced or the print result is unsatisfactory, Print Head alignment is required. ì 1 With the printer on, load a sheet of Letter-sized plain paper in the printer. 2 Open the Printer Properties dialog box. See "Opening the Printer Properties Dialog Box Directly from the Start - Canon PIXMA iP1500 | iP1500 Quick Start Guide - Page 42
Maintenance 4 Align the Print Head. (1) Look at the print out. From the patterns, select the most even, least irregular patterns and enter the number that corresponds. (2) Enter the numbers. (3) Click OK. Note If it - Canon PIXMA iP1500 | iP1500 Quick Start Guide - Page 43
-click the hard disk icon where the printer driver was installed, the Applications folder, and the Utilities folder. (2) Double-click the Printer Setup Utility icon. If you are using the OS other than Mac OS X v.10.3, double-click the Print Center icon. (3) Select iP1500 from the Name list and click - Canon PIXMA iP1500 | iP1500 Quick Start Guide - Page 44
Maintenance 4 Align the Print Head. (1) Look at the print out. From the patterns, select the most even, least irregular patterns and enter the number that corresponds. (2) Enter the numbers. (3) Click Send. Note If it - Canon PIXMA iP1500 | iP1500 Quick Start Guide - Page 45
after maintenance such as Print Head cleaning, an ink tank runs out of ink. Replace the ink tank with a new one. When replacing an ink tank, check the model number very carefully. The printer will not print properly if the wrong ink tank is used, or installed in the incorrect position. Black - Canon PIXMA iP1500 | iP1500 Quick Start Guide - Page 46
is specified. Color ink is consumed in the head cleaning and deep cleaning, which are necessary to maintain the printer's capabilities. • When an ink tank runs out of ink, replace the ink tank with a new one immediately. If printing is continued with no ink in the ink tank, a problem may occur. 42 - Canon PIXMA iP1500 | iP1500 Quick Start Guide - Page 47
the message, and click Yes. Mistakenly clicking No, instead, will prevent the low ink warning from functioning properly. If this happens, manually reset the ink counter in Printer Properties dialog box. 2 Select the replaced ink tank, and click OK. The dialog box allows you to select the replaced - Canon PIXMA iP1500 | iP1500 Quick Start Guide - Page 48
-click the hard disk icon where the printer driver was installed, the Application folder, and the Utilities folder. (2) Double-click the Printer Setup Utility icon. If you are using the OS other than Mac OS X v.10.3, double-click the Print Center icon. (3) Select iP1500 from the Name list and click - Canon PIXMA iP1500 | iP1500 Quick Start Guide - Page 49
2 Reset the Ink Counter. Printing Maintenance (1) Select Remaining ink level setting from the pop-up menu. (2) Click Ink Counter Reset. (3) Select the newly installed ink tank. (4) Click OK. 45 - Canon PIXMA iP1500 | iP1500 Quick Start Guide - Page 50
ink tank is full regardless of how much ink actually remains. The reset is the only way to match the counter value with an actual ink volume. Reset the ink counter when installing a new ink tank. Low Ink Warning Display The '!' shows a low ink level in the ink tank. BJ Status Monitor BJ Printer - Canon PIXMA iP1500 | iP1500 Quick Start Guide - Page 51
Printing Maintenance How to Display Low Ink Warning Correctly • Reset the ink counter every time you install a new ink tank. The ink counter cannot work correctly unless you synchronize it with the actual ink level. The ink counter can only be adjusted when it is reset at the time a new ink tank is - Canon PIXMA iP1500 | iP1500 Quick Start Guide - Page 52
will find the most common printing problems. Refer to the User's Guide for additional information on topics not covered in this section. • "Cannot Install the Printer Driver" on page 49 • "Print Quality is Poor or Contains Errors" on page 50 • "Troubleshooting Printer Hardware" on page 52 • "Paper - Canon PIXMA iP1500 | iP1500 Quick Start Guide - Page 53
problem persists, contact the Customer Care Center. Other applications opened on your computer can interfere with the installation routine. Close all open software applications before reinstalling the printer driver. Refer to the Easy Setup Instructions for installing the printer driver. If printer - Canon PIXMA iP1500 | iP1500 Quick Start Guide - Page 54
Troubleshooting Print Quality is Poor or Contains Errors Problem Possible Cause Try This Ink does not eject properly/Printing is Blurred/ Colors are Wrong / White Streaks appear / Printed Ruled Lines are Displaced Ink tank is not seated properly Print Head Nozzles clogged Check that the ink - Canon PIXMA iP1500 | iP1500 Quick Start Guide - Page 55
Troubleshooting Problem Printed Surface is Scratched/Back of Paper is Smudged Possible Cause Try This Media is curled If media is curled, its print side may be smudged by touching the Print Head. Uncurl the media. See "Uncurling the Media" in the User's Guide. Inside of the printer is - Canon PIXMA iP1500 | iP1500 Quick Start Guide - Page 56
your computer. It may solve the problem. Delete an undesired print job if there is any. Use BJ Status Monitor in Windows or Printer Setup Utility in Macintosh for the deletion. If you are using the OS other than Mac OS X v.10.3, use the Print Center for deletion. Cannot Print to End of Job 1. Open - Canon PIXMA iP1500 | iP1500 Quick Start Guide - Page 57
and there is no paper loaded in the printer. 2. Open the Printer Properties dialog box. 3. Click the Maintenance tab. 4. Click Roller Cleaning. 5. The confirmation message is displayed. Follow the instruction on the screen. Paper Jams 1. Ensure that the printer is on and there is no paper loaded - Canon PIXMA iP1500 | iP1500 Quick Start Guide - Page 58
turn on the printer. If the same error occurs, the Print Head Print Head may be defective. Contact the Customer Care Center. Eight flashes Waste ink absorber* The printer has a built-in waste ink absorber to hold the ink consumed during Print almost full Head cleaning. Eight flashes indicates - Canon PIXMA iP1500 | iP1500 Quick Start Guide - Page 59
reinstall the printer driver. Refer to the User's Guide for instructions on how to verify status and the correct action to take. Printer driver is not installed properly Uninstall then reinstall the printer driver. 1. Click Start, and select All Programs (or Programs), Canon PIXMA iP1500, and - Canon PIXMA iP1500 | iP1500 Quick Start Guide - Page 60
to reset ink counter when installing new ink tank The ink tank level accompanied by the ink tank icon with the "?" indicates ink tank is not synchronized with its ink counter. Always be sure to reset the ink counter in your printer driver when you replace ink tank. See "Resetting the Ink Counter - Canon PIXMA iP1500 | iP1500 Quick Start Guide - Page 61
Appendix Appendix Installing the Printer Driver when using Mac OS 9.x When using other than Mac OS X (Mac OS 9.x), install the printer driver following the procedure below. 1 Turn on your Mac and insert the Setup Software & User's Guide CD-ROM. TURN THE PRINTER ON. 2 Open the Mac OS 9 folder on the - Canon PIXMA iP1500 | iP1500 Quick Start Guide - Page 62
Appendix 15 To ensure highest quality output, carry out Print Head alignment. Refer to the Mac OS 9 Printer Driver Guide for instructions or how to align the Print Head. 58 - Canon PIXMA iP1500 | iP1500 Quick Start Guide - Page 63
or Colors are Incorrect Printing the Nozzle Check Pattern Print Head Cleaning Print Head Deep Cleaning Aligning Print Head Replacing an Ink Tank Transporting Printer Troubleshooting Cannot Install Printer Driver Print Quality is Poor Printer Does Not Start or Stops During Print Jobs Paper Does Not - Canon PIXMA iP1500 | iP1500 Quick Start Guide - Page 64
consumption: Dimensions (with a paper support retracted): Weight: Print Head: Ink Tanks: 4800* x 1200 dpi. max. (*Ink droplets can be placed in a , at standard and plain paper mode with Windows XP printer driver *2 Based on printing the ISO JIS-SCID No.5 pattern at standard and plain paper mode with - Canon PIXMA iP1500 | iP1500 Quick Start Guide - Page 65
hard-disk space for printer driver installation Windows XP/Windows 2000: 50MB Windows Me/Windows 98: 15MB Mac OS X v.10.2.1 or later: 100 MB Mac OS 9.x: 30 MB USB operation can only be guaranteed on a PC with preinstalled Windows XP, Windows 2000, Windows Me, or Windows 98. • The following - Canon PIXMA iP1500 | iP1500 Quick Start Guide - Page 66
the power outlet before cleaning the printer. If you accidentally switch the printer on while cleaning it, you could injure yourself or damage the printer. Do not attempt to disassemble or modify the printer. There are no user serviceable parts inside the printer. The printer contains high-voltage - Canon PIXMA iP1500 | iP1500 Quick Start Guide - Page 67
) fall into the printer, unplug the power cord and call for service. Print heads and ink tanks For safety reasons store print heads and ink tanks out of the reach of small children. If a child ingests any ink, consult a doctor immediately. Do not shake Print Head or ink tanks. Ink may leak out and - Canon PIXMA iP1500 | iP1500 Quick Start Guide - Page 68
, pursuant to Part 15 of the FCC Rules. These limits are designed to provide reasonable protection against harmful interference in a residential installation. This equipment generates, uses and can radiate radio frequency energy and, if not installed and used in accordance with the instructions, may - Canon PIXMA iP1500 | iP1500 Quick Start Guide - Page 69
FOR WHOM IT WAS PURCHASED AS A GIFT, AND STATES YOUR EXCLUSIVE REMEDY. Canon USA offers a full range of customer technical support* options: • Interactive troubleshooting, e-mail technical support, the latest driver downloads and answers to frequently asked questions (www.canontechsupport.com) 65 - Canon PIXMA iP1500 | iP1500 Quick Start Guide - Page 70
problem cannot be corrected by using one of the above technical support options, repair options (i.e. Carry-In/Mail-In Service*, InstantExchange Warranty Service responsible for the value of the replacement product, for which Canon USA may invoice you. This limited warranty gives you specific legal - Canon PIXMA iP1500 | iP1500 Quick Start Guide - Page 71
8 I Ink Counter Reset 44 Ink tank 41 Installing the Printer Driver when using Mac OS 9.x .....57 Index L Load Limit Mark 4 Loading Paper 3 Low Ink Warning 46 Low Ink Warning Setting 56 M Matte Photo Paper 8 Media Name 8 Media Type 8, 10, 12 Media Types Suitable for Borderless Printing 23 - Canon PIXMA iP1500 | iP1500 Quick Start Guide - Page 72
20 Speciality Media 8 Specifications 60 T Transparencies 8 Troubleshooting 48 T-Shirt Transfers 8 Turning on the Printer 2 U Uninstalling the printer driver 55 User's Guide Table of Contents 59 Using Speciality Media 7 V Vivid Photo 18 W When Printing Becomes Faint or Colors are Incorrect - Canon PIXMA iP1500 | iP1500 Quick Start Guide - Page 73
Index 69 - Canon PIXMA iP1500 | iP1500 Quick Start Guide - Page 74
Index 70 - Canon PIXMA iP1500 | iP1500 Quick Start Guide - Page 75
and order numbers. Description Ink Tanks BCI-24 Black BCI-24 Color Canon Specialty Papers Glossy Photo Paper (8.5" x 11"/20 sheets) High Resolution Paper (8.5" x 11"/100 sheets) Matte Photo Paper (8.5" x 11"/50 sheets) Photo Paper Plus Glossy (4" x 6"/20 sheets) Photo Paper Plus Glossy (4" x 6"/50 - Canon PIXMA iP1500 | iP1500 Quick Start Guide - Page 76
Canon Mexicana S. de R.L. de C.V. Periferico Sur No. 4124 Col. Ex-Rancho de Anzaldo, C.P. 01900, Mexico, D.F. The following ink tanks are compatible with iP1500. For details on ink tank replacement, refer to "Replacing an Ink Tank" in this guide. QA7-3249-V01 XXXXXXXX ©CANON INC.2004 PRINTED
-
 1
1 -
 2
2 -
 3
3 -
 4
4 -
 5
5 -
 6
6 -
 7
7 -
8
-
9
-
10
-
11
-
12
-
13
-
14
-
15
-
16
-
17
-
18
-
19
-
20
-
21
-
22
-
23
-
24
-
25
-
26
-
27
-
28
-
29
-
30
-
31
-
32
-
33
-
34
-
35
-
36
-
37
-
38
-
39
-
40
-
41
-
42
-
43
-
44
-
45
-
46
-
47
-
48
-
49
-
50
-
51
-
52
-
53
-
54
-
55
-
56
-
57
-
58
-
59
-
60
-
61
-
62
-
63
-
64
-
65
-
66
-
67
-
68
-
69
-
70
-
71
-
72
-
73
-
74
-
75
-
76
 |
 |
Photo Printer
Quick Start Guide