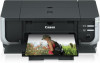
Canon PIXMA iP4300 Quick Start Guide
Canon PIXMA iP4300 Manual
 |
View all Canon PIXMA iP4300 manuals
Add to My Manuals
Save this manual to your list of manuals |
Canon PIXMA iP4300 manual content summary:
- Canon PIXMA iP4300 | Quick Start Guide - Page 1
Photo Printer Series Quick Start Guide - Canon PIXMA iP4300 | Quick Start Guide - Page 2
self-help in an intuitively guided interactive troubleshooting environment, the place to start is our helpful tech support web site. In addition, the latest driver downloads, answers to frequently asked questions, product information, and "where to buy" instructions are found here. 2. Email Tech - Canon PIXMA iP4300 | Quick Start Guide - Page 3
Photo Printer Quick Start Guide - Canon PIXMA iP4300 | Quick Start Guide - Page 4
thoroughly in order that it will be an easy-to-use guide to your Canon PIXMA iP4300 Photo Printer. All statements, technical information and recommendations in this manual and in any guides or related documents are believed reliable, but the accuracy and completeness thereof are not guaranteed - Canon PIXMA iP4300 | Quick Start Guide - Page 5
the Printer Driver 61 Cannot Connect to Computer Properly.........63 Print Results Not Satisfactory 64 Printer Does Not Start 69 Paper Does Not Feed Properly 70 Paper Jams 72 ALARM Lamp Flashes Orange 76 Error Message Appears on the Screen ........78 Cannot Print Properly from a Digital Camera - Canon PIXMA iP4300 | Quick Start Guide - Page 6
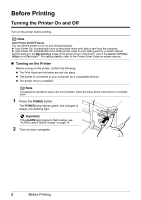
this setting in the Maintenance sheet of the printer driver in Windows®, and in the Canon IJ Printer Utility on a Macintosh®. For setting details, refer to the Printer Driver Guide on-screen manual. „ Turning on the Printer Before turning on the printer, confirm the following. z The Print Head and - Canon PIXMA iP4300 | Quick Start Guide - Page 7
the POWER button. When the POWER lamp stops flashing, the printer is turned off. Important About the Power Plug When removing the power plug after turing off the printer, be sure to confirm that the POWER lamp is not lit. If the power plug is removed from the wall outlet with the - Canon PIXMA iP4300 | Quick Start Guide - Page 8
and Requirements Media Type Model*1 Paper Support Load Limit Auto Sheet Feeder Cassette Printer Driver Setting for Media Type Plain Paper / 13 mm (A4, Letter) 0.52 inches / 13 mm (A4, Letter) Plain Paper Glossy Photo Paper GP-401 10 sheets (A4, Letter), 20 sheets (4" x 6" / 101.6 x 152.4 - Canon PIXMA iP4300 | Quick Start Guide - Page 9
Type T-Shirt Transfers Model*1 Paper Support Load Limit Auto Sheet Feeder Cassette TR-301 1 sheet 1 sheet Printer Driver Setting for Media Type T-Shirt Transfers Paper with a Model Number is Canon specialty media. You may not be able to purchase some Canon genuine papers depending on your - Canon PIXMA iP4300 | Quick Start Guide - Page 10
Using Specialty Media Canon recommends that you use Canon genuine media to ensure optimal print quality. z Photo Quality Media z Glossy Photo Paper z Matte Photo Paper z Photo Paper Plus Double Sided z Photo Paper Plus Glossy z Photo Paper Plus Semi-gloss z Photo Paper Pro z Photo Stickers z Media - Canon PIXMA iP4300 | Quick Start Guide - Page 11
to load printing paper; the Auto Sheet Feeder, found at the top of the printer, and the Cassette, found at the front of the printer. (A) (B) (A) Auto Sheet Feeder (B) Cassette z When Printing for the First Time At purchase, the printer is set to feed from the Auto Sheet Feeder. If you are printing - Canon PIXMA iP4300 | Quick Start Guide - Page 12
details, see "Changing the Paper Source" on page 11. Note You can also select the paper source using the printer driver. For details on paper source selection using the printer driver, refer to the Printer Driver Guide on-screen manual. (A) (A) Press to change the paper source. 8 Before Printing - Canon PIXMA iP4300 | Quick Start Guide - Page 13
on loading paper, see "Loading Paper" on page 12. z For details on printer driver settings, refer to the Printer Driver Guide on-screen manual. (A) (B) (A) Auto Sheet Feeder: Load paper of various types and sizes, including photo paper (B) Cassette: Load paper you use most regularly, such as plain - Canon PIXMA iP4300 | Quick Start Guide - Page 14
during printing. Note z For details on loading paper, see "Loading Paper" on page 12. z For details on printer driver settings, refer to the Printer Driver Guide on-screen manual. (A) (B) (A) Auto Sheet Feeder: Load plain paper (B) Cassette: Load plain paper z Choosing the paper source to match the - Canon PIXMA iP4300 | Quick Start Guide - Page 15
Feed Switch is selected for Paper Source in the printer driver, the printer driver settings takes precedence when printing. For details on paper source selection using the printer driver, refer to the Printer Driver Guide on-screen manual. (A) (B) (C) (A) Auto Sheet Feeder lamp (B) Paper Feed Switch - Canon PIXMA iP4300 | Quick Start Guide - Page 16
on the specialty media Canon provides for use with its various printers, refer to "Printing Media" in the User's Guide on-screen manual. z For detailed instructions on how to load specialty media into the printer, refer to "Printing Media" in the User's Guide on-screen manual. When Printing on Plain - Canon PIXMA iP4300 | Quick Start Guide - Page 17
. 2 Prepare to load paper. (1) Open the Paper Support and pull out the Paper (1) Support Extension to support the paper. (2) Press the Open Button to open the select the paper source with the printer driver. For details, refer to the Printer Driver Guide on-screen manual. Before Printing 13 - Canon PIXMA iP4300 | Quick Start Guide - Page 18
Support. Note Make sure that the Cover Guide is set upright when you load paper in the Auto Sheet Feeder. (3) (3) Pinch the Paper Guide and slide it against the left side of the paper stack. Note Select the page size of the loaded paper in Page Size in the printer driver. For details on printer - Canon PIXMA iP4300 | Quick Start Guide - Page 19
side facing DOWN and the leading edge to the far side. (A) (2) Align the paper stack against the right side of the Cassette. (3) Slide the paper guides to fit to the loaded paper stack. (1) (2) (3) Do not load higher than the Load Limit Mark (A). Before Printing 15 - Canon PIXMA iP4300 | Quick Start Guide - Page 20
in the printer driver. For details on printer driver settings, see "Printing with Windows" on page 19 or "Printing with Macintosh" on page 20. z You can also select the paper source with the printer driver. For details, refer to the Printer Driver Guide on-screen manual. (1) (2) (3) (A) 16 Before - Canon PIXMA iP4300 | Quick Start Guide - Page 21
Sheet Feeder. *2 1 3 2 Pinch the Paper Guide and slide it against the left side of the envelope. 3 Press the Paper Feed Switch so that the Auto Sheet Feeder lamp lights up. *1 *1 Printing orientation *2 Make sure the flaps are folded. 4 In the printer driver, select Envelope in Media Type, and - Canon PIXMA iP4300 | Quick Start Guide - Page 22
can be loaded at once. 3 Slide the Paper Guide against the side of the 3 envelope. 4 Press the Paper Feed Switch so that the Cassette lamp lights up. *1 Make sure the flaps are folded. 4 *1 *1 Printing orientation 5 In the printer driver, select Envelope in Media Type, and then select DL - Canon PIXMA iP4300 | Quick Start Guide - Page 23
Switch is selected in Paper Source. Note For details on other printer driver functions, click Help or Instructions to view the online help or the Printer Driver Guide on-screen manual. Instructions is only displayed when the on-screen manuals are installed. 7 Click Print (or OK). Basic Printing 19 - Canon PIXMA iP4300 | Quick Start Guide - Page 24
Page Setup on the application software's File menu. 5 Confirm that iP4300 is selected in Format for. 6 Select the desired paper size printer driver functions, click to view the Printer Driver Guide on-screen manual. If the on-screen manuals are not installed, the Printer Driver Guide on-screen manual - Canon PIXMA iP4300 | Quick Start Guide - Page 25
. Note When printing photos with the digital device connected to the printer, we recommend the use of the AC adapter supplied with the device. If you are using the device battery, be sure to charge it fully. 1 Set up the printer. Refer to the Easy Setup Instructions to set up the printer and make it - Canon PIXMA iP4300 | Quick Start Guide - Page 26
on automatically, turn it on manually. (3) Set up the PictBridge compliant device for direct printing. will appear on the LCD of the device when the printer is correctly connected. (2) Note If does not appear, see "Cannot Print Properly from a Digital Camera" on page 82. 22 Printing Photographs - Canon PIXMA iP4300 | Quick Start Guide - Page 27
to those used in Canon-brand PictBridge compliant devices. Setting item names may be different depending on the brand or model of your device. z Printable Image Data Format This printer prints images taken with a DCF® (Design rule for Camera File system)-compatible digital camera*, as well as PNG - Canon PIXMA iP4300 | Quick Start Guide - Page 28
4-up layout when Paper size is set to A4 or 8.5" x 11" (Letter). *5 Feeding this paper from the Cassette can damage the printer. Load in the Auto Sheet Feeder. *6 When printing on Photo Paper Plus Semi-gloss 8" x 10" / 203.2 x 254.0 mm (SG-201), select 20 x 25 cm/8" x 10" for Paper size and Default - Canon PIXMA iP4300 | Quick Start Guide - Page 29
by the camera's function. Note z Never disconnect the USB cable during printing unless when explicitly allowed to by the PictBridge compliant device. When disconnecting the USB cable between the PictBridge compliant device and printer, follow the instructions given in the device's instruction manual - Canon PIXMA iP4300 | Quick Start Guide - Page 30
ink tank is used, or if it is installed in the incorrect position. The printer uses the following ink tanks. Black: CLI-8BK Magenta: CLI-8M Black: PGI- Getting the Ink Level Information z Ink Level Indication on the Printer You can confirm the ink level in each ink tank by the ink lamps. Open the - Canon PIXMA iP4300 | Quick Start Guide - Page 31
IJ Status Monitor button which appears on the taskbar during printing. Open the Canon IJ Printer Utility to check the ink level information. (1) Open the Canon IJ Printer Utility. The Canon IJ Printer Utility is displayed. (2) Select Ink Level Information in the pop-up menu. The following dialog - Canon PIXMA iP4300 | Quick Start Guide - Page 32
ink is low, the "!" symbol appears above an ink tank with low ink in the Canon IJ Status Monitor. Obtain a replacement tank as soon as possible. If the ALARM lamp flashes is recommended after the printing. The printer may be damaged if printing is continued under the ink out condition. 28 - Canon PIXMA iP4300 | Quick Start Guide - Page 33
Replace the ink tank. Printing under the current condition may damage the printer. z Click Cancel Printing to cancel printing. Replace the ink tank Canon IJ Status Monitor will no longer display the remaining ink level. Please be advised that Canon shall not be liable for any malfunction or trouble - Canon PIXMA iP4300 | Quick Start Guide - Page 34
Replace the ink tank. Printing under the current condition may damage the printer. z Click Delete Job to cancel the current printing job. Click Stop Canon IJ Printer Utility will no longer display the remaining ink level. Please be advised that Canon shall not be liable for any malfunction or trouble - Canon PIXMA iP4300 | Quick Start Guide - Page 35
Ink z To maintain optimal printing quality, we recommend the use of specified Canon brand ink tanks. Refilling ink is not recommended. z Once you remove an ink tank, replace it immediately. Do not leave the printer with ink tanks removed. z Replace empty tanks with new ones. Inserting partially - Canon PIXMA iP4300 | Quick Start Guide - Page 36
the ink from being ejected properly. z Be careful not to stain your clothes and hands with on the ink tank. Doing so can cause the printer to malfunction or become ink on the removed protective cap. unable to print. *2 Carefully hold the protective cap when removing it to prevent the ink - Canon PIXMA iP4300 | Quick Start Guide - Page 37
the mark on the ink tank until the ink tank snaps firmly into place. (3) Make sure that the ink lamp lights up red. Important (1) The printer cannot be used unless all the ink tanks are installed. (2) (3) 6 Close the Inner Cover. Note Make sure that the Inner Cover is closed. Printing will - Canon PIXMA iP4300 | Quick Start Guide - Page 38
outlet. If you are using a power outlet strip, you can switch it off instead. When you press the POWER button to turn off the printer, the printer automatically puts a protective cap on the Print Head to prevent the ink from drying. If you remove the power cord or switch off the power - Canon PIXMA iP4300 | Quick Start Guide - Page 39
tank." on page 32. z Increase the Print Quality setting in the printer driver settings. See "Print Results Not Satisfactory" on page 64. Step 1 Print Head Deep Cleaning does not resolve the problem, the Print Head may be damaged. Contact your Canon service representative. z If the Ruled Lines Are - Canon PIXMA iP4300 | Quick Start Guide - Page 40
pattern is printed. Do not open the Top Cover while printing. 1 With the printer on, load a sheet of A4 or Letter-sized plain paper in the Auto select the paper source in which you loaded the paper. 4 Open the printer properties dialog box. 5 Print the Nozzle Check Pattern. (1) Click the Maintenance - Canon PIXMA iP4300 | Quick Start Guide - Page 41
and extend the Output Tray Extension. 3 Press the Paper Feed Switch to select the paper source in which you loaded the paper. 4 Open the Canon IJ Printer Utility dialog box. 5 Print the Nozzle Check Pattern. (1) Select Test Print in the pop-up menu. (2) Click Nozzle Check. (3) Read the message and - Canon PIXMA iP4300 | Quick Start Guide - Page 42
Examining the Nozzle Check Pattern Examine the nozzle check pattern output by the printer, and clean the Print Head if necessary. Note The nozzle check pattern will not be printed correctly if there is not enough ink. Replace the - Canon PIXMA iP4300 | Quick Start Guide - Page 43
the Inner Cover is closed. Cleaning the Print Head Without a Computer z The Print Head can also be cleaned from the printer itself, using the RESUME/CANCEL button. 1. Make sure that the printer is on. 2. Hold down the RESUME/CANCEL button until the POWER lamp flashes green once, and then release it - Canon PIXMA iP4300 | Quick Start Guide - Page 44
See "Examining the Nozzle Check Pattern" on page 38. Note If the problem is not resolved after performing steps 4 and 5 twice, try Print Head the Paper Output Tray and extend the Output Tray Extension. 3 Open the Canon IJ Printer Utility dialog box. 4 Start Print Head Cleaning. (1) Make sure that - Canon PIXMA iP4300 | Quick Start Guide - Page 45
condition with the printed nozzle check pattern, and take appropriate action. See "Examining the Nozzle Check Pattern" on page 38. Note If the problem is not resolved after performing steps 4 and 5 twice, try Print Head Deep Cleaning. See "Print Head Deep Cleaning" on page 42. Routine Maintenance - Canon PIXMA iP4300 | Quick Start Guide - Page 46
an Ink Tank" on page 26. (2) If the print head nozzles are still not clean, turn off the printer and perform another Print Head Deep Cleaning after 24 hours. (3) If this does not solve the problem, the Print Head may be damaged. Contact your Canon service representative. 42 Routine Maintenance - Canon PIXMA iP4300 | Quick Start Guide - Page 47
an Ink Tank" on page 26. (2) If the print head nozzles are still not clean, turn off the printer and perform another Print Head Deep Cleaning after 24 hours. (3) If this does not solve the problem, the Print Head may be damaged. Contact your Canon service representative. Routine Maintenance 43 - Canon PIXMA iP4300 | Quick Start Guide - Page 48
. Always load paper in the Auto Sheet Feeder. Aligning the Print Head without a Computer z The Print Head can also be aligned from the printer itself, using the RESUME/CANCEL button. If the printer driver is not installed in the computer, align the Print Head in this way. 1. Make sure that the - Canon PIXMA iP4300 | Quick Start Guide - Page 49
47 and align the Print Head manually. 1 With the printer on, load a sheet of A4 or Letter-sized plain paper in the Auto Sheet Feeder. 2 Press the Open Button to open the Paper Output Tray and extend the Output Tray Extension. 3 Open the Canon IJ Printer Utility dialog box. Routine Maintenance 45 - Canon PIXMA iP4300 | Quick Start Guide - Page 50
the pattern is not printed successfully, see "ALARM Lamp Flashes Orange" on page 76. z If results of Automatic Print Head Alignment are not satisfactory, see "Manual Print Head Alignment" on page 47 and align the Print Head - Canon PIXMA iP4300 | Quick Start Guide - Page 51
Paper Feed Switch to select the paper source in which you loaded the paper. 4 Open the printer properties dialog box. 5 Click the Maintenance tab and then Custom Settings. 6 Select the Align heads manually check box, and then click Send. 7 When the confirmation message is displayed, click OK. 8 In - Canon PIXMA iP4300 | Quick Start Guide - Page 52
11 Look at the printout. From the patterns, select the most even, least irregular patterns for each column and enter their numbers. Click OK. 12 When the confirmation message is displayed, click OK. Important Do not open the Top Cover while printing. 48 Routine Maintenance - Canon PIXMA iP4300 | Quick Start Guide - Page 53
13 In the same way, select the best patterns for each column, enter their numbers, then click OK. Columns G to J are striped vertically and columns K and L are striped horizontally. For Columns K and L, the best patterns will be smooth and have no streaks in the border indicated by the arrows. Note - Canon PIXMA iP4300 | Quick Start Guide - Page 54
When the confirmation message is displayed, click OK. Note When you turn off the printer, be sure to press the POWER button on the printer. Otherwise, the settings made here will not be saved. 1 Make sure that the printer is on and load three sheets of A4 or Letter-sized plain paper in - Canon PIXMA iP4300 | Quick Start Guide - Page 55
Paper Feed Switch to select the paper source in which you loaded the paper. 4 Open the Canon IJ Printer Utility dialog box. 5 Select Custom Settings in the pop-up menu. 6 Select the Align heads manually check box, and then click Send. 7 When the confirmation message is displayed, click OK. 8 Select - Canon PIXMA iP4300 | Quick Start Guide - Page 56
11 Look at the printout. From the patterns, select the most even, least irregular patterns for each column and enter their numbers. Click Send. 12 When the confirmation message is displayed, click OK. Important Do not open the Top Cover while printing. 52 Routine Maintenance - Canon PIXMA iP4300 | Quick Start Guide - Page 57
13 In the same way, select the best patterns for each column, enter their numbers, then click Send. Columns G to J are striped vertically and columns K and L are striped horizontally. For Columns K and L, the best patterns will be smooth and have no streaks in the border indicated by the arrows. - Canon PIXMA iP4300 | Quick Start Guide - Page 58
15 In the same way, select the most even patterns for each column, enter their numbers, then click Send. Note When you turn off the printer, be sure to press the POWER button on the printer. Otherwise, the settings made here will not be saved. 54 Routine Maintenance - Canon PIXMA iP4300 | Quick Start Guide - Page 59
release it when the POWER lamp flashes green three times. The paper cleans the Paper Feed Rollers as it feeds through the printer. 8 Repeat step 7 three times. If there are no signs of improvement after performing cleaning three times, contact a Canon service representative. Routine Maintenance 55 - Canon PIXMA iP4300 | Quick Start Guide - Page 60
paper is smudged, clean the inside of the printer again. If the problem is not resolved after performing cleaning twice, the protrusions inside the printer may be stained. Clean them according to instructions. See "Cleaning the Protrusions Inside the Printer" on page 59. 56 Routine Maintenance - Canon PIXMA iP4300 | Quick Start Guide - Page 61
and then Bottom Plate Cleaning. 7 Follow the instructions displayed in the message. The paper cleans the inside of the printer as it feeds through the printer. If the ejected paper is smudged, clean the inside of the printer again. If the problem is not resolved after performing cleaning twice, the - Canon PIXMA iP4300 | Quick Start Guide - Page 62
menu. 7 Click Bottom Plate Cleaning. 8 Follow the instructions displayed in the message. The paper cleans the inside of the printer as it feeds through the printer. If the ejected paper is smudged, clean the inside of the printer again. If the problem is not resolved after performing cleaning twice - Canon PIXMA iP4300 | Quick Start Guide - Page 63
z Cleaning the Protrusions Inside the Printer If protrusions inside the printer are stained, wipe off any ink from the protrusions using a cotton swab or the like. Important Before cleaning the inner parts, be sure to turn the printer off. Routine Maintenance 59 - Canon PIXMA iP4300 | Quick Start Guide - Page 64
This section describes troubleshooting tips for problems you may encounter when using the printer. Note If you cannot find appropriate tips for your problem, refer to the on-screen manuals. z "Cannot Install the Printer Driver" on page 61 z "Cannot Connect to Computer Properly" on - Canon PIXMA iP4300 | Quick Start Guide - Page 65
the Welcome screen, then remove the CD-ROM. (5)Turn the printer off. (6)Restart the computer. (7)Make sure you have no application software running, including anti-virus software. (8)Follow the procedure described in the Easy Setup Instructions to reinstall the printer driver. Troubleshooting 61 - Canon PIXMA iP4300 | Quick Start Guide - Page 66
a Canon service representative. Follow the procedure described in the Easy Setup Instructions for proper installation. If the drivers were not installed correctly, uninstall the printer driver, restart your computer, and then reinstall the drivers. Refer to the Printer Driver Guide onscreen manual - Canon PIXMA iP4300 | Quick Start Guide - Page 67
" Message Is Displayed (Windows XP Only) Cause Action The printer is connected to a computer Your system environment is not compatible with USB 2.0. that does not support USB 2.0 HiSpeed. See "Printing Speed Is Slow / USB 2.0 Hi-Speed Connection Does Not Work" on page 63. Troubleshooting 63 - Canon PIXMA iP4300 | Quick Start Guide - Page 68
. Action If the Page Size setting, set in the application software you are printing from or in the printer driver, does not match the actual size of the printing paper, part of the page may not be printed. on different flashing speeds, see "Replacing an Ink Tank" on page 26. 64 Troubleshooting - Canon PIXMA iP4300 | Quick Start Guide - Page 69
sheet of the printer driver (Windows) or printer and perform Print Head Deep Cleaning again after 24 hours or later. z If the problem is still not resolved after performing Print Head Deep Cleaning twice The Print Head may be damaged. Contact your Canon service User's Guide on-screen manual. If - Canon PIXMA iP4300 | Quick Start Guide - Page 70
such as photographs or images in deep color, we recommend using Photo Paper Pro or other Canon specialty paper. See "Media Types You Cannot Use" on page 5. Make sure that the Media Type set in the Main sheet of the printer driver (Windows) or the Quality & Media sheet of the Print dialog box - Canon PIXMA iP4300 | Quick Start Guide - Page 71
. If the problem is not resolved after performing cleaning twice, the protrusions inside the printer may be stained. In this case, wipe off any ink from the protrusions using a cotton swab or the like. Important Before cleaning the inner parts, be sure to turn the printer off. Troubleshooting 67 - Canon PIXMA iP4300 | Quick Start Guide - Page 72
Printing. For details, refer to the Printer Driver Guide on-screen manual. Paper is curled. If you and then click Send. In the Canon IJ Printer Utility, select Custom Settings in the digital camera. This setting can also be performed using the RESUME/CANCEL button on the printer. With the printer - Canon PIXMA iP4300 | Quick Start Guide - Page 73
Printer Does Not Start Cause Action Ink tank is empty. Open the Top Cover and check the ink lamps. If an ink lamp orange parts. (A) (B) (A) Correct L-shaped air hole (B) Incorrect Part of the orange tape is remaining. Peel off the tape completely along the perforation. Troubleshooting 69 - Canon PIXMA iP4300 | Quick Start Guide - Page 74
release it when the POWER lamp flashes green three times. The paper cleans the Paper Feed Rollers as it feeds through the printer. (8)Repeat step 7 three times. If there are no signs of improvement after cleaning the rollers three times, contact a Canon service representative. 70 Troubleshooting - Canon PIXMA iP4300 | Quick Start Guide - Page 75
in the printer driver, the printer driver settings takes precedence when printing. For details on paper source selection using the printer driver, refer to the Printer Driver Guide on-screen manual. You can height). For details on loading paper, see "Loading Paper" on page 12. Troubleshooting 71 - Canon PIXMA iP4300 | Quick Start Guide - Page 76
photos or graphics, since the printout may curl and cause paper exit jams. If you cannot remove the paper or the paper tears inside the printer, or if the paper jam error continues after removing the paper, contact your Canon service , contact your Canon service representative. 72 Troubleshooting - Canon PIXMA iP4300 | Quick Start Guide - Page 77
Landscape 4" x 6" / 101.6 x 152.4 mm paper loaded in the Cassette jammed inside the printer. Action Always load 4" x 6" / 101.6 x 152.4 mm media in portrait orientation regardless of paper jam error continues after removing the paper, contact your Canon service representative. Troubleshooting 73 - Canon PIXMA iP4300 | Quick Start Guide - Page 78
70 to confirm that you are using the correct paper and are loading it into the printer correctly. If you cannot remove the paper or if the paper tears inside the printer, or if the paper jam error continues after removing the paper, contact your Canon service representative. 74 Troubleshooting - Canon PIXMA iP4300 | Quick Start Guide - Page 79
and close the Paper Support. (2)Set the printer upright with the rear side printer correctly. If you cannot remove a sheet of paper or a teared piece of paper inside the printer, or if the paper jam error continues after removing the paper, contact your Canon service representative. Troubleshooting - Canon PIXMA iP4300 | Quick Start Guide - Page 80
. The printer resumes printing. If opening the Paper Output Tray does not resolve the problem, or Follow the directions given in the Easy Setup Instructions to install the Print Head. If the your Canon service representative. Close Inner Cover, then press the RESUME/CANCEL button on the printer. Do - Canon PIXMA iP4300 | Quick Start Guide - Page 81
your device's instruction manual before reconnecting it to the printer. If the error is still not resolved, there is a possibility that you are using a digital camera or digital video camcorder that is not supported by this printer. Use a digital camera or digital video camcorder compatible - Canon PIXMA iP4300 | Quick Start Guide - Page 82
alternately, disconnect the printer cable from the printer, turn the printer off, and then unplug the printer from the power supply. Plug the printer back in and turn the printer back on after leaving it for a while. If the problem is not resolved, contact your Canon service representative. Error - Canon PIXMA iP4300 | Quick Start Guide - Page 83
may not be installed properly. Uninstall them following the procedure described in the Printer Driver Guide on-screen manual and reinstall them following the procedure described in the Easy Setup Instructions. „ Error Regarding Automatic Duplex Printing Is Displayed Cause The correct media size is - Canon PIXMA iP4300 | Quick Start Guide - Page 84
Mac OS X v.10.2.8, check that iP4300 is displayed in the Printer List. (3)If iP4300 is not displayed, click Add(+) to add the printer. If you cannot add the printer, follow the procedure described in the Easy Setup Instructions to reinstall the printer driver. „ Error No.: 1700 Is Displayed Cause - Canon PIXMA iP4300 | Quick Start Guide - Page 85
according your device's instruction manual before reconnecting it to the printer. If the error is still unresolved, there is a possibility that you are using a digital camera or digital video camcorder that is not supported by this printer. Use a digital camera or digital video camcorder compatible - Canon PIXMA iP4300 | Quick Start Guide - Page 86
For the errors indicated on the camera and their solution, also refer to your camera's instruction manual. For details on other troubles with a digital camera, contact the manufacturer of the camera. Error Message On Camera Action "Printer in use" The printer is busy, perhaps processing a print - Canon PIXMA iP4300 | Quick Start Guide - Page 87
on your camera. However, because printing is disabled once the ink absorber becomes completely full and until the ink absorber is replaced, you are recommended to contact a Canon service representative as early as possible. (You will need to replace a particular part of the printer.) "No ink - Canon PIXMA iP4300 | Quick Start Guide - Page 88
, and unplug the power cord of the printer from the power supply. After a while, plug the power cord of the printer back in, turn on the printer, and then reconnect the camera to the printer. If the same error occurs, contact your Canon service representative. *1 To resume printing, you can also - Canon PIXMA iP4300 | Quick Start Guide - Page 89
Quick Start Guide, on-screen manuals are also supplied with your printer. For detailed instructions on installing the on-screen manuals, refer to your setup sheet. You can view the on-screen manuals in the following way: To view the on-screen manual, double-click the iP4300 On-screen Manual shortcut - Canon PIXMA iP4300 | Quick Start Guide - Page 90
Canon standard pattern. Print speed may vary depending on system configuration, software, document complexity, print mode and page coverage. Print width Acoustic noise level Operating environment Storage environment Power supply Power consumption External dimensions (with the Paper Support on Photo - Canon PIXMA iP4300 | Quick Start Guide - Page 91
. See "Recommended Paper and Requirements" on page 4. *2 If using a Canon PictBridge-compatible camera, you can select it. Default (the setting to follow that of the printer), Photo (Photo Paper Plus Glossy, Glossy Photo Paper), Fast Photo (Photo Paper Pro), Plain Paper (Only A4/Letter) Default (the - Canon PIXMA iP4300 | Quick Start Guide - Page 92
Explorer 5.0 or later must be installed. The on-screen manual may not be displayed properly depending on your operating system or date with Windows Update. Browser: Help Viewer Note: The on-screen manual may not be displayed properly depending on your operating system. We recommend that - Canon PIXMA iP4300 | Quick Start Guide - Page 93
it, you could injure yourself or damage the printer. Do not attempt to disassemble or modify the printer. There are no user serviceable parts inside the printer. The printer contains high-voltage components. Never attempt any maintenance procedure not described in this guide. Safety Precautions 89 - Canon PIXMA iP4300 | Quick Start Guide - Page 94
or containers of flammable solvents (alcohol, thinners, etc.) on top of the printer. If any foreign object (metal or liquid) fall into the printer, unplug the power cord and call for service. Do not transport or store the printer on a slant, vertically or upside-down, as the ink may leak and damage - Canon PIXMA iP4300 | Quick Start Guide - Page 95
Print Heads and ink tanks For safety reasons, store Print Heads and ink tanks out of the reach of small children. If a child ingests any ink, consult a doctor immediately. Do not shake Print Heads or ink tanks. Ink may leak out and stain clothing or the surrounding area. Never touch the electrical - Canon PIXMA iP4300 | Quick Start Guide - Page 96
comply with the limits for a Class B digital device, pursuant to Part 15 of the FCC installed and used in accordance with the instructions, may cause harmful interference to radio defective Product returned to a Canon USA repair facility or a Canon USA Authorized Service Facility ("ASF"), and proven - Canon PIXMA iP4300 | Quick Start Guide - Page 97
, improper use, failure to follow operating or maintenance instructions in, or environmental conditions prescribed in, Canon USA's user's manual or other documentation, or services performed by someone other than a Canon USA repair facility or ASF. Without limiting the foregoing, dropping - Canon PIXMA iP4300 | Quick Start Guide - Page 98
FOR WHOM IT WAS PURCHASED AS A GIFT, AND STATES YOUR EXCLUSIVE REMEDY. Canon USA offers a range of customer technical support* options: z Interactive troubleshooting, e-mail technical support, the latest driver downloads and answers to frequently asked questions (www.canontechsupport.com) z Toll - Canon PIXMA iP4300 | Quick Start Guide - Page 99
** InstantExchange warranty service is subject to the availability of refurbished or new replacement units. Canon U.S.A., Inc. One Canon Plaza Lake Success, NY 11042 USA ©2006 Canon U.S.A., Inc. Canon is a registered trademark of Canon Inc. in the United States and may also be a registered trademark - Canon PIXMA iP4300 | Quick Start Guide - Page 100
Print Head automatic print head alignment 44 cleaning 39 deep cleaning 42 manual print head alignment 47 Printing Photographs Directly from a Compliant Device 21 Requirements 87 T Troubleshooting 60 Turning off the Printer 3 Turning on the Printer 2 U Users in the U.S.A. Canon U.S.A., Inc. Limited - Canon PIXMA iP4300 | Quick Start Guide - Page 101
(8.5" x 11"/ 50 sheets) Photo Paper Glossy (8.5" x 11"/ 100 sheets) Glossy Photo Paper Credit Card Size Photo Stickers High Resolution Paper (8.5" x 11"/ 100 sheets) Call 1-800-OK-CANON to locate a dealer near you, or visit the Canon eStore at www.estore.usa.canon.com. Order # 0628B002 0620B002 - Canon PIXMA iP4300 | Quick Start Guide - Page 102
The following ink tanks are compatible with this product. QT5-0428-V01 XXXXXXXX ©CANON INC.2006 PRINTED IN THAILAND
-
 1
1 -
 2
2 -
 3
3 -
 4
4 -
 5
5 -
 6
6 -
 7
7 -
8
-
9
-
10
-
11
-
12
-
13
-
14
-
15
-
16
-
17
-
18
-
19
-
20
-
21
-
22
-
23
-
24
-
25
-
26
-
27
-
28
-
29
-
30
-
31
-
32
-
33
-
34
-
35
-
36
-
37
-
38
-
39
-
40
-
41
-
42
-
43
-
44
-
45
-
46
-
47
-
48
-
49
-
50
-
51
-
52
-
53
-
54
-
55
-
56
-
57
-
58
-
59
-
60
-
61
-
62
-
63
-
64
-
65
-
66
-
67
-
68
-
69
-
70
-
71
-
72
-
73
-
74
-
75
-
76
-
77
-
78
-
79
-
80
-
81
-
82
-
83
-
84
-
85
-
86
-
87
-
88
-
89
-
90
-
91
-
92
-
93
-
94
-
95
-
96
-
97
-
98
-
99
-
100
-
101
-
102
 |
 |
Photo Printer
Quick Start Guide
Series