Canon PIXMA iP5200 Service Manual - Page 33
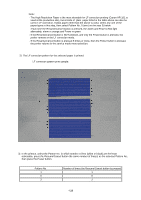
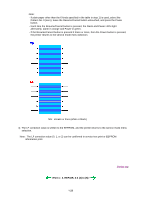
Pattern No., LF correction pattern print sample
 |
View all Canon PIXMA iP5200 manuals
Add to My Manuals
Save this manual to your list of manuals |
Page 33 highlights
Note: - The High Resolution Paper is the most desirable for LF correction printing (Canon HR-101 is used at the production site), but 6 kinds of plain paper listed in the table above can also be used in LF correction. If plain paper other than the above is used, select any one of the paper types in this step, then select Pattern No. 0 (zero) in the step 3) below. - Each time the Resume/Cancel button is pressed, the Alarm and Power LEDs light alternately, alarm in orange and Power in green. - If the Resume/Cancel button is NOT pressed, and only the Power button is pressed, the printer remains in the LF correction mode. - If the Resume/Cancel button is pressed 5 times or more, then the Power button is pressed, the printer returns to the service mode menu selection. 2) The LF correction pattern for the selected paper is printed. LF correction pattern print sample: 3) In the printout, select the Pattern No. in which streaks or lines (white or black) are the least noticeable, press the Resume/Cancel button the same number of time(s) as the selected Pattern No., then press the Power button. Pattern No. 1 0 2 Number of times the Resume/Cancel button is pressed 1 0 2 1-28
-
 1
1 -
2
-
3
-
4
-
5
-
6
-
7
-
8
-
9
-
10
-
11
-
12
-
13
-
14
-
15
-
16
-
17
-
18
-
19
-
20
-
21
-
22
-
23
-
24
-
25
-
26
-
27
-
 28
28 -
 29
29 -
 30
30 -
 31
31 -
 32
32 -
 33
33 -
 34
34 -
 35
35 -
 36
36 -
 37
37 -
 38
38 -
39
-
40
-
41
-
42
-
43
-
44
-
45
-
46
-
47
-
48
-
49
-
50
-
51
-
52
-
53
-
54
-
55
-
56
-
57
-
58
-
59
-
60
-
61
-
62
-
63
-
64
 |
 |