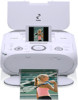
Canon PIXMA mini260 Photo Printing Guide
Canon PIXMA mini260 Manual
 |
View all Canon PIXMA mini260 manuals
Add to My Manuals
Save this manual to your list of manuals |
Canon PIXMA mini260 manual content summary:
- Canon PIXMA mini260 | Photo Printing Guide - Page 1
Guide Table of Contents Introduction 2 Before Printing 3 Printing from the Memory Card 18 Printing Photographs Directly from a Digital Camera 31 Printing Photographs from a Wireless Communication Device 36 Printing Maintenance 42 Changing the Printer Settings 52 Troubleshooting - Canon PIXMA mini260 | Photo Printing Guide - Page 2
self-help in an intuitively guided interactive troubleshooting environment, the place to start is our helpful tech support web site. In addition, the latest driver downloads, answers to frequently asked questions, product information, and "where to buy" instructions are found here. 2. Email Tech - Canon PIXMA mini260 | Photo Printing Guide - Page 3
: AC 100-240V, 50/60Hz About Consumables Consumables (ink tanks / FINE Cartridges) are available for 5 years after production has stopped. Safety Precautions Warning Never attempt to plug the power cord into the power outlet or unplug the power cord when your hands are wet. Never damage, modify - Canon PIXMA mini260 | Photo Printing Guide - Page 4
Introduction Thank you for purchasing the Canon PIXMA mini260. This Photo Printing Guide uses the following symbols to indicate important information. Always observe the instructions indicated by these symbols. Warning Instructions that, if ignored, could result in death or serious personal injury - Canon PIXMA mini260 | Photo Printing Guide - Page 5
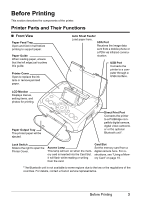
and Their Functions Front View Paper Feed Tray Open and fold in half before printing to support paper. Paper Guide When loading paper, ensure that the left edge just touches this guide. Printer Cover Open to replace the ink tank or remove jammed paper. Auto Sheet Feeder Load paper here. IrDA Port - Canon PIXMA mini260 | Photo Printing Guide - Page 6
attach the optional Portable Kit, refer to the manual provided with the Portable Kit. AC Adapter Connector Connector used to connect the supplied AC Adapter plug. Carrying Handle Pulls out this handle to carry the printer. Interior Print Head Holder Install the Print Head here. Ink Lamp Lights or - Canon PIXMA mini260 | Photo Printing Guide - Page 7
For information on how to install the Print Head and ink tank, refer to the Easy Setup Instructions (Setup Sheet). Ink Lamp You can check the status of ink tank according to the way its lamp flashes. On: The printer is ready to print. Slow flashing (at around 3-second intervals): Ink is low. If the - Canon PIXMA mini260 | Photo Printing Guide - Page 8
Reset button Allows you to reset the print settings you made. Also, to cancel printing in progress, press this button. Print button Press to start printing a photo to be printed, selecting a menu item or other settings. Also, press to resume printing once an error has been resolved. The printer will - Canon PIXMA mini260 | Photo Printing Guide - Page 9
the procedure to display each menu from the HOME screen. 1 Display the HOME screen. (1) Press the HOME button. The HOME screen will be displayed. Before Printing 7 - Canon PIXMA mini260 | Photo Printing Guide - Page 10
are Incorrect" on page 42 or "Changing the Printer Settings" on page 52. Sticker print: Print your favorite photo with a frame on the Canon genuine Photo Stickers. See "Printing Stickers from a Photo-Sticker print" on page 21. Slide show: You can display photos stored in a memory card on the LCD - Canon PIXMA mini260 | Photo Printing Guide - Page 11
screen, Remaining ink volume screen will be displayed. When you press the Function button (f2/Introduction), the introductions for the selected menu will be displayed. When you press them on the other than the HOME screen, the operation procedure or the menus will be displayed. Before Printing 9 - Canon PIXMA mini260 | Photo Printing Guide - Page 12
printer. Turning On the Printer Ensure that the Print Head and ink tank are installed, before turning on the printer. Note If the Print Head and ink tank are not installed, refer to the Easy Setup Instructions (Setup Sheet) to install them. 1 Plug the AC Adapter and connect the other end to a power - Canon PIXMA mini260 | Photo Printing Guide - Page 13
Printing such paper will not only produce unsatisfactory results, but can also cause the printer to jam or malfunction. Also, do not use a cut paper or memo than 105 gsm or 28 lb)* Picture postcards Postcards with an affixed photo or sticker Any type of paper with holes Paper that is not rectangle - Canon PIXMA mini260 | Photo Printing Guide - Page 14
Feed Tray and fold it in half. (2) Press the ON/OFF button. See "Turning On the Printer" on page 10. 2 Flatten the four corners of the paper before loading it. Note If to the right. Note Set the Paper Thickness Lever to the left, only if ink smudges or the printed surface is stained. 12 Before - Canon PIXMA mini260 | Photo Printing Guide - Page 15
. (2) Align the paper with the right edge of the Auto Sheet Feeder and insert the paper until it is fully inserted. Photo stickers Card Shorter margin Note Do not touch the printed surface until the ink dries. For specific drying times, refer to the instructions packaged with your media. Before - Canon PIXMA mini260 | Photo Printing Guide - Page 16
on sticker paper, select Sticker print. When printing photos in a mobile phone or a PDA on sticker paper, see "Printing Photographs from a Wireless Communication Device" on page 36. Note You may not be able to purchase some Canon genuine papers depending on your country. 14 Before Printing - Canon PIXMA mini260 | Photo Printing Guide - Page 17
digital camera guarantees operation, refer to the manuals supplied with your digital camera. Format the memory card with a digital camera. The memory card may not be usable with the printer if formatted on a computer. Images edited on a computer may not be printed correctly. Do not insert more than - Canon PIXMA mini260 | Photo Printing Guide - Page 18
Inserting a Memory Card This printer is equipped with two Card Slots to meet various types Card, Multimedia Card (ver3.31), and miniSD Card* Insert the card into the upper slot with the arrow-printed side facing up. Turn on For CompactFlash (CF) card, Microdrive and xD-Picture Card* Insert the card - Canon PIXMA mini260 | Photo Printing Guide - Page 19
a Memory Card Note If you use the printer connected to your computer, follow the instructions for removal of the memory card from the computer. For the procedure, refer to "Using Data in the Memory Card on the Computer" of the User's Guide on-screen manual. 1 Ensure that the Access lamp is not - Canon PIXMA mini260 | Photo Printing Guide - Page 20
LCD goes into sleep mode. Selecting Photographs to Print-Select and print You can display the photos stored in the memory card on the LCD and print them. 1 Prepare to print. To prepare the printer for printing: (1) Turn on the printer. See "Turning On the Printer" on page 10. (2) Load the paper. See - Canon PIXMA mini260 | Photo Printing Guide - Page 21
will be printed. If you want to print the file no., select Date OFF. It is not possible to print both the shooting date and the file no.. To confirm the selected photos before printing, press the Function button (f2/Check photo). To cancel printing, press the Stop/Reset button. Printing from the - Canon PIXMA mini260 | Photo Printing Guide - Page 22
select Next, and then press the OK button. 5 Select the paste method. Paste automatically Select the Search or All photos on the following Layout print screen, and proceed to step 7. All the photos in the memory card are pasted automatically in the selected layout. Paste one by one Specify to paste - Canon PIXMA mini260 | Photo Printing Guide - Page 23
the file no.. Press the Stop/Reset button to cancel printing. Printing Stickers from a Photo-Sticker print You can print your favorite photo with a frame on the Canon genuine Photo Stickers. Stickers ×16 1 Prepare to print. See "Selecting Photographs to Print-Select and print" on page 18. 2 Select - Canon PIXMA mini260 | Photo Printing Guide - Page 24
Wheel or the W or X button to select the layout, and then press the OK button. 4 Select the photo to print. (1) Use the Easy-Scroll Wheel or the W or X button to select the photo you want to print. (2) Press the OK button. The screen to select a frame will be displayed. Note You can do... See - Canon PIXMA mini260 | Photo Printing Guide - Page 25
Wide 4x7.1 (101x180) (2) Specify the media type. Glossy Photo Paper/Matte Photo Paper/Photo Plus Glossy/Photo Paper Pro (3) Specify the print quality. Standard/High(quality-priority) Print Settings 1 If the print setting screen or the print confirmation screen is displayed, select the setting item - Canon PIXMA mini260 | Photo Printing Guide - Page 26
/101 x 180 mm: 28 photos Printing Photographs from Your Camera-DPOF print If DPOF (Digital Print Order Format) settings are made on the camera, photos are printed automatically according to those settings. Procedure: Home button > Special photo print > DPOF print Note This printer allows you to make - Canon PIXMA mini260 | Photo Printing Guide - Page 27
of the hue that you like. Printing all Photographs-Print all photos You can print all photos saved on a memory card. Procedure: Home button > Special photo print > Print all photos Print Photograph Information-Captured info print You can print the Photograph information (Exif information) when - Canon PIXMA mini260 | Photo Printing Guide - Page 28
, press the Stop/Reset button. Display photos sequentially-Slide show You can display to confirm photos stored on the memory card on the LCD sequentially. Procedure: HOME button > Slide show Note You can do... You can specify the image quality of the slide show. 26 Printing from the Memory Card - Canon PIXMA mini260 | Photo Printing Guide - Page 29
Edit/menu. (2) Select Select date range, and then press the OK button. To set from Search on the Specify print range screen (Layout print, Photo index print, and Print all photos) (1) Select Search and then press the OK button. The Search screen is displayed. 2 Set the search method. (1) Select - Canon PIXMA mini260 | Photo Printing Guide - Page 30
. If you select Select date range (1) Select the date of the oldest photos to print and then press the OK button. (2) Select the date of the most recent photos to print and then press the OK button. You can display the photos that are shot within the specified range of date. Note The date that - Canon PIXMA mini260 | Photo Printing Guide - Page 31
) on the screen displaying Advanced. Border Bordered Prints with a border. Borderless Prints on the whole paper without a border. Date Date ON Prints the date the photo was taken. Date OFF Does not print the date the photo was taken. File no. File no. ON Prints the image No. (DCF No.) on the - Canon PIXMA mini260 | Photo Printing Guide - Page 32
reduced. Face brightener ON/Face brightener OFF If you select Face brightener ON, the Face brightener function activates and prints darkened faces brighter when printing photos taken against a bright light. Image optimizer ON/Image optimizer OFF If you select Image optimizer ON, the Image optimizer - Canon PIXMA mini260 | Photo Printing Guide - Page 33
. Note When producing photos with the digital device connected to the printer, it is advisable to use the AC adapter supplied with the device. If you use the device battery, be sure to charge it fully. 1 Set up the printer for printing. Refer to the Easy Setup Instructions (Setup Sheet). 2 Turn - Canon PIXMA mini260 | Photo Printing Guide - Page 34
printing photos compliant with PictBridge before connecting the device. You may also have to turn on the device or select Play mode manually after connecting the device to the printer. Perform necessary operations according to the instruction manual to those used in Canon-brand PictBridge compliant - Canon PIXMA mini260 | Photo Printing Guide - Page 35
Fast Photo Photo Fast Photo Paper loaded in printer Photo Paper Plus Glossy Photo Paper Plus Semi-gloss Glossy Photo Paper Photo Stickers* Photo Paper Pro Glossy Photo Paper Credit Card Photo Paper Pro * Sticker media manufactured by Canon. Set Paper size to 10×15 cm/4"×6" when printing stickers - Canon PIXMA mini260 | Photo Printing Guide - Page 36
the USB cable, follow the instructions given in the device's Instruction manual. Controls of the digital camera cannot be used for the following: - Print quality setting - Printer maintenance Confirming and Changing PictBridge Print Settings from the Printer This section describes how to change - Canon PIXMA mini260 | Photo Printing Guide - Page 37
more brightly) is used. (7) If you select Face brightener ON, the Face brightener function activates and prints darkened faces brighter when printing photos taken against a bright light. (8) If you select Noise reduction ON, digital camera noise (which may be seen in dark areas or areas such as - Canon PIXMA mini260 | Photo Printing Guide - Page 38
an infrared port for wireless data transmission, you can print photos through a cordless connection with the printer. If the optional Bluetooth unit BU-20 is connected to the printer, you can also print photos through Bluetooth communication. Important In order to use infrared communication, your - Canon PIXMA mini260 | Photo Printing Guide - Page 39
optimizer ON/Image optimizer OFF (4) Select the layout of the photos as below. Sticker print: Stickers x 16 Printing on paper other than sticker: Bordered, x 2, x 4, x 8 Borderless, x 2, x 4, x 8 Note When printing on Canon Genuine Photo Stickers, make the settings as below. Page size Stickers - Canon PIXMA mini260 | Photo Printing Guide - Page 40
Infrared Communication You can print photos in your mobile phone or PDA. When printing through infrared communication, also refer to the manual of your mobile phone or PDA. 1 Turn on the printer. 2 Load the paper. See "Loading Printing Paper" on page 11. 3 Set the printing paper and layout. See - Canon PIXMA mini260 | Photo Printing Guide - Page 41
your mobile phone supports, refer to your product's instruction manual. Printing through Bluetooth communication When you print through Bluetooth communication from a mobile phone or a PDA, refer to the manual of your mobile phone or PDA. 1 Prepare to print. (1) Turn on the printer. (2) Load the - Canon PIXMA mini260 | Photo Printing Guide - Page 42
Bluetooth unit BU-20 to the printer. 3 Set the printing paper and layout. See "Setting the Page Size, Media Type, and Layout When Printing from a Mobile Phone or a PDA" on page 36. 4 Start printing from a mobile phone or a PDA. When you select the device name, select the initial value "Canon mini260 - Canon PIXMA mini260 | Photo Printing Guide - Page 43
device name of this printer displayed on the screen of the Bluetooth devices. When you set mini260-2, the printer name on the Bluetooth device is "Canon mini260-2". The initial value is set to mini260-1. Selecting ON will disable searching and printing from Bluetooth devices. Selecting Enable will - Canon PIXMA mini260 | Photo Printing Guide - Page 44
performing Print Head Cleaning twice Step 3 "Print Head Deep Cleaning" on page 45 If Print Head Deep Cleaning does not resolve the problem, the Print Head may be damaged. Contact your Canon Service representative. Note Before performing maintenance Open the Printer Cover and make sure that the ink - Canon PIXMA mini260 | Photo Printing Guide - Page 45
ink ejects properly from the Print Head Nozzles. Use this function when printed results are blurred or the color is incorrect. 1 Prepare to print. (1) Turn on the printer. See "Turning On the Printer" on page 10. (2) Load the supplied paper or Canon 4"×6"/101.6×152.4mm paper into the Paper Support - Canon PIXMA mini260 | Photo Printing Guide - Page 46
or white stripes appear in the nozzle check pattern. Cleaning the Print Head consumes ink, so perform Cleaning only when necessary. 1 Turn on the printer. See "Turning On the Printer" on page 10. 2 Start Print Head Cleaning. (1) Display the Settings screen. (2) Select Maintenance and then press the - Canon PIXMA mini260 | Photo Printing Guide - Page 47
. Select Yes to print the Nozzle Check Pattern, and verify the Print Head Nozzles. See "Printing the Nozzle Check Pattern" on page 43. Note If Print Head Deep Cleaning does not resolve the problem, the Print Head may be worn out. Contact a Canon service representative. Printing Maintenance 45 - Canon PIXMA mini260 | Photo Printing Guide - Page 48
the Print Head position. It may solve the problem. 1 Prepare to print. (1) Turn on the printer. See "Turning On the Printer" on page 10. (2) Load two sheets of supplied paper or Canon genuine 4"×6"/101.6×152.4mm paper in the Auto Sheet Feeder. Note The following papers are recommended. z Matte Photo - Canon PIXMA mini260 | Photo Printing Guide - Page 49
(at around 1-second intervals). Replace the ink tank with a new one. If an ink tank related error message is displayed on the LCD, an ink tank error has occurred and the printer is unable to print. For details, see "Error Message Is Displayed on the LCD" in "Troubleshooting" on page 55. You can also - Canon PIXMA mini260 | Photo Printing Guide - Page 50
/Reset button for at least 5 seconds, and then release it. * With this operation, releasing the function for detecting the remaining ink level is memorized. Please be advised that Canon shall not be liable for any malfunction or trouble which may be caused by continuation of printing under the ink - Canon PIXMA mini260 | Photo Printing Guide - Page 51
. (1) Slide the Lock Switch toward the right to open the Printer Cover. The Print Head Holder moves to the center. Important If the Printer Cover is left open for more than 10 minutes, the Print Head Holder moves to the right. Close and reopen the Printer Cover to return the holder to the center - Canon PIXMA mini260 | Photo Printing Guide - Page 52
protective cap. Dispose of the protective cap. Important Do not touch the electrical contacts (A) on the ink tank. Doing so can cause the printer to malfunction or (A) become unable to print. Do not reattach the protective cap once you have removed it. Once the protective cap is removed - Canon PIXMA mini260 | Photo Printing Guide - Page 53
tank slightly slanted toward the Print Head. (1) (2) (2) Push down on the clicks into place. on the ink tank until it Ensure that the ink lamp is lit red. 6 Close the Printer Cover. (2) (1) Lift the Printer Cover and pull the Lock Bar close. (2) Close the Printer Cover firmly until it clicks - Canon PIXMA mini260 | Photo Printing Guide - Page 54
the procedure to change the settings in the Device settings screen, taking the steps to specify Date display as an example. 1 Turn on the printer. 2 Display the Device settings screen. See "Basic Operation for the Operation Panel" on page 7. (1) Select Device settings, then press the OK button. The - Canon PIXMA mini260 | Photo Printing Guide - Page 55
from a Mobile Phone or a PDA" on page 36. Bluetooth settings For details, see "Changing the Bluetooth Settings-Bluetooth settings" on page 41. PictBridge settings For details, see "Confirming and Changing PictBridge Print Settings from the Printer" on page 34. Other settings Date display Changes the - Canon PIXMA mini260 | Photo Printing Guide - Page 56
messages and menus. Reset setting You can change the settings back to the default, except for the LCD language and the position of the Print Head. Save settings Saves the settings for the settings screen. Load settings Loads the settings for the settings screen. 54 Changing the Printer Settings - Canon PIXMA mini260 | Photo Printing Guide - Page 57
during use of the printer. Note Here, we will discuss errors indicated on the LCD, problems that might occur during direct printing from the digital camera. If you cannot find the symptom corresponding to a certain problem, refer to the User's Guide on-screen manual. "Error Message Is Displayed on - Canon PIXMA mini260 | Photo Printing Guide - Page 58
Instructions (Setup Sheet) to install the Print Head. If the Print Head is already installed, remove the Print Head and then reinstall it. If the error is not resolved, the Print Head may be damaged. Contact your Canon Service representative. The printer has a built-in ink absorber to hold the ink - Canon PIXMA mini260 | Photo Printing Guide - Page 59
optional battery, remove it once. After a while, plug the power cord of the printer back in, and then turn on the printer. If the same error occurs, contact a Canon service representative. The Card Slot is set to Read/write mode. You cannot print in this mode. After writing on the memory card, set - Canon PIXMA mini260 | Photo Printing Guide - Page 60
light. After carrying out the above measures, if the problem continues after aligning the Print Head again, press the OK button to dismiss the error message, and then perform Manual Print Head Alignment. * Use the following papers. Matte Photo Paper Photo Paper Plus Glossy 58 Troubleshooting - Canon PIXMA mini260 | Photo Printing Guide - Page 61
the print heads manually, follow the procedure below. 1. Press the ON/OFF button to turn on the printer, and then load two sheets of supplied paper or Canon genuine 4" x 6"/101.6 x 152.4 mm paper* in the Auto Sheet Feeder. * Use the following papers. Matte Photo Paper Photo Paper Pro Photo Paper - Canon PIXMA mini260 | Photo Printing Guide - Page 62
POWER lamp on the Operation Panel is off The printer is not powered on. Connect the power cord and press the ON/OFF button. The printer will power on and the LCD will display a message. If the POWER press the OK button. If the Bluetooth unit is connected to the printer, press the T button five times, - Canon PIXMA mini260 | Photo Printing Guide - Page 63
have no application software running, including anti-virus software. (8) Follow the procedure described in the Easy Setup Instructions (Setup Sheet) to reinstall the printer driver. Click Start > My Computer > double-click the CD-ROM icon. In Windows 2000, open the My Computer window and then double - Canon PIXMA mini260 | Photo Printing Guide - Page 64
the Printer Driver Guide on-screen manual. Note If the installer was forced to be terminated due to an Windows error, the system may be in an unstable condition and you may not be able to install the drivers. Restart your computer before reinstalling. Cannot Connect to Computer Properly Printing - Canon PIXMA mini260 | Photo Printing Guide - Page 65
paper. Print Head nozzles are clogged. Open the Printer Cover and check if the ink lamp is lit red. See "Getting the Ink Level Information" on page 47. Print the nozzle check pattern to check for uneven ink output. Ink output is uneven. See "Print Head Cleaning" on page 44. See "Print Head Deep - Canon PIXMA mini260 | Photo Printing Guide - Page 66
Print Head and then print the nozzle check pattern to check that ink is ejecting properly. If the problem is not resolved after performing Print Head Cleaning twice, perform Print Head Deep Cleaning. If the problem is still not resolved, the Print Head may be damaged. Contact your Canon Service - Canon PIXMA mini260 | Photo Printing Guide - Page 67
. For details on cleaning, see "Cleaning the Roller (Roller Cleaning)" of the User's Guide on-screen manual. Inside of the printer is dirty. Performing many printings may leave some ink inside the printer, causing printouts to be smudged. In this case, perform bottom plate cleaning to clean the - Canon PIXMA mini260 | Photo Printing Guide - Page 68
is effective in reducing uneven colors. Printer Does Not Start or Stops During Print Jobs Printing Does Not Start Cause Ink tank is empty. Ink tank is not installed securely. Action An ink tank is not installed properly, or is out of ink. Confirm the error message displayed on the LCD and take - Canon PIXMA mini260 | Photo Printing Guide - Page 69
procedure only when necessary. For details on cleaning, see "Cleaning the Roller (Roller Cleaning)" of the User's Guide on-screen manual. Make sure of the following when you load paper in the printer. When loading two or more sheets of paper, align the edges of the sheets before loading. Always load - Canon PIXMA mini260 | Photo Printing Guide - Page 70
the printer, or if the paper jam error continues after removing the paper, contact your Canon Service representative. printing. The paper is fed and then pushes out the jammed paper as it ejects. If you cannot remove the jammed paper, contact your Canon Service representative. 68 Troubleshooting - Canon PIXMA mini260 | Photo Printing Guide - Page 71
then unplug the printer from the power supply. Plug the printer back in and turn the printer back on after leaving it for a while. If the problem is not resolved, contact your Canon Service representative. Cannot Print Properly from the Digital Camera The following are the possible errors that may - Canon PIXMA mini260 | Photo Printing Guide - Page 72
Instructions (Setup Sheet). If the Print Head has already been installed, remove the Print Head and reinstall it. If the error still remains, the Print Head may be defective. Contact the Canon service representative. The printer has a built-in ink absorber to hold the ink used during Print Head - Canon PIXMA mini260 | Photo Printing Guide - Page 73
off the printer, and unplug the power cord of the printer from the power supply. After a while, plug the power cord of the printer back in, turn on the printer, and then reconnect the camera to the printer. If the same error occurs, contact a Canon service representative. *1 To resume printing, you - Canon PIXMA mini260 | Photo Printing Guide - Page 74
to the printer (For Bluetooth communication). Confirm that the Bluetooth unit is inserted properly. If Bluetooth settings is displayed on the menu screen, the Bluetooth unit is inserted properly. Note This printer cannot print data from a PC via Bluetooth communication. 72 Troubleshooting - Canon PIXMA mini260 | Photo Printing Guide - Page 75
this Photo Printing Guide, on-screen manuals are also supplied with your printer. Install the following on-screen manuals when you need to know how to print from your computer, printer driver setup, or how to use the supplied print application. Select Easy Install to install the printer driver and - Canon PIXMA mini260 | Photo Printing Guide - Page 76
Bluetooth Unit Users Safety Precautions Please read the safety warnings and cautions provided in this manual to ensure that you use your product safely. Do not attempt to use the product in any way not described in this manual. Warning You may cause an electric shock/fire or damage the printer - Canon PIXMA mini260 | Photo Printing Guide - Page 77
When using with PIXMA mini260, the specification of Bluetooth unit BU-20 is as follows. Communication method Output Communication distance Profile Frequency band Transmission speed Power supply Power consumption Operating temperature Operating humidity Dimensions Weight Bluetooth standard Ver - Canon PIXMA mini260 | Photo Printing Guide - Page 78
Specifications Printer Printing resolution: Print speed: Print width: Acoustic noise level: Operating environment: Storage environment: Power supply: Power consumption: Dimensions (with the Paper Support retracted): Weight: Print Head: AC Adapter Dimensions: Weight: Rated input: Rated output: - Canon PIXMA mini260 | Photo Printing Guide - Page 79
No. print Default (selections based on the printer setting), Photo (Photo Paper Plus Glossy, Glossy Photo Paper, Photo Paper Plus Semi-gloss), Fast Photo (Photo Paper Pro) Default (selections based on the printer setting), Borderless, Bordered, N-up (2, 4, 9, 16)* * Layout compatible with Canon - Canon PIXMA mini260 | Photo Printing Guide - Page 80
depending on your operating system or Internet Explorer version. We recommend that you keep your system up to date with Windows Update. Browser: Help Viewer Note: The On-screen Manual may not be displayed properly depending on your operating system. We recommend that you keep your system up to date - Canon PIXMA mini260 | Photo Printing Guide - Page 81
and may cause insulation failure and fire. Use only power supplies listed in the user instructions (Canon AC Adapter: K30273 and/or Li-ion Battery Pack: Canon K30274). Do not use them for other products. Use a damp cloth to clean the printer. Never use flammable solvents such as alcohol, benzene or - Canon PIXMA mini260 | Photo Printing Guide - Page 82
containers of flammable solvents (alcohol, thinners, etc.) on top of the printer. If any foreign object (metal or liquid) fall into the printer, unplug the power cord and call for service. Do not transport or store the printer on a slant, vertically or upside-down, as the ink may leak and damage the - Canon PIXMA mini260 | Photo Printing Guide - Page 83
on a Print Head after printing. The metal parts may be very hot and could cause burns. During printing AC Adapter Do not touch the part around the ejecting paper during printing. This could cause the printer to malfunction. When you pack the AC adapter for travel or storage, never wrap the cord - Canon PIXMA mini260 | Photo Printing Guide - Page 84
and, if not installed and used in accordance with the instructions, may cause harmful interference to radio communications. However, there in the manual. If such changes or modifications should be made, you could be required to stop operation of the equipment. Canon U.S.A., Inc. One Canon Plaza Lake - Canon PIXMA mini260 | Photo Printing Guide - Page 85
's manual or other documentation for the Product. (b) Use of parts, media, software or supplies (other than those sold by Canon USA), including nonCanon ink cartridges or refilled ink cartridges, that cause damage to the Product or cause abnormally frequent service calls or service problems. (c) If - Canon PIXMA mini260 | Photo Printing Guide - Page 86
FOR WHOM IT WAS PURCHASED AS A GIFT, AND STATES YOUR EXCLUSIVE REMEDY. Canon USA offers a range of customer technical support* options: Interactive troubleshooting, e-mail technical support, the latest driver downloads and answers to frequently asked questions (www.canontechsupport.com) Toll-free - Canon PIXMA mini260 | Photo Printing Guide - Page 87
SURE TO RETAIN YOUR PRINTHEAD AND INK CARTRIDGE(S) AND TANK(S). InstantExchange Service expedites, usually by the second business day, the exchange of a defective Product with a replacement Product, which will normally be shipped the same day if your request for this service is by 3 p.m. E.T. Monday - Canon PIXMA mini260 | Photo Printing Guide - Page 88
are duplicated in all such forms and that any documentation, advertising materials, and other materials related to such distribution and use acknowledge that the software was developed at Cygnus Support, Inc. Cygnus Support, Inc. may not be used to endorse or promote products derived from this - Canon PIXMA mini260 | Photo Printing Guide - Page 89
- Canon PIXMA mini260 | Photo Printing Guide - Page 90
- Canon PIXMA mini260 | Photo Printing Guide - Page 91
. Description Order # Ink Tanks CLI-36 Color 1511B002 Canon Specialty Papers Photo Paper Plus Glossy (4" x 6"/ 20 sheets) Photo Paper Plus Glossy (4" x 6"/ 50 sheets) Photo Paper Plus Glossy (4" x 6"/ 120 sheets) Photo Paper Pro for Borderless Printing (4" x 6"/ 20 sheets) Photo Paper Pro for - Canon PIXMA mini260 | Photo Printing Guide - Page 92
The following ink tank is compatible with this printer. For details on ink tank replacement, refer to "Replacing an Ink Tank" in this guide. QT5-0760-V01 XXXXXXXX ©CANON INC.2006 PRINTED IN VIETNAM
-
 1
1 -
 2
2 -
 3
3 -
 4
4 -
 5
5 -
 6
6 -
 7
7 -
8
-
9
-
10
-
11
-
12
-
13
-
14
-
15
-
16
-
17
-
18
-
19
-
20
-
21
-
22
-
23
-
24
-
25
-
26
-
27
-
28
-
29
-
30
-
31
-
32
-
33
-
34
-
35
-
36
-
37
-
38
-
39
-
40
-
41
-
42
-
43
-
44
-
45
-
46
-
47
-
48
-
49
-
50
-
51
-
52
-
53
-
54
-
55
-
56
-
57
-
58
-
59
-
60
-
61
-
62
-
63
-
64
-
65
-
66
-
67
-
68
-
69
-
70
-
71
-
72
-
73
-
74
-
75
-
76
-
77
-
78
-
79
-
80
-
81
-
82
-
83
-
84
-
85
-
86
-
87
-
88
-
89
-
90
-
91
-
92
 |
 |
Photo Printing Guide
Table of Contents
Introduction
2
Before Printing
3
Printing from the Memory Card
18
Printing Photographs Directly from a Digital Camera
31
Printing Photographs from a Wireless Communication Device
36
Printing Maintenance
42
Changing the Printer Settings
52
Troubleshooting
55
Appendix
73
US
Photo Printer
QT5-0760-V01