Canon PS G7 PowerShot G7 Camera User Guide Basic
Canon PS G7 - PowerShot G7 Digital Camera Manual
 |
UPC - 013803071221
View all Canon PS G7 manuals
Add to My Manuals
Save this manual to your list of manuals |
Canon PS G7 manual content summary:
- Canon PS G7 | PowerShot G7 Camera User Guide Basic - Page 1
CDI-E299-010 XXXXXXX © 2006 CANON INC. PRINTED IN JAPAN The Components Guide Preparation Shooting Playback/Erasing Menus and Settings Printing Basic Downloading Images to a Computer Camera User Guide Please Read This First This guide explains how to prepare the camera and use its basic - Canon PS G7 | PowerShot G7 Camera User Guide Basic - Page 2
items and items sold separately System Map The Components Guide Preparations • Charging the battery • Installing the battery and memory card • Setting the date, time and language Shooting Playback/Erasing Menus and Settings Basic Camera User Guide (This Guide) • Read this first. Handling - Canon PS G7 | PowerShot G7 Camera User Guide Basic - Page 3
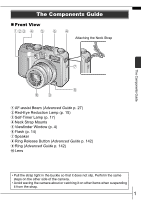
Reduction Lamp (p. 15) c Self-Timer Lamp (p. 17) d Neck Strap Mounts e Viewfinder Window (p. 4) f Flash (p. 14) g Speaker h Ring Release Button (Advanced Guide p. 142) i Ring (Advanced Guide p. 142) j Lens • Pull the strap tight in the buckle so that it does not slip. Perform the same steps on the - Canon PS G7 | PowerShot G7 Camera User Guide Basic - Page 4
„ Back View a LCD Monitor (Advanced Guide p. 12) b Viewfinder (p. 4) c Terminal Cover d DC Coupler Cable Cover (Advanced Guide p. 139) e Memory Card Slot / Battery Cover (p. 6) f Tripod Socket g A/V OUT (Audio/Video output) Terminal (Advanced Guide p. 133) h DIGITAL Terminal (p. 27) 2 - Canon PS G7 | PowerShot G7 Camera User Guide Basic - Page 5
Button (p. 20) q MENU Button (p. 21) r DISPLAY Button (Advanced Guide p. 12) s (AF Frame Selector)/ (Single Image Erase) Button (p. 19, Advanced Guide p. 61) t (Macro)/ Button (p. 16) u (Manual Focus)/ Button (Advanced Guide p. 65) v (Flash)/ Button (p. 14) w (Continuous)/ (Selftimer)/ Button (p. 17 - Canon PS G7 | PowerShot G7 Camera User Guide Basic - Page 6
aperture value in (Advanced Guide p. 50) • Selecting the shutter speed and the aperture value in (Advanced Guide p. 51) • Selecting the AF Frame (Advanced Guide p. 61) • Adjusting the focus in manual focus mode (Advanced Guide p. 65) • Program Shift (Advanced Guide p. 69) • Adjusting the exposure - Canon PS G7 | PowerShot G7 Camera User Guide Basic - Page 7
(Advanced Guide p. 118) Indicators The camera indicators will light or blink under the following conditions. Never do the following while the indicator blinks green. These actions may corrupt image data. • Shake or jolt the camera • Shut off the power, or open the memory card slot/battery cover - Canon PS G7 | PowerShot G7 Camera User Guide Basic - Page 8
30 minutes. Charge Indicator Î See the Advanced Guide: Battery Handling (p. 134) 2. Installing the Battery. 1. Slide the memory card slot/battery cover lock in the direction of the arrow (a), and open the memory card slot/ battery cover (b). 2. Push the battery lock in the direction of the arrow - Canon PS G7 | PowerShot G7 Camera User Guide Basic - Page 9
Memory Cards (p. 33). „ To Remove the Memory Card Push the memory card with your finger until the memory card clicks and then release it. Preparations You can use SD memory cards, SDHC memory cards and MultiMediaCards with this camera. These cards are collectively called memory cards in this guide - Canon PS G7 | PowerShot G7 Camera User Guide Basic - Page 10
(sold separately) to charge the lithium battery. It will charge even if the camera is turned off. • The date/time settings may be lost after approximately three weeks if you remove the main battery. Reset the date/time settings if this occurs. Î See the Advanced Guide: Setting the World Clock (p. 22 - Canon PS G7 | PowerShot G7 Camera User Guide Basic - Page 11
Preparations „ Setting the Display Language 1. Press the (playback) button. 2. Hold down the FUNC./SET button and press the MENU button. 3. Use the , , or button to select a language and press the FUNC./SET button. The display language can also be set in the Set up menu (p. 21). „ Switching - Canon PS G7 | PowerShot G7 Camera User Guide Basic - Page 12
button. The start-up sound will play and the startup image will display in the LCD monitor. • Pressing the power Advanced Guide: Using the LCD Monitor (p. 12). Î See the Advanced Guide: Power Saving Function (p. 21). Î See the Advanced Guide: Set up Menu (p. 28). Î See the Advanced Guide: My Camera - Canon PS G7 | PowerShot G7 Camera User Guide Basic - Page 13
is recorded to the memory card. Î See Indicators (p. 5). Î See the Advanced Guide: Selecting an AF Frame (p. 61). Î See the Advanced Guide: Setting the Image Stabilizer Function (p. 35). Î See the Advanced Guide for the various shooting methods available. „ Reviewing an Image Right After Shooting - Canon PS G7 | PowerShot G7 Camera User Guide Basic - Page 14
with autofocus. Well suited for shooting moving subjects. Î See the Advanced Guide (p. 44). Image zone Night Snapshot Allows you to take snapshots of people against twilight or night backgrounds by reducing the effects of camera shake even without using a tripod. Kids&Pets Allows you to capture - Canon PS G7 | PowerShot G7 Camera User Guide Basic - Page 15
Î See the Advanced Guide: Functions Available in Each Shooting Mode (p. 168). Shooting • With , recording pixels are fixed at . • The shutter speed is slow in or mode. Always use a tripod to avoid camera shake. • In or mode, the ISO speed may increase and cause noise in the image depending on the - Canon PS G7 | PowerShot G7 Camera User Guide Basic - Page 16
• To shoot underwater, install the camera in Waterproof Case WP-DC11 (sold separately). • We recommend you use Waterproof Case WP-DC11 for shooting at ski resorts or beaches. Using the Zoom 1. Press the zoom lever toward or . The zoom can be adjusted from 35 - 210 mm (focal length) in 35mm film - Canon PS G7 | PowerShot G7 Camera User Guide Basic - Page 17
cannot be set in mode. Î See the Advanced Guide: Functions Available in Each Shooting Mode (p. 168). Î See Selecting a Shooting Mode (p. 11). You are recommended to shoot with the camera attached to a tripod or other device if the camera shake warning icon appears. Shooting „ Setting the Red- - Canon PS G7 | PowerShot G7 Camera User Guide Basic - Page 18
as if in standard shooting mode. The zoom bar disappears after approx. 2 sec. To cancel the macro mode, press the button to display . Use this mode to shoot close-ups of flowers or small items. Macro Image Area at Minimum Shooting Distance from End of Lens to Subject • Maximum wide angle setting: 28 - Canon PS G7 | PowerShot G7 Camera User Guide Basic - Page 19
releases. If multiple shots have been specified for the [Shots] option, the sound will play for the first shot only. * 1 May differ depending on My Camera settings. * 2 Default setting. * 3 Default setting is 3 shots. This setting cannot be set in some shooting modes. Î See the Advanced - Canon PS G7 | PowerShot G7 Camera User Guide Basic - Page 20
flash must charge. - The interval between shots may lengthen when the built-in memory of the camera fills. - Shooting will automatically cease if the memory card becomes full. Playback 1. Press the (playback) button (a). The last image that was played back appears (Resume Playback). If additional - Canon PS G7 | PowerShot G7 Camera User Guide Basic - Page 21
turning the control dial. Turning it counterclockwise displays the previous image while turning it clockwise displays the next image. Playback screen when the control dial is activated. Î See the Advanced Guide for the various playback methods available. Î See Using the Control Dial (p. 4). Erasing - Canon PS G7 | PowerShot G7 Camera User Guide Basic - Page 22
as the date/time and sounds are set using the FUNC., Rec., Play, Print, Set up or My Camera menu. FUNC. Menu This menu sets many of the common shooting functions. a b e c d •This example to switch between menus. e Press the FUNC./SET button. Î See the Advanced Guide: Menu List (p. 26). 20 - Canon PS G7 | PowerShot G7 Camera User Guide Basic - Page 23
playback mode, the Play, Print, Set up and My Camera menus display. a Press the MENU button. b Use the or button to switch between menus. • You can also use the zoom lever to switch between menus. c Use the or button setting. e Press the MENU button. Î See the Advanced Guide: Menu List (p. 26). 21 - Canon PS G7 | PowerShot G7 Camera User Guide Basic - Page 24
Photo Printers*2 PIXMA Series/ SELPHY DS Series Bubble Jet Printers *1 Since this camera uses a standard protocol (PictBridge), you can use it with other PictBridge-compliant printers in addition to Canon-brand printers. *2 You can also use card photo printers such as the CP-10/CP-100/CP-200/ CP - Canon PS G7 | PowerShot G7 Camera User Guide Basic - Page 25
(b) and press the button (c). • The button will blink blue and printing will start. • You can also select an image with the control dial. Î See the Advanced Guide: Setting the DPOF Print Settings (p. 111). Î See the Direct Print User Guide. Î See the user guide for your printer. Printing 23 - Canon PS G7 | PowerShot G7 Camera User Guide Basic - Page 26
System Requirements • Basic Guide (p. 25) • Software Starter Guide Connecting the Camera to a Computer • Basic Guide (p. 27) Downloading Images to • Basic Guide (pp. 28-29) a Computer • Software Starter Guide • Windows® XP and Mac OS X Users leaflet „ Using a Memory Card Reader A memory card - Canon PS G7 | PowerShot G7 Camera User Guide Basic - Page 27
Downloading Images to a Computer System Requirements Please install the software on a computer meeting the following minimum requirements. „ Windows OS Computer Model CPU RAM Interface Free Hard Disk Space Display Windows 98 Second Edition (SE) Windows Me Windows 2000 Service Pack 4 Windows XP ( - Canon PS G7 | PowerShot G7 Camera User Guide Basic - Page 28
Images Ensure that you install the software first before connecting the camera to the computer. „ Items to Prepare • Camera and computer • Canon Digital Camera Solution Disk supplied with the camera • Interface cable supplied with the camera 1. Install the software. 1. Place the Canon Digital Camera - Canon PS G7 | PowerShot G7 Camera User Guide Basic - Page 29
cover, lift it open and plug the interface cable in all the way. USB Port DIGITAL Terminal Downloading Images to a Computer Interface Cable Interface Cable 2. Press the (playback) button. The camera and computer will be able to communicate. Always grasp the sides of the connector when - Canon PS G7 | PowerShot G7 Camera User Guide Basic - Page 30
menu and select [All Programs] or [Programs], followed by [Canon Utilities], [CameraWindow], [PowerShot - IXY - IXUS - DV 6] and [CameraWindow]. 2. Download the images. • Download the images using the camera or the computer. • By default, the downloaded images are saved into the [My Pictures] folder - Canon PS G7 | PowerShot G7 Camera User Guide Basic - Page 31
computer. If it fails to appear, click the [Canon CameraWindow] icon on the Dock (the bar which appears at the bottom of the desktop). 1. Download the images. • Download the images using the camera or the computer. • By default, the downloaded images are saved into the [Pictures] folder. Downloading - Canon PS G7 | PowerShot G7 Camera User Guide Basic - Page 32
Transfer) Use this method to download images using camera operations. Install the supplied software and adjust the computer settings before using this method for the first time (p. 26). All Images Transfers and saves all images to the computer. New Images Transfers and saves to the computer - Canon PS G7 | PowerShot G7 Camera User Guide Basic - Page 33
Guide p. 90). • Press the MENU button to return to the Direct Transfer menu. button Only JPEG images can be downloaded as wallpaper for a computer. On the Windows platform, the files are automatically created as BMP images. The option selected with the button is retained even when the camera - Canon PS G7 | PowerShot G7 Camera User Guide Basic - Page 34
the safety precautions listed in the Advanced Camera User Guide. Warnings • Do not trigger the batteries which are not specified for this camera. • The battery charger and the compact power adapter output terminals have been designed exclusively for this equipment. Do not use them for other products
-
 1
1 -
 2
2 -
 3
3 -
 4
4 -
 5
5 -
 6
6 -
 7
7 -
8
-
9
-
10
-
11
-
12
-
13
-
14
-
15
-
16
-
17
-
18
-
19
-
20
-
21
-
22
-
23
-
24
-
25
-
26
-
27
-
28
-
29
-
30
-
31
-
32
-
33
-
34
 |
 |

ENGLISH
The Components Guide
Preparation
Shooting
Playback/Erasing
Menus and Settings
Printing
Basic
Downloading Images
to a Computer
CDI-E299-010
XXXXXXX
© 2006 CANON INC.
PRINTED IN JAPAN
Camera User Guide
Please Read This First
This guide explains how to prepare the camera and use its basic features.