Canon PowerShot A2500 Black User Guide
Canon PowerShot A2500 Black Manual
 |
View all Canon PowerShot A2500 Black manuals
Add to My Manuals
Save this manual to your list of manuals |
Canon PowerShot A2500 Black manual content summary:
- Canon PowerShot A2500 Black | User Guide - Page 1
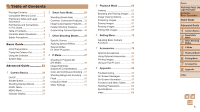
the beginning of a chapter, click the chapter title at right. From chapter title pages, you can access topics by clicking their titles. 1 Camera Basics 2 Smart Auto Mode 3 Other Shooting Modes 4 P Mode 5 Playback Mode 6 Setting Menu 7 Accessories 8 Appendix Index ©CANON INC. 2013 CDD-E525-010 1 - Canon PowerShot A2500 Black | User Guide - Page 2
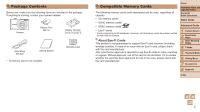
cards have been verified to work with the camera. About Eye-Fi Cards This product is not guaranteed to support Eye-Fi card functions (including wireless transfer). Notes and Legal Information Contents: Basic Operations Basic Guide Advanced Guide 1 Camera Basics 2 Smart Auto Mode 3 Other Shooting - Canon PowerShot A2500 Black | User Guide - Page 3
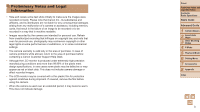
purchase. In case of camera problems while abroad, return to the area of purchase before contacting a Canon Customer Support Help Desk. • Although Preliminary Notes and Legal Information Contents: Basic Operations Basic Guide Advanced Guide 1 Camera Basics 2 Smart Auto Mode 3 Other Shooting Modes 4 - Canon PowerShot A2500 Black | User Guide - Page 4
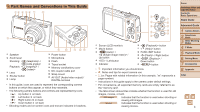
DIGITAL terminal • In this guide, icons are used to represent the corresponding camera buttons on which they appear, or which they resemble. • The following camera page number) • Instructions in this guide apply to the camera under default settings. • For convenience, all supported memory cards are - Canon PowerShot A2500 Black | User Guide - Page 5
92 Troubleshooting 93 On-Screen Messages 95 On-Screen Information 97 Functions and Menu Tables..........99 Handling Precautions 103 Specifications 103 Index 106 Cover Preliminary Notes and Legal Information Contents: Basic Operations Basic Guide Advanced Guide 1 Camera Basics 2 Smart - Canon PowerShot A2500 Black | User Guide - Page 6
pictures 83 Save zzSave images to a computer 18 Cover Preliminary Notes and Legal Information Contents: Basic Operations Basic Guide Advanced Guide 1 Camera Basics 2 Smart Auto Mode 3 Other Shooting Modes 4 P Mode 5 Playback Mode 6 Setting Menu 7 Accessories 8 Appendix Index Miniature Effect - Canon PowerShot A2500 Black | User Guide - Page 7
or damage to the equipment. • Be sure to also check the guides included with any separately sold accessories you use. Warning Denotes the possibility becomes wet, unplug it from the outlet and consult your camera retailer or a Canon Customer Support Help Desk. • Use only the recommended battery. • Do - Canon PowerShot A2500 Black | User Guide - Page 8
do not come into contact with the screen. • Do not attach any hard objects to the camera. Doing so may cause malfunctions or damage the screen. Cover Preliminary Notes and Legal Information Contents: Basic Operations Basic Guide Advanced Guide 1 Camera Basics 2 Smart Auto Mode 3 Other Shooting - Canon PowerShot A2500 Black | User Guide - Page 9
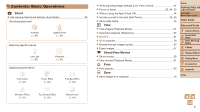
basic instructions, from initial preparations to shooting, playback, and saving on a computer Initial Preparations 10 Trying the Camera Out 14 Using the Software 17 System Map 21 Cover Preliminary Notes and Legal Information Contents: Basic Operations Basic Guide Advanced Guide 1 Camera Basics - Canon PowerShot A2500 Black | User Guide - Page 10
included charger. Be sure to charge the battery initially, because the camera is not sold with the battery charged. 1 Insert the battery. Cover Preliminary Notes and Legal Information Contents: Basic Operations Basic Guide Advanced Guide 1 Camera Basics 2 Smart Auto Mode 3 Other Shooting Modes 4 - Canon PowerShot A2500 Black | User Guide - Page 11
when you insert it. Inserting memory cards facing the wrong way may damage the camera. Cover Preliminary Notes and Legal Information Contents: Basic Operations Basic Guide Advanced Guide 1 Camera Basics 2 Smart Auto Mode 3 Other Shooting Modes 4 P Mode 5 Playback Mode 6 Setting Menu 7 Accessories - Canon PowerShot A2500 Black | User Guide - Page 12
screen is displayed. 2 Set the date and time. zzPress the buttons to choose an option. zzPress the buttons to specify the date and time. zzWhen finished, press the button. Cover Preliminary Notes and Legal Information Contents: Basic Operations Basic Guide Advanced Guide 1 Camera - Canon PowerShot A2500 Black | User Guide - Page 13
is depleted, the [Date/Time] screen will be displayed when you turn the camera on. Follow the steps in "Setting the Date and Time" (=12) to set the date and time. Cover Preliminary Notes and Legal Information Contents: Basic Operations Basic Guide Advanced Guide 1 Camera Basics 2 Smart Auto Mode - Canon PowerShot A2500 Black | User Guide - Page 14
language has been set, the setting screen is no longer displayed. • You can also change the display language by pressing the button and choosing [Language ] on the [3] tab. Still Images Trying the Camera Out Movies Follow these instructions to turn the camera on, shoot still images or movies - Canon PowerShot A2500 Black | User Guide - Page 15
recording stops. Viewing After shooting images or movies, you can view them on the screen as follows. Cover Preliminary Notes and Legal Information Contents: Basic Operations Basic Guide Advanced Guide 1 Camera Basics 2 Smart Auto Mode 3 Other Shooting Modes 4 P Mode 5 Playback Mode 6 Setting Menu - Canon PowerShot A2500 Black | User Guide - Page 16
the button. • You can also erase all images at once (=67). Cover Preliminary Notes and Legal Information Contents: Basic Operations Basic Guide Advanced Guide 1 Camera Basics 2 Smart Auto Mode 3 Other Shooting Modes 4 P Mode 5 Playback Mode 6 Setting Menu 7 Accessories 8 Appendix Index 16 - Canon PowerShot A2500 Black | User Guide - Page 17
Access on-screen descriptions of scenes detected by the camera, shooting advice, and playback instructions as follows. Guide After downloading the software from the Canon website and installing it, you can do the following things on your computer. CameraWindow zzImport images and change camera - Canon PowerShot A2500 Black | User Guide - Page 18
performance. • Check the Canon website for the latest system requirements, including supported OS versions. Installing the screen instructions to complete the installation process. 3 When a message is displayed prompting you to connect the camera, connect it to a computer. zzWith the camera - Canon PowerShot A2500 Black | User Guide - Page 19
below. zzIn the screen that displays, click the [ ] link to modify the program. zzChoose [Downloads Images From Canon Camera using Canon CameraWindow] and then click [OK]. Cover Preliminary Notes and Legal Information Contents: Basic Operations Basic Guide Advanced Guide 1 Camera Basics 2 Smart - Canon PowerShot A2500 Black | User Guide - Page 20
. zzFor instructions on viewing images on a computer, refer to the Software Guide (= 17). • In Windows 7, if the screen in step 2 is not displayed, click the [ ] icon in the taskbar. • To start CameraWindow in Windows Vista or XP, click [Downloads Images From Canon Camera using Canon CameraWindow - Canon PowerShot A2500 Black | User Guide - Page 21
Guide 1 Camera Basics 2 Smart Auto Mode 3 Other Shooting Modes 4 P Mode 5 Playback Mode 6 Setting Menu 7 Accessories 8 Appendix Index *1 Also available for purchase separately. *2 A genuine Canon accessory is also available (Interface Cable IFC-400PCU). *3 High-Power Flash HF-DC1 also supported - Canon PowerShot A2500 Black | User Guide - Page 22
basics and describes shooting and playback options Cover Preliminary Notes and Legal Information Contents: Basic Operations Basic Guide Advanced Guide 1 Camera Basics 2 Smart Auto Mode 3 Other Shooting Modes 4 P Mode 5 Playback Mode 6 Setting Menu 7 Accessories 8 Appendix Index On/Off 23 Shutter - Canon PowerShot A2500 Black | User Guide - Page 23
lens is retracted and the camera turns itself off. To activate the screen and prepare for shooting when the screen is off but the lens the camera is connected to a computer (= 19). Cover Preliminary Notes and Legal Information Contents: Basic Operations Basic Guide Advanced Guide 1 Camera Basics - Canon PowerShot A2500 Black | User Guide - Page 24
shoot. In this manual, shutter button screen image distortion or jerky subject motion will not affect recorded images. • For playback display options, see "Switching Display Modes" (=62). Cover Preliminary Notes and Legal Information Contents: Basic Operations Basic Guide Advanced Guide 1 Camera - Canon PowerShot A2500 Black | User Guide - Page 25
can be specified simply by pressing the or button, or another screen is displayed for configuring the function. 3 Choose an option. zzPress the camera's default settings (=78). Cover Preliminary Notes and Legal Information Contents: Basic Operations Basic Guide Advanced Guide 1 Camera - Canon PowerShot A2500 Black | User Guide - Page 26
the setup process. zzPress the button to return to the screen displayed before you pressed the button in step 1. Cover Preliminary Notes and Legal Information Contents: Basic Operations Basic Guide Advanced Guide 1 Camera Basics 2 Smart Auto Mode 3 Other Shooting Modes 4 P Mode 5 Playback - Canon PowerShot A2500 Black | User Guide - Page 27
they may corrupt images, or damage the camera or memory card. - Turn the camera off - Shake or jolt the camera - Open the memory card/battery cover Cover Preliminary Notes and Legal Information Contents: Basic Operations Basic Guide Advanced Guide 1 Camera Basics 2 Smart Auto Mode 3 Other Shooting - Canon PowerShot A2500 Black | User Guide - Page 28
for easy shots with greater control over shooting Cover Preliminary Notes and Legal Information Contents: Basic Operations Basic Guide Advanced Guide 1 Camera Basics 2 Smart Auto Mode 3 Other Shooting Modes 4 P Mode 5 Playback Mode 6 Setting Menu 7 Accessories 8 Appendix Index Shooting (Smart Auto - Canon PowerShot A2500 Black | User Guide - Page 29
let the camera determine the subject and shooting conditions. 1 Turn the camera on. zzPress the power button. XXThe startup screen is displayed the camera is ready to shoot again. Cover Preliminary Notes and Legal Information Contents: Basic Operations Basic Guide Advanced Guide 1 Camera Basics - Canon PowerShot A2500 Black | User Guide - Page 30
camera beeps once as recording begins, and [●Rec] is displayed with the elapsed time. XXBlack bars displayed on the top and bottom edges of the screen Preliminary Notes and Legal Information Contents: Basic Operations Basic Guide Advanced Guide 1 Camera Basics 2 Smart Auto Mode 3 Other Shooting Modes - Canon PowerShot A2500 Black | User Guide - Page 31
is held still, as when mounted on a tripod. Cover Preliminary Notes and Legal Information Contents: Basic Operations Basic Guide Advanced Guide 1 Camera Basics 2 Smart Auto Mode 3 Other Shooting Modes 4 P Mode 5 Playback Mode 6 Setting Menu 7 Accessories 8 Appendix Index • Try shooting in [G] mode - Canon PowerShot A2500 Black | User Guide - Page 32
the camera detects subject movement, only the white frame will remain on the screen. • When you are pressing the shutter button halfway and the camera digital zoom for up to about 20x enlargement. Cover Preliminary Notes and Legal Information Contents: Basic Operations Basic Guide Advanced Guide - Canon PowerShot A2500 Black | User Guide - Page 33
following step 1. • Focal length when optical and digital zoom are combined is as follows (35mm film can include yourself in group photos or other timed shots. The camera will shoot about 10 seconds Information Contents: Basic Operations Basic Guide Advanced Guide 1 Camera Basics 2 Smart Auto Mode - Canon PowerShot A2500 Black | User Guide - Page 34
When you specify multiple shots, image brightness and white balance are determined by the first shot. More .) Deactivating the Flash Still Images Prepare the camera for shooting without the flash as follows. halfway in low-light conditions, mount the camera on a tripod or take other measures to - Canon PowerShot A2500 Black | User Guide - Page 35
without adding a date stamp can be printed with one as follows. However, adding Canon website to print For details, refer to the Software Guide (=17). Using Eco Mode Still Images Movies This function allows you to conserve battery power in Shooting mode. When the camera is not in use, the screen - Canon PowerShot A2500 Black | User Guide - Page 36
images displayed on widescreen HDTVs or similar display devices, on a 16:9 screen. Red-Eye Correction Still Images Red-eye that occurs in the flash photography Notes and Legal Information Contents: Basic Operations Basic Guide Advanced Guide 1 Camera Basics 2 Smart Auto Mode 3 Other Shooting Modes - Canon PowerShot A2500 Black | User Guide - Page 37
standard definition • In [ ] mode, black bars displayed on the top and bottom edges of the screen indicate image areas not recorded. Helpful Preliminary Notes and Legal Information Contents: Basic Operations Basic Guide Advanced Guide 1 Camera Basics 2 Smart Auto Mode 3 Other Shooting Modes 4 - Canon PowerShot A2500 Black | User Guide - Page 38
Customizing Camera Operation Customize shooting functions on the [4] tab of the menu as follows. For instructions on menu functions, ]. Cover Preliminary Notes and Legal Information Contents: Basic Operations Basic Guide Advanced Guide 1 Camera Basics 2 Smart Auto Mode 3 Other Shooting Modes 4 P - Canon PowerShot A2500 Black | User Guide - Page 39
image effects or captured using special functions Cover Preliminary Notes and Legal Information Contents: Basic Operations Basic Guide Advanced Guide 1 Camera Basics 2 Smart Auto Mode 3 Other Shooting Modes 4 P Mode 5 Playback Mode 6 Setting Menu 7 Accessories 8 Appendix Index Specific Scenes - Canon PowerShot A2500 Black | User Guide - Page 40
. • [ ] mode resolution is [ ] (2304 x 1728) and cannot be changed. Cover Preliminary Notes and Legal Information Contents: Basic Operations Basic Guide Advanced Guide 1 Camera Basics 2 Smart Auto Mode 3 Other Shooting Modes 4 P Mode 5 Playback Mode 6 Setting Menu 7 Accessories 8 Appendix Index 40 - Canon PowerShot A2500 Black | User Guide - Page 41
the setting. zzPress the button to access the setting screen. Press the buttons to choose a setting item, With Reduced Blur (Digital IS) Shoot with minimal camera shake and subject blur. In scenes Contents: Basic Operations Basic Guide Advanced Guide 1 Camera Basics 2 Smart Auto Mode - Canon PowerShot A2500 Black | User Guide - Page 42
, to make sure you obtain the desired results. Cover Preliminary Notes and Legal Information Contents: Basic Operations Basic Guide Advanced Guide 1 Camera Basics 2 Smart Auto Mode 3 Other Shooting Modes 4 P Mode 5 Playback Mode 6 Setting Menu 7 Accessories 8 Appendix Index • In [ ] and [ ] modes - Canon PowerShot A2500 Black | User Guide - Page 43
in "Specific Scenes" (=40) and choose [ ]. XXA white frame is displayed, indicating the image area that will not shooting screen and shoot. zzPress the button to return to the shooting screen, and Information Contents: Basic Operations Basic Guide Advanced Guide 1 Camera Basics 2 Smart Auto Mode - Canon PowerShot A2500 Black | User Guide - Page 44
your shot will look with the effect applied. 3 Shoot. B/W Sepia Blue Black and white shots. Sepia tone shots. Blue and white shots. Cover Preliminary Notes and Legal Information Contents: Basic Operations Basic Guide Advanced Guide 1 Camera Basics 2 Smart Auto Mode 3 Other Shooting Modes 4 P Mode - Canon PowerShot A2500 Black | User Guide - Page 45
photos or similar shots. 1 Choose [ ]. zzFollow steps 1 - 2 in "Specific Scenes" (=40) and choose [ ]. 2 Compose the shot and press the shutter button halfway. zzMake sure a green frame is displayed around the face you focus on and white Operations Basic Guide Advanced Guide 1 Camera Basics 2 Smart - Canon PowerShot A2500 Black | User Guide - Page 46
the exposure for your selected shutter speed. 4 Shoot. • On-screen image brightness in step 3, when you pressed the shutter button halfway, Cover Preliminary Notes and Legal Information Contents: Basic Operations Basic Guide Advanced Guide 1 Camera Basics 2 Smart Auto Mode 3 Other Shooting Modes 4 - Canon PowerShot A2500 Black | User Guide - Page 47
More discerning shots, in your preferred shooting style • Instructions in this chapter apply to the camera when set to [G] mode. • [G]: Program AE Preliminary Notes and Legal Information Contents: Basic Operations Basic Guide Advanced Guide 1 Camera Basics 2 Smart Auto Mode 3 Other Shooting Modes 4 - Canon PowerShot A2500 Black | User Guide - Page 48
the button and choose [#] in the menu. As you watch the screen, press the buttons to adjust brightness (=25). XXThe correction level you Preliminary Notes and Legal Information Contents: Basic Operations Basic Guide Advanced Guide 1 Camera Basics 2 Smart Auto Mode 3 Other Shooting Modes 4 - Canon PowerShot A2500 Black | User Guide - Page 49
. 1 Deactivate the flash (=34). 2 Lock the exposure. zzAim the camera at the subject to shoot with the exposure locked. With the shutter button the center of the screen. Cover Preliminary Notes and Legal Information Contents: Basic Operations Basic Guide Advanced Guide 1 Camera Basics 2 Smart Auto - Canon PowerShot A2500 Black | User Guide - Page 50
to appear grainy. • You can also correct existing images (=70). Cover Preliminary Notes and Legal Information Contents: Basic Operations Basic Guide Advanced Guide 1 Camera Basics 2 Smart Auto Mode 3 Other Shooting Modes 4 P Mode 5 Playback Mode 6 Setting Menu 7 Accessories 8 Appendix Index 50 - Canon PowerShot A2500 Black | User Guide - Page 51
tint of the screen changes once the white balance data has been recorded. • Colors may look unnatural if you change camera settings after recording white balance data. Cover Preliminary Notes and Legal Information Contents: Basic Operations Basic Guide Advanced Guide 1 Camera Basics 2 Smart Auto - Canon PowerShot A2500 Black | User Guide - Page 52
will turn gray and the camera will not focus. • To prevent camera shake, try mounting the camera on a tripod and shooting with the camera set to [[] (=33). Cover Preliminary Notes and Legal Information Contents: Basic Operations Basic Guide Advanced Guide 1 Camera Basics 2 Smart Auto Mode 3 Other - Canon PowerShot A2500 Black | User Guide - Page 53
Detects people's faces, and then sets the focus, exposure (evaluative metering only), and white balance ([ ] only). • After you aim the camera at the subject, a white frame is displayed around the person's face determined by the camera to be the main subject, and up to two gray frames are displayed - Canon PowerShot A2500 Black | User Guide - Page 54
[Tracking AF]. XX[ ] is displayed in the center of the screen. 2 Choose a subject to focus on. zzAim the camera so that [ ] is on the desired subject. □ zzPress the Notes and Legal Information Contents: Basic Operations Basic Guide Advanced Guide 1 Camera Basics 2 Smart Auto Mode 3 Other Shooting - Canon PowerShot A2500 Black | User Guide - Page 55
[Off] (=26). Helps avoid missing sudden photo On opportunities, because the camera constantly focuses on subjects until you press the Cover Preliminary Notes and Legal Information Contents: Basic Operations Basic Guide Advanced Guide 1 Camera Basics 2 Smart Auto Mode 3 Other Shooting Modes 4 - Canon PowerShot A2500 Black | User Guide - Page 56
[(] is no longer displayed. 3 Compose the shot and shoot. Cover Preliminary Notes and Legal Information Contents: Basic Operations Basic Guide Advanced Guide 1 Camera Basics 2 Smart Auto Mode 3 Other Shooting Modes 4 P Mode 5 Playback Mode 6 Setting Menu 7 Accessories 8 Appendix Index • FE: Flash - Canon PowerShot A2500 Black | User Guide - Page 57
26). XXOnce the setting is complete, grid lines are displayed on the screen. zzTo restore the original setting, repeat this process but choose [Off]. Preliminary Notes and Legal Information Contents: Basic Operations Basic Guide Advanced Guide 1 Camera Basics 2 Smart Auto Mode 3 Other Shooting Modes - Canon PowerShot A2500 Black | User Guide - Page 58
Notes and Legal Information Contents: Basic Operations Basic Guide Advanced Guide 1 Camera Basics 2 Smart Auto Mode 3 Other Shooting Modes the camera and their face is too large for the screen, or if the camera detects subject movement. • The display will not magnify when using the digital zoom - Canon PowerShot A2500 Black | User Guide - Page 59
Period After Shots 1 Access the [Review image after shooting] screen. zzPress the button, choose [Review image after shooting] on the Cover Preliminary Notes and Legal Information Contents: Basic Operations Basic Guide Advanced Guide 1 Camera Basics 2 Smart Auto Mode 3 Other Shooting Modes 4 P - Canon PowerShot A2500 Black | User Guide - Page 60
Playback Mode Have fun reviewing your shots, and browse or edit them in many ways • To prepare the camera for these operations, press , or images from other cameras. Cover Preliminary Notes and Legal Information Contents: Basic Operations Basic Guide Advanced Guide 1 Camera Basics 2 Smart Auto Mode - Canon PowerShot A2500 Black | User Guide - Page 61
After shooting images or movies, you can view them on the screen as follows. 1 Enter Playback mode. zzPress the button. . Cover Preliminary Notes and Legal Information Contents: Basic Operations Basic Guide Advanced Guide 1 Camera Basics 2 Smart Auto Mode 3 Other Shooting Modes 4 P Mode - Canon PowerShot A2500 Black | User Guide - Page 62
Washed-out highlights in the image flash on the screen in detailed information display (=62). Still Images Movies display. Cover Preliminary Notes and Legal Information Contents: Basic Operations Basic Guide Advanced Guide 1 Camera Basics 2 Smart Auto Mode 3 Other Shooting Modes 4 P Mode - Canon PowerShot A2500 Black | User Guide - Page 63
86), or "Adding Images to a Photobook" (= 88). • If you edit images and save them as new images (=69 - 71), a message is displayed, and the images that were found are no longer shown. Cover Preliminary Notes and Legal Information Contents: Basic Operations Basic Guide Advanced Guide 1 Camera Basics - Canon PowerShot A2500 Black | User Guide - Page 64
mode (=63), only images matching search conditions are played. Cover Preliminary Notes and Legal Information Contents: Basic Operations Basic Guide Advanced Guide 1 Camera Basics 2 Smart Auto Mode 3 Other Shooting Modes 4 P Mode 5 Playback Mode 6 Setting Menu 7 Accessories 8 Appendix Index 64 - Canon PowerShot A2500 Black | User Guide - Page 65
a menu item and a setting as desired (=26). zzTo return to the menu screen, press the button. Cover Preliminary Notes and Legal Information Contents: Basic Operations Basic Guide Advanced Guide 1 Camera Basics 2 Smart Auto Mode 3 Other Shooting Modes 4 P Mode 5 Playback Mode 6 Setting Menu - Canon PowerShot A2500 Black | User Guide - Page 66
cancel protection for groups of images, choose [Unlock] in step 2. Cover Preliminary Notes and Legal Information Contents: Basic Operations Basic Guide Advanced Guide 1 Camera Basics 2 Smart Auto Mode 3 Other Shooting Modes 4 P Mode 5 Playback Mode 6 Setting Menu 7 Accessories 8 Appendix Index 66 - Canon PowerShot A2500 Black | User Guide - Page 67
cannot be erased. Choosing a Selection Method 1 Access the setting screen. zzPress the button, and then choose [Erase] on the ] is no longer displayed. zzRepeat this process to specify other images. Advanced Guide 1 Camera Basics 2 Smart Auto Mode 3 Other Shooting Modes 4 P Mode 5 Playback - Canon PowerShot A2500 Black | User Guide - Page 68
]. zzPress the button and choose [Rotate] on the [1] tab (=26). Cover Preliminary Notes and Legal Information Contents: Basic Operations Basic Guide Advanced Guide 1 Camera Basics 2 Smart Auto Mode 3 Other Shooting Modes 4 P Mode 5 Playback Mode 6 Setting Menu 7 Accessories 8 Appendix Index 68 - Canon PowerShot A2500 Black | User Guide - Page 69
is rotated 90° each time you press the button. zzTo return to the menu screen, press the button. • Movies with an image quality of [ ] cannot Preliminary Notes and Legal Information Contents: Basic Operations Basic Guide Advanced Guide 1 Camera Basics 2 Smart Auto Mode 3 Other Shooting Modes - Canon PowerShot A2500 Black | User Guide - Page 70
an option, and then press the button. 4 Save as a new image and review. zzFollow steps 4 - 5 in "Resizing Images" (= 69). • For some images, Preliminary Notes and Legal Information Contents: Basic Operations Basic Guide Advanced Guide 1 Camera Basics 2 Smart Auto Mode 3 Other Shooting Modes - Canon PowerShot A2500 Black | User Guide - Page 71
steps in "Magnifying Images" (= 64). 4 Save as a new image and review. zzPress the buttons to choose [New File], and then press the Preliminary Notes and Legal Information Contents: Basic Operations Basic Guide Advanced Guide 1 Camera Basics 2 Smart Auto Mode 3 Other Shooting Modes - Canon PowerShot A2500 Black | User Guide - Page 72
4 6 Setting Menu Customize or adjust basic camera functions for greater convenience Cover Preliminary Notes and Legal Information Contents: Basic Operations Basic Guide Advanced Guide 1 Camera Basics 2 Smart Auto Mode 3 Other Shooting Modes 4 P Mode 5 Playback Mode 6 Setting Menu 7 Accessories 8 - Canon PowerShot A2500 Black | User Guide - Page 73
Notes and Legal Information Contents: Basic Operations Basic Guide Advanced Guide Screen Brightness Adjust screen brightness as follows. zzChoose [LCD Brightness], and then press the buttons to adjust the brightness. 1 Camera Basics 2 Smart Auto Mode 3 Other Shooting Modes 4 P Mode - Canon PowerShot A2500 Black | User Guide - Page 74
card to a computer, or take other steps to back them up. zzOn the screen in step 2 of "Formatting Memory Cards" (=74), press the buttons to Preliminary Notes and Legal Information Contents: Basic Operations Basic Guide Advanced Guide 1 Camera Basics 2 Smart Auto Mode 3 Other Shooting Modes - Canon PowerShot A2500 Black | User Guide - Page 75
to [0 sec.]. zzChoose [Lens Retract], and then choose [0 sec.]. Cover Preliminary Notes and Legal Information Contents: Basic Operations Basic Guide Advanced Guide 1 Camera Basics 2 Smart Auto Mode 3 Other Shooting Modes 4 P Mode 5 Playback Mode 6 Setting Menu 7 Accessories 8 Appendix Index 75 - Canon PowerShot A2500 Black | User Guide - Page 76
convenient feature eliminates the need to change the Date/ Time setting manually. Before using the world clock, be sure to set the date shooting screen ("On-Screen Information" (=97)). Cover Preliminary Notes and Legal Information Contents: Basic Operations Basic Guide Advanced Guide 1 Camera Basics - Canon PowerShot A2500 Black | User Guide - Page 77
. Checking Certification Logos Some logos for certification requirements met by the camera can be viewed on the screen. Other certification logos are printed in this guide, on the camera packaging, or on the camera body. zzChoose [Certification Logo Display], and then press the button. Display - Canon PowerShot A2500 Black | User Guide - Page 78
76), [Language ] (=14), and [Video System] (=81) - Custom white balance data you have recorded (=51) - Shooting mode (=40) Cover Preliminary Notes and Legal Information Contents: Basic Operations Basic Guide Advanced Guide 1 Camera Basics 2 Smart Auto Mode 3 Other Shooting Modes 4 P Mode 5 Playback - Canon PowerShot A2500 Black | User Guide - Page 79
included accessories effectively and enjoy the camera in more ways with optional Canon accessories and other compatible accessories sold separately Cover Preliminary Notes and Legal Information Contents: Basic Operations Basic Guide Advanced Guide 1 Camera Basics 2 Smart Auto Mode 3 Other Shooting - Canon PowerShot A2500 Black | User Guide - Page 80
to a TV to enjoy playback on the larger TV screen. Interface Cable IFC-400PCU zzFor connecting the camera to a computer or printer. Printers Cover Preliminary Notes and Legal Information Contents: Basic Operations Basic Guide Advanced Guide 1 Camera Basics 2 Smart Auto Mode 3 Other Shooting Modes - Canon PowerShot A2500 Black | User Guide - Page 81
screen of the TV as you control the camera. For details on connection or how to switch inputs, refer to the TV manual. • Some information may not be displayed on the TV (=98). Black or white Yellow Yellow Black 1 Make sure the camera Operations Basic Guide Advanced Guide 1 Camera Basics 2 Smart - Canon PowerShot A2500 Black | User Guide - Page 82
. Doing so could result in malfunction or damage to the product. Cover Preliminary Notes and Legal Information Contents: Basic Operations Basic Guide Advanced Guide 1 Camera Basics 2 Smart Auto Mode 3 Other Shooting Modes 4 P Mode 5 Playback Mode 6 Setting Menu 7 Accessories 8 Appendix Index 82 - Canon PowerShot A2500 Black | User Guide - Page 83
the camera to a printer. On the camera, you can specify images to set up batch printing, prepare orders for photo development services, and prepare orders or print images for photobooks. A Canon SELPHY CP series compact photo printer is used here for the sake of illustration. Screens displayed - Canon PowerShot A2500 Black | User Guide - Page 84
screen at left. 2 Configure the settings. zzPress the buttons to choose an item, and then press the buttons to choose an option. Default Date File No. Both Off Default Off On Red-Eye 1 Matches current printer settings. Prints images with the date added Guide Advanced Guide 1 Camera - Canon PowerShot A2500 Black | User Guide - Page 85
Print Settings" (=84) to access the printing screen, choose [Paper Settings] and press the Options Default Bordered Borderless N-up ID Photo Fixed Size Matches current printer settings. Information Contents: Basic Operations Basic Guide Advanced Guide 1 Camera Basics 2 Smart Auto Mode - Canon PowerShot A2500 Black | User Guide - Page 86
] and [Sequence] cannot be chosen on Canon-brand PictBridge- compatible printers from CP720/CP730 and earlier models. Still Images Adding Images to the Print List (DPOF) Batch printing (=88) and ordering prints from a photo development service can be set up on the camera. Choose up to 998 images on - Canon PowerShot A2500 Black | User Guide - Page 87
or photo development service, in some cases. • [ ] may be displayed on the camera to printing is not available on some Canon-brand PictBridge-compatible printers (sold separately screen. Cover Preliminary Notes and Legal Information Contents: Basic Operations Basic Guide Advanced Guide 1 Camera - Canon PowerShot A2500 Black | User Guide - Page 88
importing images to your computer, also refer to the Software Guide (=17) and the printer manual for further information. Cover Preliminary Notes and Legal Information Contents: Basic Operations Basic Guide Advanced Guide 1 Camera Basics 2 Smart Auto Mode 3 Other Shooting Modes 4 P Mode 5 Playback - Canon PowerShot A2500 Black | User Guide - Page 89
finished, press the button to return to the menu screen. Still Images Adding All Images to a Photobook zzFollowing the procedure in " Cover Preliminary Notes and Legal Information Contents: Basic Operations Basic Guide Advanced Guide 1 Camera Basics 2 Smart Auto Mode 3 Other Shooting Modes 4 - Canon PowerShot A2500 Black | User Guide - Page 90
transfer of images to a computer or uploading to a photo-sharing website. Images are transferred by the Eye-Fi card. Refer to the card's user manual or contact the manufacturer for instructions on preparing and using cards or resolving transfer problems. • When using an Eye-Fi card, keep the - Canon PowerShot A2500 Black | User Guide - Page 91
Eye-Fi card if the write-protect tab is in the locked position. Cover Preliminary Notes and Legal Information Contents: Basic Operations Basic Guide Advanced Guide 1 Camera Basics 2 Smart Auto Mode 3 Other Shooting Modes 4 P Mode 5 Playback Mode 6 Setting Menu 7 Accessories 8 Appendix Index 91 - Canon PowerShot A2500 Black | User Guide - Page 92
when using the camera Troubleshooting 93 On-Screen Messages 95 On-Screen Information 97 Functions and Menu Tables.....99 Handling Precautions 103 Specifications 103 Cover Preliminary Notes and Legal Information Contents: Basic Operations Basic Guide Advanced Guide 1 Camera Basics 2 Smart Auto - Canon PowerShot A2500 Black | User Guide - Page 93
Troubleshooting If you think there is a problem with the camera, first check the following. If the items below do not solve your problem, contact a Canon Customer Support stamps are not added in shooting modes (=99) in which this setting cannot be configured (=35). [h] flashes on the screen when the - Canon PowerShot A2500 Black | User Guide - Page 94
• Set the flash mode to [!] (=34). White dots or similar image artifacts appear in flash shots. • Use the camera to format the memory card, or switch to a card that supports high-speed recording or alter the folder structure. Refer to the Software Guide (=17) for details on folder structure and file - Canon PowerShot A2500 Black | User Guide - Page 95
same time. On the next screen, press the buttons to choose [B], and then supported memory card (=2) and have inserted it facing the correct way, contact a Canon Customer Support camera. Cover Preliminary Notes and Legal Information Contents: Basic Operations Basic Guide Advanced Guide 1 Camera - Canon PowerShot A2500 Black | User Guide - Page 96
• Frequent display of this error message may indicate camera damage. In this case, write down the error number (Exx) and contact a Canon Customer Support Help Desk. File Error • Correct printing (=83) may not be possible for photos from other cameras or images that have been altered using computer - Canon PowerShot A2500 Black | User Guide - Page 97
White balance (= 51) Drive mode (= 52) Eco mode (=35, 57) Self-timer (=33) Camera shake warning (=30) Metering method (= 49) Eye-Fi connection status (=90) Resolution (=36) Recordable shots (= 104) Movie quality (= 37) Remaining time (= 104) Digital An on-screen icon or Guide Advanced Guide 1 Camera - Canon PowerShot A2500 Black | User Guide - Page 98
) ISO speed (=50), Playback speed (=43) Exposure compensation level (= 48) White balance (= 51) Histogram (=62) Image editing (=69 - 71) Resolution (= Notes and Legal Information Contents: Basic Operations Basic Guide Advanced Guide 1 Camera Basics 2 Smart Auto Mode 3 Other Shooting Modes - Canon PowerShot A2500 Black | User Guide - Page 99
) - O O O Eco Mode (=35, 57) On/Off O O O OOOOOOOOOOOOO Screen Display No Information Display O O - OO - O - - - - OOOOO Information Preliminary Notes and Legal Information Contents: Basic Operations Basic Guide Advanced Guide 1 Camera Basics 2 Smart Auto Mode 3 Other Shooting Modes 4 - Canon PowerShot A2500 Black | User Guide - Page 100
(= 48) O O *1 OOOOOOOOOOOOO ISO Speed (=50) O O O OOOOOOOOOOOO - - O O White Balance (=51) O O O OOOOOOOOOOOOO - O - O - OO O Drive Mode (=52) O Notes and Legal Information Contents: Basic Operations Basic Guide Advanced Guide 1 Camera Basics 2 Smart Auto Mode 3 Other Shooting - Canon PowerShot A2500 Black | User Guide - Page 101
OO - O - - - OOOO - O - O O OO - OO - OOOOOOO Digital Zoom (=32) On O O O - OO OOO Off - O O OOOOOOOOOOOOO AF-Point O O OOO - OOOOOOOOO Shooting Mode G I Function PtN Review image after shooting (=59) Off/ Quick/ Display 2 sec./ Operations Basic Guide Advanced Guide 1 Camera Basics 2 - Canon PowerShot A2500 Black | User Guide - Page 102
Search Slideshow Ref. Page = 88 = 86 Ref. Page = 61 = 63 = 64 Cover Preliminary Notes and Legal Information Contents: Basic Operations Basic Guide Advanced Guide 1 Camera Basics 2 Smart Auto Mode 3 Other Shooting Modes 4 P Mode 5 Playback Mode 6 Setting Menu 7 Accessories 8 Appendix Index 102 - Canon PowerShot A2500 Black | User Guide - Page 103
organic solvents to clean the camera or screen. • Use a blower brush to remove dust from the lens. If cleaning is difficult, contact a Canon Customer Support Help Desk. • To prevent condensation from forming on the camera after sudden temperature changes (when the camera is transferred from cold to - Canon PowerShot A2500 Black | User Guide - Page 104
in the table are measured according to Canon standards and may change depending on the subject, memory card and camera settings. • Recording will automatically stop Notes and Legal Information Contents: Basic Operations Basic Guide Advanced Guide 1 Camera Basics 2 Smart Auto Mode 3 Other Shooting - Canon PowerShot A2500 Black | User Guide - Page 105
(41 - 104 °F) • All data is based on tests by Canon. • Camera specifications or appearance are subject to change without notice. USA and Canada Preliminary Notes and Legal Information Contents: Basic Operations Basic Guide Advanced Guide 1 Camera Basics 2 Smart Auto Mode 3 Other Shooting Modes - Canon PowerShot A2500 Black | User Guide - Page 106
Camera Reset all 78 Center (AF frame mode 54 Color (white balance 51 Continuous shooting 52 Creative filters (shooting mode 42 Custom white balance 51 D Date/time Adding and Legal Information Contents: Basic Operations Basic Guide Advanced Guide 1 Camera Basics 2 Smart Auto Mode 3 Other - Canon PowerShot A2500 Black | User Guide - Page 107
Resizing images 69 Resolution (image size 36 Rotating 68 S Screen Display language 14 Icons 97, 98 Menu" FUNC. menu, camera 76 Troubleshooting 93 TV display 81 V Viewing 15 Image search 63 Index display 62 Magnified display 64 Single-image display 15 Slideshow 64 TV display 81 W White - Canon PowerShot A2500 Black | User Guide - Page 108
manual. If such changes or modifications should be made, you could be required to stop operation of the equipment. Canon U.S.A., Inc. One Canon Park, Melville, New York 11747, U.S.A. Tel No. 1-800-OK-CANON (1-800-652-2666). Battery Charger CB-2LF IMPORTANT SAFETY INSTRUCTIONSSAVE THESE INSTRUCTIONS - Canon PowerShot A2500 Black | User Guide - Page 109
the actual equipment. • The above items notwithstanding, Canon accepts no liability for damages due to mistaken operation of the products. Cover Preliminary Notes and Legal Information Contents: Basic Operations Basic Guide Advanced Guide 1 Camera Basics 2 Smart Auto Mode 3 Other Shooting Modes
-
 1
1 -
 2
2 -
 3
3 -
 4
4 -
 5
5 -
 6
6 -
 7
7 -
8
-
9
-
10
-
11
-
12
-
13
-
14
-
15
-
16
-
17
-
18
-
19
-
20
-
21
-
22
-
23
-
24
-
25
-
26
-
27
-
28
-
29
-
30
-
31
-
32
-
33
-
34
-
35
-
36
-
37
-
38
-
39
-
40
-
41
-
42
-
43
-
44
-
45
-
46
-
47
-
48
-
49
-
50
-
51
-
52
-
53
-
54
-
55
-
56
-
57
-
58
-
59
-
60
-
61
-
62
-
63
-
64
-
65
-
66
-
67
-
68
-
69
-
70
-
71
-
72
-
73
-
74
-
75
-
76
-
77
-
78
-
79
-
80
-
81
-
82
-
83
-
84
-
85
-
86
-
87
-
88
-
89
-
90
-
91
-
92
-
93
-
94
-
95
-
96
-
97
-
98
-
99
-
100
-
101
-
102
-
103
-
104
-
105
-
106
-
107
-
108
-
109
 |
 |
Camera User Guide
ENGLISH
©CANON INC. 2013
CDD-E525-010
•
Click the buttons in the lower right to access other pages.
: Next page
: Previous page
: Page before you clicked a link
•
To jump to the beginning of a chapter, click the chapter
title at right.
From chapter title pages, you can access topics by
clicking their titles.
•
Make sure you read this guide, including the “Safety
Precautions” section, before using the camera.
•
Reading this guide will help you learn to use the camera
properly.
•
Store this guide safely so that you can use it in the
future.
1
1
2
3
4
5
6
7
8
Cover
Preliminary Notes and
Legal Information
Contents:
Basic Operations
Advanced Guide
Camera Basics
Smart Auto
Mode
Other Shooting
Modes
P Mode
Setting Menu
Accessories
Appendix
Index
Basic Guide
Playback Mode