Canon PowerShot ELPH 520 HS User Guide - Page 106
Correcting Image Brightness i-Contrast
 |
View all Canon PowerShot ELPH 520 HS manuals
Add to My Manuals
Save this manual to your list of manuals |
Page 106 highlights
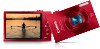
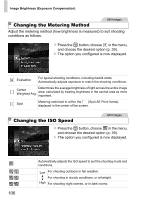
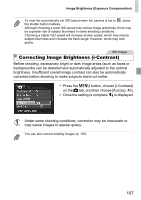
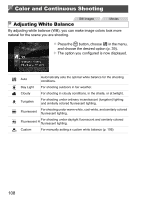
Image Brightness (Exposure Compensation) • To view the automatically set ISO speed when the camera is set to , press the shutter button halfway. • Although choosing a lower ISO speed may reduce image graininess, there may be a greater risk of subject blurriness in some shooting conditions. • Choosing a higher ISO speed will increase shutter speed, which may reduce subject blurriness and increase the flash range. However, shots may look grainy. Still Images Correcting Image Brightness (i-Contrast) Before shooting, excessively bright or dark image areas (such as faces or backgrounds) can be detected and automatically adjusted to the optimal brightness. Insufficient overall image contrast can also be automatically corrected before shooting to make subjects stand out better. z Press the n button, choose [i-Contrast] on the 4 tab, and then choose [Auto] (p. 40). X Once the setting is complete, @ is displayed. • Under some shooting conditions, correction may be inaccurate or may cause images to appear grainy. • You can also correct existing images (p. 155). 107
-
 1
1 -
2
-
3
-
4
-
5
-
6
-
7
-
8
-
9
-
10
-
11
-
12
-
13
-
14
-
15
-
16
-
17
-
18
-
19
-
20
-
21
-
22
-
23
-
24
-
25
-
26
-
27
-
28
-
29
-
30
-
31
-
32
-
33
-
34
-
35
-
36
-
37
-
38
-
39
-
40
-
41
-
42
-
43
-
44
-
45
-
46
-
47
-
48
-
49
-
50
-
51
-
52
-
53
-
54
-
55
-
56
-
57
-
58
-
59
-
60
-
61
-
62
-
63
-
64
-
65
-
66
-
67
-
68
-
69
-
70
-
71
-
72
-
73
-
74
-
75
-
76
-
77
-
78
-
79
-
80
-
81
-
82
-
83
-
84
-
85
-
86
-
87
-
88
-
89
-
90
-
91
-
92
-
93
-
94
-
95
-
96
-
97
-
98
-
99
-
100
-
 101
101 -
 102
102 -
 103
103 -
 104
104 -
 105
105 -
 106
106 -
 107
107 -
 108
108 -
 109
109 -
 110
110 -
 111
111 -
112
-
113
-
114
-
115
-
116
-
117
-
118
-
119
-
120
-
121
-
122
-
123
-
124
-
125
-
126
-
127
-
128
-
129
-
130
-
131
-
132
-
133
-
134
-
135
-
136
-
137
-
138
-
139
-
140
-
141
-
142
-
143
-
144
-
145
-
146
-
147
-
148
-
149
-
150
-
151
-
152
-
153
-
154
-
155
-
156
-
157
-
158
-
159
-
160
-
161
-
162
-
163
-
164
-
165
-
166
-
167
-
168
-
169
-
170
-
171
-
172
-
173
-
174
-
175
-
176
-
177
-
178
-
179
-
180
-
181
-
182
-
183
-
184
-
185
-
186
-
187
-
188
-
189
-
190
-
191
-
192
-
193
-
194
-
195
-
196
-
197
-
198
-
199
-
200
-
201
-
202
-
203
-
204
-
205
-
206
-
207
-
208
-
209
-
210
-
211
-
212
-
213
-
214
-
215
-
216
-
217
 |
 |