Canon PowerShot ELPH 520 HS User Guide - Page 179
Printing Images
 |
View all Canon PowerShot ELPH 520 HS manuals
Add to My Manuals
Save this manual to your list of manuals |
Page 179 highlights
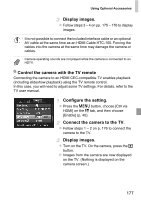
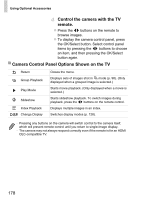
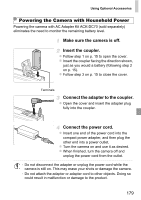
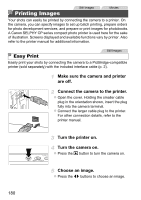
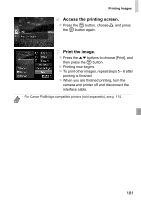
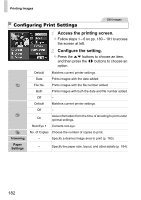
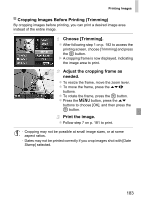
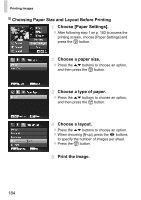
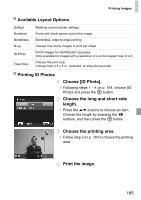
Printing Images Still Images Movies Your shots can easily be printed by connecting the camera to a printer. On the camera, you can specify images to set up batch printing, prepare orders for photo development services, and prepare or print images for photobooks. A Canon SELPHY CP series compact photo printer is used here for the sake of illustration. Screens displayed and available functions vary by printer. Also refer to the printer manual for additional information. Still Images Easy Print Easily print your shots by connecting the camera to a PictBridge-compatible printer (sold separately) with the included interface cable (p. 2). Make sure the camera and printer are off. Connect the camera to the printer. z Open the cover. Holding the smaller cable plug in the orientation shown, insert the plug fully into the camera terminal. z Connect the larger cable plug to the printer. For other connection details, refer to the printer manual. Turn the printer on. Turn the camera on. z Press the 1 button to turn the camera on. Choose an image. z Press the qr buttons to choose an image. 180
-
 1
1 -
2
-
3
-
4
-
5
-
6
-
7
-
8
-
9
-
10
-
11
-
12
-
13
-
14
-
15
-
16
-
17
-
18
-
19
-
20
-
21
-
22
-
23
-
24
-
25
-
26
-
27
-
28
-
29
-
30
-
31
-
32
-
33
-
34
-
35
-
36
-
37
-
38
-
39
-
40
-
41
-
42
-
43
-
44
-
45
-
46
-
47
-
48
-
49
-
50
-
51
-
52
-
53
-
54
-
55
-
56
-
57
-
58
-
59
-
60
-
61
-
62
-
63
-
64
-
65
-
66
-
67
-
68
-
69
-
70
-
71
-
72
-
73
-
74
-
75
-
76
-
77
-
78
-
79
-
80
-
81
-
82
-
83
-
84
-
85
-
86
-
87
-
88
-
89
-
90
-
91
-
92
-
93
-
94
-
95
-
96
-
97
-
98
-
99
-
100
-
101
-
102
-
103
-
104
-
105
-
106
-
107
-
108
-
109
-
110
-
111
-
112
-
113
-
114
-
115
-
116
-
117
-
118
-
119
-
120
-
121
-
122
-
123
-
124
-
125
-
126
-
127
-
128
-
129
-
130
-
131
-
132
-
133
-
134
-
135
-
136
-
137
-
138
-
139
-
140
-
141
-
142
-
143
-
144
-
145
-
146
-
147
-
148
-
149
-
150
-
151
-
152
-
153
-
154
-
155
-
156
-
157
-
158
-
159
-
160
-
161
-
162
-
163
-
164
-
165
-
166
-
167
-
168
-
169
-
170
-
171
-
172
-
173
-
 174
174 -
 175
175 -
 176
176 -
 177
177 -
 178
178 -
 179
179 -
 180
180 -
 181
181 -
 182
182 -
 183
183 -
 184
184 -
185
-
186
-
187
-
188
-
189
-
190
-
191
-
192
-
193
-
194
-
195
-
196
-
197
-
198
-
199
-
200
-
201
-
202
-
203
-
204
-
205
-
206
-
207
-
208
-
209
-
210
-
211
-
212
-
213
-
214
-
215
-
216
-
217
 |
 |