Canon PowerShot ELPH 520 HS User Guide - Page 64
Choose the name of the person to, overwrite., Access the face info screen., Choose the face info
 |
View all Canon PowerShot ELPH 520 HS manuals
Add to My Manuals
Save this manual to your list of manuals |
Page 64 highlights
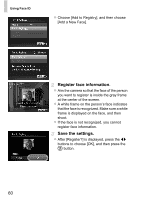
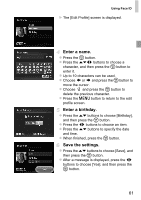
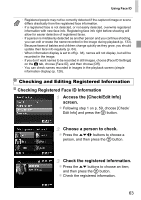
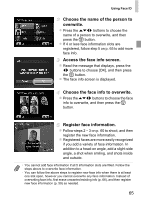
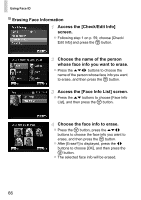
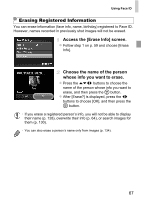
Using Face ID Choose the name of the person to overwrite. z Press the opqr buttons to choose the name of a person to overwrite, and then press the m button. z If 4 or less face information slots are registered, follow step 5 on p. 65 to add more face info. Access the face info screen. z Read the message that displays, press the qr buttons to choose [OK], and then press the m button. z The face info screen is displayed. Choose the face info to overwrite. z Press the opqr buttons to choose the face info to overwrite, and then press the m button. Register face information. z Follow steps 2 - 3 on p. 60 to shoot, and then register the new face information. z Registered faces are more easily recognized if you add a variety of face information. In addition to a head-on angle, add a slight side angle, a shot when smiling, and shots inside and outside. • You cannot add face information if all 5 information slots are filled. Follow the steps above to overwrite face information. • You can follow the above steps to register new face info when there is at least one slot open, however you cannot overwrite any face information. Instead of overwriting face info, first erase unwanted existing info (p. 66), and then register new face information (p. 59) as needed. 65
-
 1
1 -
2
-
3
-
4
-
5
-
6
-
7
-
8
-
9
-
10
-
11
-
12
-
13
-
14
-
15
-
16
-
17
-
18
-
19
-
20
-
21
-
22
-
23
-
24
-
25
-
26
-
27
-
28
-
29
-
30
-
31
-
32
-
33
-
34
-
35
-
36
-
37
-
38
-
39
-
40
-
41
-
42
-
43
-
44
-
45
-
46
-
47
-
48
-
49
-
50
-
51
-
52
-
53
-
54
-
55
-
56
-
57
-
58
-
 59
59 -
 60
60 -
 61
61 -
 62
62 -
 63
63 -
 64
64 -
 65
65 -
 66
66 -
 67
67 -
 68
68 -
 69
69 -
70
-
71
-
72
-
73
-
74
-
75
-
76
-
77
-
78
-
79
-
80
-
81
-
82
-
83
-
84
-
85
-
86
-
87
-
88
-
89
-
90
-
91
-
92
-
93
-
94
-
95
-
96
-
97
-
98
-
99
-
100
-
101
-
102
-
103
-
104
-
105
-
106
-
107
-
108
-
109
-
110
-
111
-
112
-
113
-
114
-
115
-
116
-
117
-
118
-
119
-
120
-
121
-
122
-
123
-
124
-
125
-
126
-
127
-
128
-
129
-
130
-
131
-
132
-
133
-
134
-
135
-
136
-
137
-
138
-
139
-
140
-
141
-
142
-
143
-
144
-
145
-
146
-
147
-
148
-
149
-
150
-
151
-
152
-
153
-
154
-
155
-
156
-
157
-
158
-
159
-
160
-
161
-
162
-
163
-
164
-
165
-
166
-
167
-
168
-
169
-
170
-
171
-
172
-
173
-
174
-
175
-
176
-
177
-
178
-
179
-
180
-
181
-
182
-
183
-
184
-
185
-
186
-
187
-
188
-
189
-
190
-
191
-
192
-
193
-
194
-
195
-
196
-
197
-
198
-
199
-
200
-
201
-
202
-
203
-
204
-
205
-
206
-
207
-
208
-
209
-
210
-
211
-
212
-
213
-
214
-
215
-
216
-
217
 |
 |