Canon PowerShot G10 Software Starter Guide
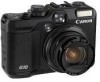
Canon PowerShot G10 - Digital Camera - Compact Manual
 |
UPC - 013803100075
View all Canon PowerShot G10 manuals
Add to My Manuals
Save this manual to your list of manuals |
Canon PowerShot G10 manual content summary:
- Canon PowerShot G10 | Software Starter Guide - Page 1
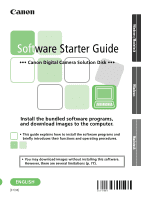
Canon Digital Camera Solution Disk ••• Install the bundled software programs, and download images to the computer. • This guide explains how to install the software programs and briefly introduces their functions and operating procedures. • You may download images without installing this software - Canon PowerShot G10 | Software Starter Guide - Page 2
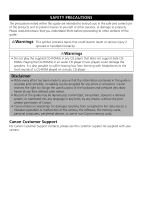
The precautions noted within this guide are intended to instruct you in the safe and guide. Warnings This symbol indicates topics that could lead to death or serious injury if ignored or handled incorrectly. Warnings • Do not play the supplied CD-ROM(s) in any CD player that does not support - Canon PowerShot G10 | Software Starter Guide - Page 3
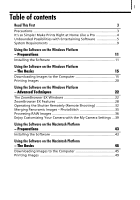
1 Table of contents Read This First 3 Precautions 3 It's so Simple! Make Prints Right at Home Like a Pro 4 Unbounded Possibilities with Entertaining Software 5 System Requirements 9 Using the Software on the Windows Platform - Preparations 11 Installing the Software 11 Using the - Canon PowerShot G10 | Software Starter Guide - Page 4
72 Troubleshooting 73 Downloading Images without Installing the Software 77 Index 78 Using the PDF Manuals The following PDF manuals are User Guide (Windows) • ImageBrowser Software User Guide (Macintosh) Adobe Reader must be installed to read the aforementioned manuals. These manuals are - Canon PowerShot G10 | Software Starter Guide - Page 5
may vary slightly from those shown. • The following terms are used in this guide. Mac OS X is used for Mac OS X (v10.4-v10.5) Precautions they are in standby (sleep) mode. Please refer to your computer manual for instructions regarding the standby (sleep) mode. • You are recommended to use an - Canon PowerShot G10 | Software Starter Guide - Page 6
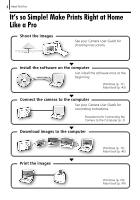
4 Read This First It's so Simple! Make Prints Right at Home Like a Pro Shoot the images See your Camera User Guide for shooting instructions. Install the software on the computer Just install the software once at the beginning. Windows (p. 11) Macintosh (p. 43) Connect the camera to the computer - Canon PowerShot G10 | Software Starter Guide - Page 7
5 Unbounded Possibilities with Entertaining Software ZoomBrowser EX (Windows)/ImageBrowser (Macintosh) Versatile image management software for downloading images, editing still images and movies, and printing. Experiment with diverse printing techniques Print a variety of layouts. Change paper sizes - Canon PowerShot G10 | Software Starter Guide - Page 8
6 Read This First Operate the Camera Shutter from the Computer (Remote Shooting) Shoot and control the camera's shutter from a computer. You can save the recorded images directly to the computer. (Certain models only) Windows (p. 32) Macintosh (p. 61) Enjoy Customizing Your Camera (My Camera) Set - Canon PowerShot G10 | Software Starter Guide - Page 9
7 PhotoStitch (Windows/Macintosh) A program for merging multiple images into dramatic panoramas. Stitch a Panorama Together Windows (p. 35) Macintosh (p. 64) - Canon PowerShot G10 | Software Starter Guide - Page 10
8 Read This First - Canon PowerShot G10 | Software Starter Guide - Page 11
OS Computer Model CPU Still Images Movies RAM Still Images Movies Interface Free Hard Disk Space Display Windows Vista (including Service Pack 1) Windows XP Service Pack 2 The above OS should be pre-installed on computers with built-in USB ports. Windows Vista: Windows XP: Pentium - Canon PowerShot G10 | Software Starter Guide - Page 12
10 Read This First If you will be using Digital Photo Professional, check the "Processing Raw Images" section also (Windows, p. 36; Macintosh, p. 65) (certain models only). • A CD-ROM drive is required to install the software. • Even when system requirements are met, not all computer functions can - Canon PowerShot G10 | Software Starter Guide - Page 13
11 Using the Software on the Windows Platform - Preparations This chapter explains how to install the software. Read this before connecting the camera to the computer for the first time. Installing the Software Start by installing the software from the Canon Digital Camera Solution Disk. • Install - Canon PowerShot G10 | Software Starter Guide - Page 14
the Canon Digital Camera Solution Disk in the computer's CD-ROM drive. If the [User Account Control] window appears, follow the on-screen instructions to proceed. If the installer panel does not appear automatically, use the following procedures. How to Display the Installer Panel Use the following - Canon PowerShot G10 | Software Starter Guide - Page 15
7 Click [Yes] if you agree to all of the terms of the software license agreement. The installation will start. Follow the on-screen instructions to proceed with the installation. Click [Yes] if a dialog confirming the installation of Microsoft .Net Framework displays. 8 When the installation is over - Canon PowerShot G10 | Software Starter Guide - Page 16
14 Using the Software on the Windows Platform - Preparations 9 Remove the disk from the CD-ROM drive when your normal desktop screen appears after restarting. This concludes the software installation. See Uninstalling the Software (p. 71) to delete the installed programs. To ensure security on - Canon PowerShot G10 | Software Starter Guide - Page 17
for connecting the camera to the computer and placing the camera in the correct mode for connecting vary between camera models. See the Camera User Guide. - Canon PowerShot G10 | Software Starter Guide - Page 18
16 Using the Software on the Windows Platform - The Basics 2 Select [Canon CameraWindow] when a dialog (Events dialog) similar to that on the right displays and click [OK]. In Windows Vista, select [Downloads Images From Canon Camera using Canon CameraWindow] from the AutoPlay dialog. Your camera - Canon PowerShot G10 | Software Starter Guide - Page 19
Direct Transfer settings menu will appear on the LCD monitor and the (Print/Share) button will light blue. • See the Camera User Guide for instructions regarding Direct Transfer settings and procedures. Set the Direct Transfer settings on the camera and press the (Print/Share) button or the FUNC - Canon PowerShot G10 | Software Starter Guide - Page 20
Connection 1 Insert the memory card into the reader. Use a separately sold card adapter if required. See the manual for the memory card reader for its connection and handling instructions. 2 Select [View/Download Images using Canon ZoomBrowser EX] when the dialog to the right appears and click - Canon PowerShot G10 | Software Starter Guide - Page 21
19 3 Click [Download Images]. You can adjust the settings, such as the type of image downloaded and the destination folder, by clicking [Preferences]. • By default, all the images that have yet to be downloaded will download to the [Pictures] or [My Pictures] folder. • To download images that have - Canon PowerShot G10 | Software Starter Guide - Page 22
20 Using the Software on the Windows Platform - The Basics Printing Images There are three methods for using ZoomBrowser EX to print images: [Photo Print], [Index Print] and [Print Using Other Software]. This section explains how to use the [Photo Print] option. • Movies cannot be printed, but you - Canon PowerShot G10 | Software Starter Guide - Page 23
21 3 Click [2. Printer and Layout Settings] and adjust the categories as you feel necessary. Text can be inserted here to print with this photo. Selects the printer and the paper size etc. Selects a printing method for the shooting date/time information. Sets the number of print copies. 4 Click - Canon PowerShot G10 | Software Starter Guide - Page 24
22 Using the Software on the Windows Platform - Advanced Techniques This chapter explains various ZoomBrowser EX features. Proceed to this chapter once you have mastered the basic ZoomBrowser EX procedures in the Using the Software on the Windows Platform - The Basics chapter. The ZoomBrowser EX - Canon PowerShot G10 | Software Starter Guide - Page 25
23 Task Buttons • ZoomBrowser EX's tasks are arranged here like an index. • Click a Task button to carry out the desired task. These features are described in ZoomBrowser EX Features (p. 28) Folders Area • Use this area to select folders. The selected folders and the images within the selected - Canon PowerShot G10 | Software Starter Guide - Page 26
24 Using the Software on the Windows Platform - Advanced Techniques Display Mode • Selects the display style for the Browser Area. Zoom Mode Displays all the images in a folder as thumbnail images. This mode is convenient for searching for images since many can be displayed at once. If additional - Canon PowerShot G10 | Software Starter Guide - Page 27
25 Display Control Panel • This panel adjusts the display settings for the Browser Area. Selection Menu Click this to select/deselect all images in the Browser Area. Fit to Window Display Size Changes the thumbnail size to Changes the size of the fit them into the window. thumbnail in the - Canon PowerShot G10 | Software Starter Guide - Page 28
26 Using the Software on the Windows Platform - Advanced Techniques Viewer Window Double-click an image in the Browser Area to display it in the Viewer Window. Edit Menu You can edit, eliminating red eyes, adjusting colors and brightness, cropping and inputting titles. You can also use it to - Canon PowerShot G10 | Software Starter Guide - Page 29
27 Properties Window The Properties Window displays when you select an image in the Browser Area and click the Properties button. The Properties Window does not display in the Preview Mode. Shows or hides categories. File Name The file name can be changed. Star Rating and My Category Sets the - Canon PowerShot G10 | Software Starter Guide - Page 30
models. Check the Specifications section of your Camera User Guide to see if your model supports them. Workflow The following workflow is used in ZoomBrowser procedures according to the instructions. Summary of the procedures for this step Steps to follow Procedural instructions Return to Main Menu - Canon PowerShot G10 | Software Starter Guide - Page 31
the camera owner's name. Connect to EOS Camera This can only be used with EOS series cameras. For details on this function, see the user guide for your camera. (Windows XP only) Acquire Images from Memory Card Downloads images and sound files from a memory card (p. 18). You can also select images - Canon PowerShot G10 | Software Starter Guide - Page 32
30 Using the Software on the Windows Platform - Advanced Techniques Edit Edit Image Allows you to perform image editing, such as cropping, image correction, inserting comments, and red-eye correction. You can also use it to start other image editing programs. Stitch Photos Merges multiple images and - Canon PowerShot G10 | Software Starter Guide - Page 33
31 Print & Email Photo Print Prints one image per page (p. 20). You can print "photos" easily. Index Print Lines up small versions of the images in rows and prints. Print Using Other Software Select the software to use and then print. Email Images Converts the selected images to the appropriate size - Canon PowerShot G10 | Software Starter Guide - Page 34
the camera to the computer and placing it in the correct mode for connecting vary between camera models. Please refer to the Camera User Guide. 2 Click [Cancel] ( in Windows Vista) to close the Events Dialog (or the slide show screen) if it appears. If CameraWindow appears, click [Operate Images - Canon PowerShot G10 | Software Starter Guide - Page 35
33 3 In the [Start] menu, select [All Programs] or [Programs], followed by [Canon Utilities], [CameraWindow], [RemoteCapture DC 3] and [RemoteCapture DC]. According to the default settings, recorded images are saved into the [Pictures] or [My Pictures] folder. To change the destination, open the [ - Canon PowerShot G10 | Software Starter Guide - Page 36
34 Using the Software on the Windows Platform - Advanced Techniques Shows/Hides the viewfinder or detailed settings area. You can add comments to images by placing a check mark here and typing text in the boxes below. Size and Resolution Selector Selects the size and resolution at which images are - Canon PowerShot G10 | Software Starter Guide - Page 37
size and orientation. You can also manually specify the overlapping areas. 1 Click 3 Click [2. Open PhotoStitch]. Instructions 4 Merge the images following the instructions in the guidance panel at camera models may not support Stitch Assist mode. • See the Camera User Guide for information about - Canon PowerShot G10 | Software Starter Guide - Page 38
as one of the data types in the Specifications section of the Camera User Guide. • Only RAW images compatible with Digital Photo Professional can be converted. Be sure CPU: Core 2 Duo or better • You can download a PDF manual from the Canon website that explains in detail how to use Digital Photo - Canon PowerShot G10 | Software Starter Guide - Page 39
37 4 Adjust the image brightness and white balance in the tool palette. The modified contents (the information for image processing requirements) are saved along with the image as a "recipe". The items available to be modified differ depending on the camera model. You can adjust all three RGB - Canon PowerShot G10 | Software Starter Guide - Page 40
38 Using the Software on the Windows Platform - Advanced Techniques Printing Images Digital Photo Professional offers the following printing methods. Single Print (Auto Settings) After selecting an image in the Main Window, click the [File] menu and select [Print]. With this method you can - Canon PowerShot G10 | Software Starter Guide - Page 41
My Camera functions are only available with camera models listed as compatible with My Camera functions in the Specifications section of the Camera User Guide. • To register the My Camera settings with the camera, ensure that you install the software that came with the camera. •Do not break the - Canon PowerShot G10 | Software Starter Guide - Page 42
the settings saved to the computer. [Delete] Button Deletes settings from the computer. 8 Changing the My Camera settings with the camera. See the Camera Users Guide. [Save to PC] Button Saves settings files registered with the camera to the computer. - Canon PowerShot G10 | Software Starter Guide - Page 43
Data] button. My Camera Maker will start. Add File Button Adds images and sound files for use as settings files in the list. 3 Follow the instructions at the top part of the My Camera Maker window and create image or sound files. The created settings files automatically appear in the My - Canon PowerShot G10 | Software Starter Guide - Page 44
42 Using the Software on the Windows Platform - Advanced Techniques Use the following settings to create start-up images or start-up sounds using image editing software or sound processing software. • Start-Up Images Image Type Data Sampling Resolution (WxH) : JPEG (Baseline JPEG) : 4:2:0 or - Canon PowerShot G10 | Software Starter Guide - Page 45
43 Using the Software on the Macintosh Platform - Preparations This chapter explains how to install the software. Read this before connecting the camera to the computer for the first time. Installing the Software Start by installing the software from the Canon Digital Camera Solution Disk. Items to - Canon PowerShot G10 | Software Starter Guide - Page 46
if you agree to all of the terms of the software license agreement. 7 Review the installation settings and click [Next]. Follow the on-screen instructions to proceed with the installation. 8 When the installation is over, click [Finish]. 9 Click [Exit] in the installer panel and remove the disk from - Canon PowerShot G10 | Software Starter Guide - Page 47
for attaching the camera to the computer and placing the camera in the correct mode for connecting vary between camera models. See the Camera User Guide. - Canon PowerShot G10 | Software Starter Guide - Page 48
Direct Transfer settings menu will appear on the LCD monitor and the (Print/Share) button will light blue. • See the Camera User Guide for instructions regarding Direct Transfer settings and procedures. Set the Direct Transfer settings on the camera and press the (Print/Share) button or the FUNC - Canon PowerShot G10 | Software Starter Guide - Page 49
47 Using the Computer to Download Images Click [Transfer Untransferred Images]. CameraWindow Click this button to close the start screen. Thumbnail Window View Window • To download images that have had transfer settings set with the camera, use the camera or a memory card reader (p. 48). • To - Canon PowerShot G10 | Software Starter Guide - Page 50
Platform - The Basics Memory Card Reader Connection 1 Insert the memory card into the reader. Use a separately sold card adapter if required. See the manual for the memory card reader for details on how to connect and use the reader. 2 Click [Download Images]. You can adjust the settings, such - Canon PowerShot G10 | Software Starter Guide - Page 51
49 Printing Images There are three methods for using ImageBrowser to print images: [Photo Print], [Index Print] and [Layout Print]. This section explains how to use the [Photo Print] option. Movies cannot be printed, but you can print still images saved from movies. Photo Print Prints one image on - Canon PowerShot G10 | Software Starter Guide - Page 52
50 Using the Software on the Macintosh Platform - The Basics 3 Set the categories as you feel necessary. Selects a printer. Selects options such as the paper size and orientation when you click [Page Setup]. Selects a printing method for the shooting date/time information. Click this button to - Canon PowerShot G10 | Software Starter Guide - Page 53
51 Using the Software on the Macintosh Platform - Advanced Techniques This chapter explains various ImageBrowser features. Proceed to this chapter once you have mastered the basic ImageBrowser procedures in the Using the Software on the Macintosh Platform - The Basics chapter. The ImageBrowser - Canon PowerShot G10 | Software Starter Guide - Page 54
52 Using the Software on the Macintosh Platform - Advanced Techniques Folders Area • Use this area to select folders. The selected folders and the images within the selected folders display in the Browser Area. • If you selected Favorite Folders, only the folders registered in advance as Favorite - Canon PowerShot G10 | Software Starter Guide - Page 55
53 Display Mode • Selects the display style for the Browser Area. Preview Mode This mode displays the image at a larger size as well as the image information. List Mode Displays the images in the folder selected in the Explorer Panel section in rows and columns. - Canon PowerShot G10 | Software Starter Guide - Page 56
54 Using the Software on the Macintosh Platform - Advanced Techniques Display Control Panel • This panel adjusts the display settings for the Browser Area. Display Size Changes the size of the thumbnail in the Browser Area. Selection Menu Click this to select/deselect all images in the Browser - Canon PowerShot G10 | Software Starter Guide - Page 57
55 Viewer Window Double-click an image in the Browser Area to display it in the Viewer Window. Zoom Changes the image zoom setting. Image Selector Button Switches between images. Save Button Saves the edited image. Edit Menu You can edit, eliminating red eyes, adjusting colors and brightness, - Canon PowerShot G10 | Software Starter Guide - Page 58
56 Using the Software on the Macintosh Platform - Advanced Techniques File Information Window The File Information Window displays when you select an image in the Browser Area, click the [File] menu and select [Get Info]. The File Information Window does not display in the Preview display mode. - Canon PowerShot G10 | Software Starter Guide - Page 59
features. Some ImageBrowser functions may not be available with certain camera models. Check the Specifications section of your Camera User Guide to see if your model supports them. Workflow The following workflow is used in ImageBrowser. 1 Select a feature from the Control Panel or the menu. Menu - Canon PowerShot G10 | Software Starter Guide - Page 60
58 Using the Software on the Macintosh Platform - Advanced Techniques Control Panel Features Canon Camera CameraWindow will display if the camera is connected, and you will be able to perform the following actions. Acquire Images Downloads images and sound files from the camera (p. 45) . Print - Canon PowerShot G10 | Software Starter Guide - Page 61
59 Print & Email Photo Print Prints one image per page (p. 49). You can print "photos" easily. Index Print Lines up small versions of the images in rows and prints. Layout Print Allows you to freely arrange multiple images on a single page and print. You can also insert captions and titles. Create - Canon PowerShot G10 | Software Starter Guide - Page 62
60 Using the Software on the Macintosh Platform - Advanced Techniques Display Settings: [View] menu, [View Settings] Hides or shows image information beneath the thumbnail, such as the file name or the shooting date and time. Sort Images: [View] menu, [Sort] Arranges image order in the Browser Area - Canon PowerShot G10 | Software Starter Guide - Page 63
compatible with remote shooting in the Specifications section of the Camera User Guide. 1 Attach the supplied interface cable to the computer's USB port connecting vary between camera models. Please refer to the Camera User Guide. 2 If CameraWindow appears, click [Operate Images on Camera] followed - Canon PowerShot G10 | Software Starter Guide - Page 64
62 Using the Software on the Macintosh Platform - Advanced Techniques 3 Double-click the [Applications] folder, followed by the [Canon Utilities] folder, [CameraWindow] folder and the [RemoteCapture DC] icon. According to the default settings, recorded images are saved into the [Pictures] folder. - Canon PowerShot G10 | Software Starter Guide - Page 65
Shows/Hides the viewfinder or detailed settings area. You can add comments to images by placing a check mark here and typing text in the boxes below. Viewfinder Display Click the [Start/Stop Viewfinder] button while a connection to the camera is open to display the image appearing in the camera's - Canon PowerShot G10 | Software Starter Guide - Page 66
manually specify the overlapping areas. 1 Select a series of images in the ImageBrowser's Browser Area. 2 Click the [Edit] menu and select [PhotoStitch]. Instructions 3 Merge the images following the instructions models may not support Stitch Assist mode. • See the Camera User Guide for information - Canon PowerShot G10 | Software Starter Guide - Page 67
RAW as one of the data types in the Specifications section of the Camera User Guide. • Only RAW images compatible with Digital Photo Professional can be converted. Be sure CPU: Core 2 Duo or better • You can download a PDF manual from the Canon website that explains in detail how to use Digital Photo - Canon PowerShot G10 | Software Starter Guide - Page 68
66 Using the Software on the Macintosh Platform - Advanced Techniques 4 Adjust the image brightness and white balance in the tool palette. The modified contents (the information for image processing requirements) are saved along with the image as a "recipe". The items available to be modified differ - Canon PowerShot G10 | Software Starter Guide - Page 69
67 Printing Images Digital Photo Professional offers the following printing methods. Single Print (Auto Settings) After selecting an image in the Main Window, click the [File] menu and select [Print]. With this method you can automatically lay out a single image on a single sheet of paper and print - Canon PowerShot G10 | Software Starter Guide - Page 70
My Camera functions can are only available with camera models listed as compatible with My Camera functions in the Specifications section of the Camera User Guide. • To register the My Camera settings with the camera, ensure that you install the software that came with the camera. •Do not break the - Canon PowerShot G10 | Software Starter Guide - Page 71
saved to the computer. [Send to Trash] Button Deletes settings from the computer. 8 Changing the My Camera settings with the camera. See the Camera Users Guide. - Canon PowerShot G10 | Software Starter Guide - Page 72
70 Using the Software on the Macintosh Platform - Advanced Techniques Adding Original Start-Up Images or Sounds You can add original start-up images or sounds created with image editing and other software to the My Camera Window. Sound files are saved as WAVE-type files. 1 Double-click the [ - Canon PowerShot G10 | Software Starter Guide - Page 73
71 Appendices This chapter explains how to uninstall the programs. Read the Troubleshooting section in this chapter if you experience a problem using the programs. Uninstalling the Software The procedures for uninstalling the software are only required when you wish to delete the programs from your - Canon PowerShot G10 | Software Starter Guide - Page 74
72 Appendices Memory Card Folder Structure The images on a memory card are placed in subfolders of the [DCIM] folder labeled [xxxCANON], where the "xxx" represents a number in the range 100 - 999. DCIM xxxCANON IMG_xxxx.JPG (JPEG images) _MG_xxxx.JPG (JPEG images recorded in the Adobe RGB color - Canon PowerShot G10 | Software Starter Guide - Page 75
Troubleshooting Please read this section if you encounter a problem using the software. Start by Checking This Investigate the following points first if you encounter a problem the playback mode to transfer data. See the Camera User Guide for details. Is the battery sufficiently charged? Check the - Canon PowerShot G10 | Software Starter Guide - Page 76
. Cannot download images or shoot remotely. (For cameras connected to the computer via an interface cable: only cameras supporting Hi-Speed USB 2.0). The problem may be resolved by lowering the transmission speed for data by following the procedures below. Solution: Hold the MENU button on - Canon PowerShot G10 | Software Starter Guide - Page 77
or [Canon Camera] will display in these categories if it is being recognized as an "other" device. There are other potential reasons for the problem if the "Other devices", "Portable Devices" or "Imaging devices" categories do not appear or your camera model name or [Canon Camera] does not appear - Canon PowerShot G10 | Software Starter Guide - Page 78
] tab. Windows XP: Click the [Appearance and Theme] icon, followed by the [Display] icon, [Settings] tab, [Advanced] button and [Troubleshoot] tab. 3. Set the [Hardware acceleration] to a setting below [Full] and click [OK]. 4. Restart the computer if prompted. An error message "Insufficient - Canon PowerShot G10 | Software Starter Guide - Page 79
position. • The protection setting for images protected in the camera may be lost when transferred to the computer. • In addition, there may be problems with downloading images or image information correctly depending upon the version of the operating system in use, the file size or the software in - Canon PowerShot G10 | Software Starter Guide - Page 80
78 Index Index A Adobe Reader 2 B Browser Area Macintosh Windows 5212,, 52 23 Browser Window 51 C CameraWindow Macintosh Windows 4166,, 4177,, 6312,, 68 39 Canon Digital Camera Solution Disk ........ 10 Macintosh 43 Windows 11 Comment Macintosh 56 Windows 27 Computer - Canon PowerShot G10 | Software Starter Guide - Page 81
Operating the Shutter Remotely 6 Macintosh 61 Windows 32 P PDF Manuals 2 PhotoStitch 7 Macintosh 64 Windows 35 Playing Movies Macintosh 55 Windows 18 ThuMWmbaincndianoitlwoWsshi.n....d..o....w 4166,, 4177,, 6312,, 68 39 Troubleshooting 73 U Uninstalling Software 71 - Canon PowerShot G10 | Software Starter Guide - Page 82
80 Index V View Window Macintosh Windows 4166,, 4177,, 6312,, 68 39 Viewer Window Macintosh 55 Windows 26 Z ZoomBrowser EX 5, 10, 15 Ver. 2/3 10 - Canon PowerShot G10 | Software Starter Guide - Page 83
CDI-E381-010 xxxxxxxx © CANON INC. 2008 PRINTED IN JAPAN
-
 1
1 -
 2
2 -
 3
3 -
 4
4 -
 5
5 -
 6
6 -
 7
7 -
8
-
9
-
10
-
11
-
12
-
13
-
14
-
15
-
16
-
17
-
18
-
19
-
20
-
21
-
22
-
23
-
24
-
25
-
26
-
27
-
28
-
29
-
30
-
31
-
32
-
33
-
34
-
35
-
36
-
37
-
38
-
39
-
40
-
41
-
42
-
43
-
44
-
45
-
46
-
47
-
48
-
49
-
50
-
51
-
52
-
53
-
54
-
55
-
56
-
57
-
58
-
59
-
60
-
61
-
62
-
63
-
64
-
65
-
66
-
67
-
68
-
69
-
70
-
71
-
72
-
73
-
74
-
75
-
76
-
77
-
78
-
79
-
80
-
81
-
82
-
83
 |
 |

Windows/Macintosh
Windows
Macintosh
• This guide explains how to install the software programs and
briefly introduces their functions and operating procedures.
• You may download images without installing this software.
However, there are several limitations (p. 77).
Install the bundled software programs,
and download images to the computer.
[37/38]
••• Canon Digital Camera Solution Disk •••
Soft
ware Starter Guide
ENGLISH