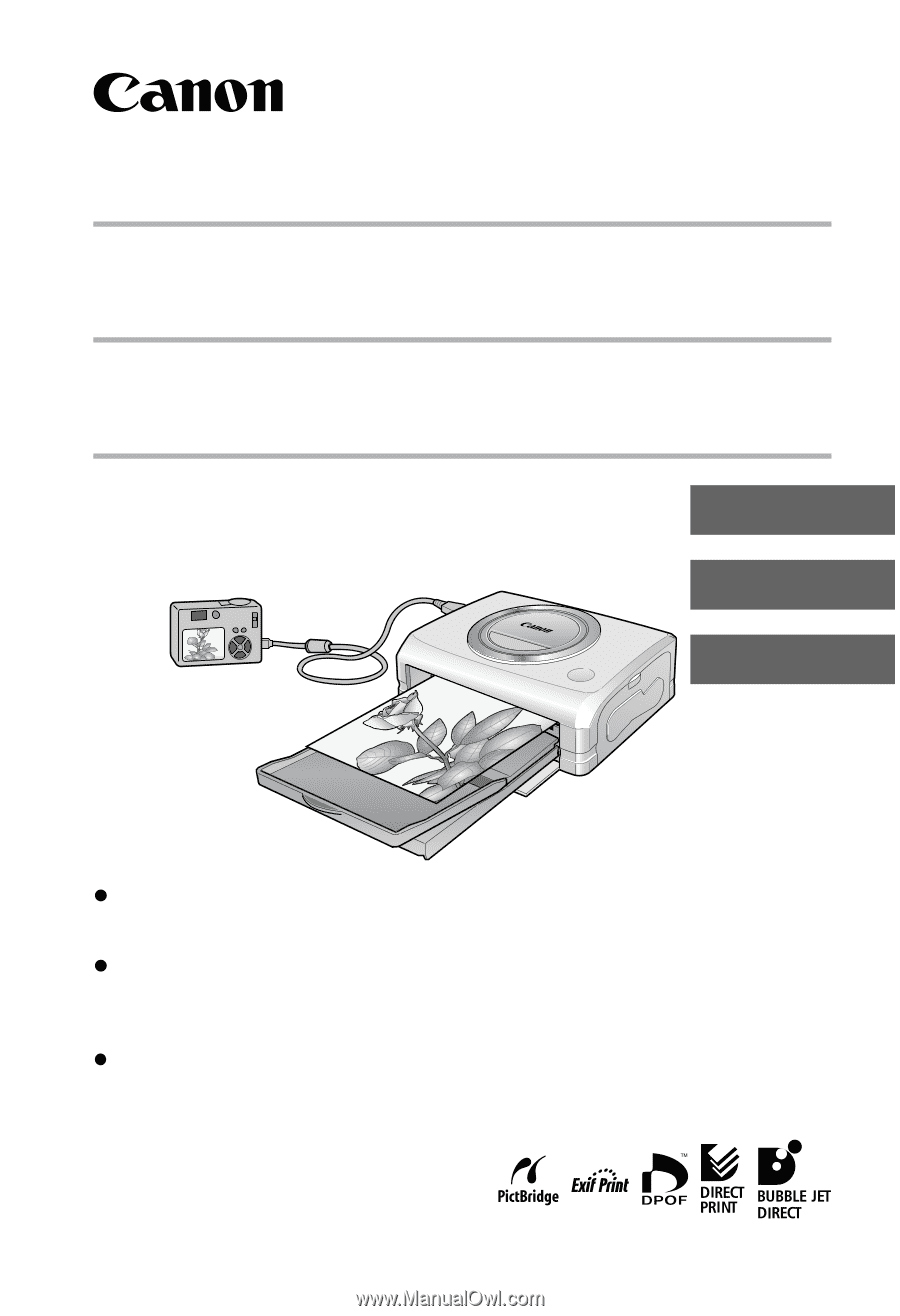
Canon PowerShot S1 IS Direct Print User Guide
Canon PowerShot S1 IS Manual
 |
View all Canon PowerShot S1 IS manuals
Add to My Manuals
Save this manual to your list of manuals |
Canon PowerShot S1 IS manual content summary:
- Canon PowerShot S1 IS | Direct Print User Guide - Page 1
ÇAIS ESPAÑOL z Depending on your camera model, some printing instructions may also be included in the Camera User Guide. However, you must read this guide as well for complete printing instructions. z Selon le modèle d'appareil photo, certaines instructions d'impression peuvent aussi se trouver dans - Canon PowerShot S1 IS | Direct Print User Guide - Page 2
- Canon PowerShot S1 IS | Direct Print User Guide - Page 3
Direct Print User Guide Printing Using a Direct Camera/Printer Connection ENGLISH - Canon PowerShot S1 IS | Direct Print User Guide - Page 4
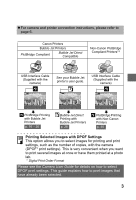
Canon Direct Print Compatible Cable LCD Monitor Display USB Interface Cable*2 (Supplied with the camera) Canon Direct Printing with CP Printers p. 8 - 15 *1 When connecting a Non-Canon PictBridge Compliant camera, please refer to the camera's user guide. *2 CP-100/CP-10: Direct Interface Cable - Canon PowerShot S1 IS | Direct Print User Guide - Page 5
printer connection instructions, please refer to page 6. Canon Printers Bubble Jet Printers PictBridge Compliant Bubble Jet Direct Compatible Non-Canon PictBridge Compliant Printers*3 USB Interface Cable (Supplied with the camera) See your Bubble Jet printer's user guide. USB Interface Cable - Canon PowerShot S1 IS | Direct Print User Guide - Page 6
contained in this guide is accurate and complete, no liability can be accepted for any errors or omissions. z Canon makes no warranties for damages resulting from corrupted or lost data due to a mistaken operation or malfunction of the camera, the software, the memory cards, personal computers - Canon PowerShot S1 IS | Direct Print User Guide - Page 7
your camera. z For details regarding the printer connection settings, refer to the user guide that came with it. Printing Use the camera controls to connections between Canon printers and cameras, please refer to the following URL: http://web.canon.jp/Imaging/BeBit-e.html http://www.canon.com/ - Canon PowerShot S1 IS | Direct Print User Guide - Page 8
should be used (see page 2). Connect the camera to the printer. To Printer Camera: Connect the cable to the DIGITAL terminal. Printer: Refer to the 1 printer's user guide. DIGITAL terminal This illustration shows the PowerShot S400 DIGITAL ELPH/DIGITAL IXUS 400 as an example. 2 Turn the - Canon PowerShot S1 IS | Direct Print User Guide - Page 9
. • Movie playback. • Language settings that use the SET button and the MENU button. Disconnecting the Camera and the Printer 1. Detach the cable from the printer. 2. Turn the camera's power off. 3. Detach the cable from the camera. • When you detach the cable, hold the plug and do not pull by the - Canon PowerShot S1 IS | Direct Print User Guide - Page 10
Canon Direct Printing with CP Printers Printing 1 Make sure that displays in the upper left corner of the LCD monitor. Display the images you wish to print and press the SET button. The print order screen appears. 2 Setting the Print Style (p. 9) Selecting the Number of Copies (p. 9) Setting - Canon PowerShot S1 IS | Direct Print User Guide - Page 11
. Prints with a border. On Date Off Adds the date to the print. Prints without the date. * This option can be selected when printing on card size paper. 1 In the print order screen, select [Style] and press the SET button. Select [Image], [Borders], or [Date]. 2 Select settings as needed. 3 9 - Canon PowerShot S1 IS | Direct Print User Guide - Page 12
be set. (Images are printed without any date or borders.) z Practically all of the image area displayed on the LCD PowerShot A60) section in the Camera User Guide. In the print order screen, select [Trimming] and press the SET button. 1 The trimming frame will appear at the center of the image - Canon PowerShot S1 IS | Direct Print User Guide - Page 13
camera model. Check which of the following screens appear before selecting settings. Trimming Frame Steps 2a and 3a Steps 2b and 3b Trim the image selection of approximately half the displayed image or a maximum selection that is virtually the same size as the image. z Expanding the trimming - Canon PowerShot S1 IS | Direct Print User Guide - Page 14
z The trimming setting only applies to one image. z The trimming setting is canceled with the following operations. • When you set the trimming settings for another image. • When you close the Print mode (when you turn the camera power off, change the camera mode, or detach the connection cable). 12 - Canon PowerShot S1 IS | Direct Print User Guide - Page 15
frame may not display correctly on a TV screen. Printing with DPOF Print Settings For instructions on how to set DPOF print settings, please refer to the DPOF print settings section of the Camera User Guide. In this section, we will explain how to print several images already specified with - Canon PowerShot S1 IS | Direct Print User Guide - Page 16
Canon memory card when the printing was canceled. If these circumstances apply, you can select [OK] in the print order menu and reprint starting from the first image. z If printing is canceled because the camera the camera power on again. Printing Errors z An error message appears if an error occurs - Canon PowerShot S1 IS | Direct Print User Guide - Page 17
Messages The following messages may appear on the camera's LCD monitor when an error occurs during a camera and CP printer connection. (Depending on the CP printer model, some messages may not display.) z Please refer to the CP printer's user guide for solutions. No Paper No Ink Incompatible paper - Canon PowerShot S1 IS | Direct Print User Guide - Page 18
please refer to Bubble Jet Direct Printing with Bubble Jet Printers (p. 28). Sets the print effect (p. 18) Sets the date On or Off (p. 18) Display the images you wish to print and press the SET button. The print order screen appears. Depending on the Bubble Jet printer model, some setting options - Canon PowerShot S1 IS | Direct Print User Guide - Page 19
for details. z On Bubble Jet printers equipped with an operation panel, an error number displays on the panel. Please refer to the Bubble Jet printer user guide for the remedies corresponding to the error numbers. Selecting Print Settings Available settings differ depending on the Bubble Jet printer - Canon PowerShot S1 IS | Direct Print User Guide - Page 20
Printers (continued) „ Setting the Date Printing Option Select [ ] and set [On], [Off] or [Default]. 1 „ Setting the Print Effect This function uses the camera's shooting information to optimize the image data, yielding high quality prints. You can select the following print effects. On Uses the - Canon PowerShot S1 IS | Direct Print User Guide - Page 21
trimming frame will appear at the center of the image. If a trimming setting has already been selected for the image, the frame will appear around the previously selected portion. The trimming setting screen differs depending on the camera 1 model. Check which of the following screens appear before - Canon PowerShot S1 IS | Direct Print User Guide - Page 22
of the trimming frame. z The trimming frame can be changed to a minimum selection of approximately half the displayed image or a maximum selection that is virtually the same size as the image. z Expanding the trimming frame beyond its maximum size cancels the trimming setting. 2a z When printing an - Canon PowerShot S1 IS | Direct Print User Guide - Page 23
The trimming setting only applies to one image. z The trimming setting is canceled with the following operations. • When you set the trimming settings for another image. • When you close the Print mode (when you turn the camera power off, change the camera mode, or detach the connection cable). 21 - Canon PowerShot S1 IS | Direct Print User Guide - Page 24
selected image, paper size and border settings determine the shape of the trimming frame. z Please use the LCD monitor to set the trimming settings. The trimming frame may not display correctly differ according to your Bubble Jet printer model. * Canon brand paper The Page Layout screen appears. 22 - Canon PowerShot S1 IS | Direct Print User Guide - Page 25
SET button. This ends 5 the paper settings operations. The display returns to the print order screen. With Bubble Jet printers, when [Plain Paper] is selected with the printer and [Default] is selected in the camera's [Paper Type], images will print with borders, even if [Borderless] was selected - Canon PowerShot S1 IS | Direct Print User Guide - Page 26
instructions on how to set DPOF print settings, please refer to the DPOF print settings section of the Camera User Guide. In this section, we will explain how to print several images SET button. 4 The image will start to print and, when it is completely finished, the display will revert to the standard - Canon PowerShot S1 IS | Direct Print User Guide - Page 27
• If there was very little free space on the memory card when the printing was canceled. If these circumstances apply, you can select [OK] in the print order menu and reprint starting from the first image. z If printing is canceled because the camera battery is depleted, you are recommended to power - Canon PowerShot S1 IS | Direct Print User Guide - Page 28
or your nearest Canon Customer Support center (listed in the Contact List provided with the Bubble Jet Printer). The printer is printing the data from the memory card inserted in the computer or printer. The printer automatically starts printing the images from the camera after completing the - Canon PowerShot S1 IS | Direct Print User Guide - Page 29
the printer. Check whether or not an error other than a paper or ink error has occurred. Also check the printer's battery charge. You tried to print an image that is not compatible with PictBridge. Some images that have been recorded with another camera or modified using a computer cannot be printed - Canon PowerShot S1 IS | Direct Print User Guide - Page 30
printing process. Select [Stop] or [Continue] and press the SET button. The print will automatically restart if the error is resolved. z The error number is displayed on the operation panel of Bubble Jet printer. Please refer to the Bubble Jet printer user guide for the remedies corresponding to the - Canon PowerShot S1 IS | Direct Print User Guide - Page 31
among the following print styles. Paper Select the paper size from the following. [Card #1], [Card #2], [Card #3], [LTR] or [A4] For the usable paper type, please refer to the Bubble Jet Printer user guide. Borders Borderless Prints right to the edges of the page. Bordered Prints with a border - Canon PowerShot S1 IS | Direct Print User Guide - Page 32
your images. However, please note that some menus and precautions differ, as listed below. p. 18 „ Setting the Print Effect [VIVID], [NR] and [VIVID+NR] are not available. p. 22 „ Selecting the Paper Settings [A3+/13×19] and [5"×7"] or [13×18cm] are not available. Please also refer to the user guide - Canon PowerShot S1 IS | Direct Print User Guide - Page 33
with the Camera Canon CP Printers/ Canon Bubble Jet Printers (When or appears on the camera's LCD monitor during a connection) Print Options Selectable with the Camera CP Printers Bubble Jet Printers Number of Prints 1 to 99 { { Image 1 image { - Multiple { - Style Paper Card #1, Card - Canon PowerShot S1 IS | Direct Print User Guide - Page 34
Settings that Can Be Set with the Camera (continued) Canon Bubble Jet Printers (When appears on the camera's LCD monitor during a connection) Some settings are not available with certain Bubble Jet printers. Print Options Selectable with the Camera Off Date On Default Off On Print Effect - Canon PowerShot S1 IS | Direct Print User Guide - Page 35
Guide d'utilisation de l'impression directe Imprimer au moyen d'une connexion directe appareil photo/imprimante FRANÇAIS - Canon PowerShot S1 IS | Direct Print User Guide - Page 36
Affichage du moniteur LCD Câble d'interface USB*2 (Fourni avec l'appareil photo) Impression Canon Direct avec les imprimantes CP page 8 - 15 *1 Si vous connectez un appareil photo compatible Pictbridge d'une autre marque que Canon, reportez-vous au guide d'utilisation de l'appareil photo. *2 CP - Canon PowerShot S1 IS | Direct Print User Guide - Page 37
de marques autres que Canon*3 Câble d'interface USB Reportez-vous au guide Câble d'interface USB (Fourni avec l'appareil imprimer plusieurs images simultanément ou les faire imprimer dans un laboratoire photo. * DPOF (Digital Print Order Format) Veuillez consulter le Guide d'utilisation de - Canon PowerShot S1 IS | Direct Print User Guide - Page 38
marques autres que Canon 30 Réglages pouvant être effectués à l'aide de l'appareil photo 31 Avis de non-responsabilité z Ce guide ne peut être cartes mémoire d'une marque autre que Canon. Marques déposées z Canon et PowerShot sont des marques commerciales de Canon Inc. z Les autres noms et produits - Canon PowerShot S1 IS | Direct Print User Guide - Page 39
sur les réglages de connexion de l'imprimante, reportez-vous au guide d'utilisation qui l'accompagne. Impression Servez-vous des commandes de l'appareil les imprimantes et les appareils photo Canon, veuillez vous reporter à l'URL suivante : http://web.canon.jp/Imaging/BeBit-e.html http://www - Canon PowerShot S1 IS | Direct Print User Guide - Page 40
Appareil photo : Connectez le câble à la prise DIGITAL (Numérique). 1 Imprimante : Consultez le guide d'utilisation de Borne DIGITAL votre imprimante. (Numérique) L'illustration prend pour exemple le PowerShot S400 DIGITAL ELPH/ DIGITAL IXUS 400. 2 Mettez l'imprimante sous tension. Réglez - Canon PowerShot S1 IS | Direct Print User Guide - Page 41
z Les opérations suivantes ne sont pas disponibles au cours d'une connexion appareil photo/imprimante. • Lecture vidéo. • Paramètres de langue utilisant les boutons SET et MENU. Déconnexion de l'appareil photo et de l'imprimante 1. Déconnectez le câble de l'imprimante. 2. Mettez l'appareil photo - Canon PowerShot S1 IS | Direct Print User Guide - Page 42
Impression Canon Direct avec les imprimantes CP Impression 1 Vérifiez que s'affiche dans le coin supérieur gauche du moniteur LCD. Affichez les images à imprimer et appuyez sur le bouton SET. L'écran d'impression apparaît. 2 Réglage du style d'impression (page 9) Sélection du nombre de copies - Canon PowerShot S1 IS | Direct Print User Guide - Page 43
avez le choix entre les styles d'impression indiqués ci-dessous. Image Standard Multiple* Permet d'imprimer une image par page. Permet d'imprimer huit exemplaires de la même image sur une page. Bordures sans bords Imprime l'image jusqu'aux bords de la page. avec bords Permet d'imprimer avec - Canon PowerShot S1 IS | Direct Print User Guide - Page 44
Canon Direct avec les imprimantes CP (suite) 4 Cadre de zone d'impression Appuyez sur le bouton MENU pour mettre fin au processus de sélection des paramètres. Dans le cas des impressions sans bords ou multiples, les côtés supérieur, inférieur et latéraux de l'image (PowerShot A60) du Guide d' - Canon PowerShot S1 IS | Direct Print User Guide - Page 45
tres. Cadre de rognage Etapes 2a et 3a Etapes 2b et 3b Rognez l'image. Modification de la taille du cadre de rognage z Appuyez sur le levier faire pivoter le cadre de rognage en appuyant sur les boutons DISP. ou DISPLAY (Affichage). Appuyez sur le bouton SET pour fermer le menu des 3a param - Canon PowerShot S1 IS | Direct Print User Guide - Page 46
Impression Canon Direct avec les imprimantes CP (suite) Rognez l'image. Modification de la taille du cadre de rognage z Appuyez sur les boutons Haut et Bas pour régler la taille du cadre de rognage. z La plage de variation du cadre de rognage va approximativement de la moitié de l'image affichée - Canon PowerShot S1 IS | Direct Print User Guide - Page 47
DPOF Pour obtenir des instructions sur la définition des paramètres d'impression DPOF, veuillez vous reporter à la section des paramètres d'impression DPOF du Guide d'utilisation de l'appareil photo. Dans cette section, nous expliquons comment imprimer plusieurs images déjà spécifiées avec - Canon PowerShot S1 IS | Direct Print User Guide - Page 48
Impression Canon Direct avec les imprimantes CP (suite) z Pour imprimer la date, donnez l'impression z Dans le menu d'impression, sélectionnez [Reprise] et appuyez sur le bouton SET. Les images restantes peuvent être imprimées. z La reprise de l'impression n'est pas possible dans les conditions - Canon PowerShot S1 IS | Direct Print User Guide - Page 49
peuvent ne pas s'afficher.) z Veuillez vous reporter au guide d'utilisation de l'imprimante CP pour obtenir des solutions. Manque avez défini les paramètres de découpage. Vous avez demandé à imprimer une image provenant d'un autre appareil photo, enregistrée dans un format différent ou éditée - Canon PowerShot S1 IS | Direct Print User Guide - Page 50
le moniteur LCD, veuillez vous reporter à Impression Bubble Jet Direct avec les imprimantes bulle d'encre (page 28). Permet de définir l'effet Affichez les images à imprimer et d'impression (page 18) appuyez sur le bouton SET. Permet de donner à la date la valeur On ou Off (page 18) L'écran - Canon PowerShot S1 IS | Direct Print User Guide - Page 51
] et appuyez sur le bouton SET. L'imprimante arrête l'impression de l'image en cours et éjecte le papier. Erreurs d'impression z Un message d'erreur correspondant aux numéros des erreurs signalées, veuillez vous reporter au guide d'utilisation de l'imprimante Bulle d'encre. Sélection des paramètres - Canon PowerShot S1 IS | Direct Print User Guide - Page 52
faut]. 1 „ Réglage de l'effet d'impression Cette fonction utilise les informations de prise de vue de l'appareil photo pour optimiser les données d'image et produire des impressions de haute qualité. Vous pouvez sélectionner les effets d'impression suivants. On Off Vivid NR Vivid+NR Défaut Permet - Canon PowerShot S1 IS | Direct Print User Guide - Page 53
les sélectionner à nouveau. Sélectionnez [Rogner] et appuyez sur le bouton SET. Le cadre de rognage apparaît au centre de l'image. Si un paramètre de rognage est déjà attribué à l'image, le cadre apparaît autour de la partie sélectionnée. L'écran des paramètres de rognage diffère selon le modèle - Canon PowerShot S1 IS | Direct Print User Guide - Page 54
sa taille 2a maximale annule le paramètre de rognage. z Lorsque vous imprimez une image qui a été agrandie à l'aide de l'option de rognage, sa qualité peut faire pivoter le cadre de rognage en appuyant sur les boutons DISP. ou DISPLAY (Affichage). Appuyez sur le bouton SET pour fermer le menu de 3a - Canon PowerShot S1 IS | Direct Print User Guide - Page 55
(sélection maximale). z L'extension du cadre de rognage au-delà de sa taille maximale annule le paramètre de rognage. 2b z Lorsque vous imprimez une image qui a été agrandie à l'aide de l'option de rognage, sa qualité peut diminuer et le grain être moins fin selon le niveau d'agrandissement. Dans ce - Canon PowerShot S1 IS | Direct Print User Guide - Page 56
Impression PictBridge avec les imprimantes bulle d'encre (suite) z Les paramètres d'image, de format de papier et de bordure déterminent la forme du cadre de rognage. z Utilisez le moniteur LCD pour définir les paramètres de rognage. - Canon PowerShot S1 IS | Direct Print User Guide - Page 57
de votre modèle d'imprimante bulle d'encre. * Papier de marque Canon L'écran Mise en forme apparaît. Sélectionnez une mise en page. Il possible de sélectionner les effets d'impression suivants. sans bords Permet d'imprimer l'image 4 jusqu'aux bords de la page. avec bords Permet d'imprimer avec - Canon PowerShot S1 IS | Direct Print User Guide - Page 58
DPOF Pour obtenir des instructions sur la définition des paramètres d'impression DPOF, veuillez vous reporter à la section des paramètres d'impression DPOF du Guide d'utilisation de l'appareil photo. Dans cette section, nous expliquons comment imprimer plusieurs images déjà spécifiées avec - Canon PowerShot S1 IS | Direct Print User Guide - Page 59
d'impression, le numéro de fichier ne peut être imprimé. z Pour annuler l'impression entre des images, appuyez sur le bouton SET. Une boîte de dialogue de confirmation apparaît. Sélectionnez [OK] et erreurs signalées, veuillez vous reporter au guide d'utilisation de l'imprimante Bulle d'encre. 25 - Canon PowerShot S1 IS | Direct Print User Guide - Page 60
du collecteur d'encre au magasin où vous avez acheté l'imprimante ou au centre d'assistance Canon le plus proche répertorié dans la liste des adresses fournie avec l'imprimante Bulle d'encre ou dans le Guide d'utilisation de l'imprimante Bulle d'encre. Vérifiez le niveau d'encre de l'imprimante et - Canon PowerShot S1 IS | Direct Print User Guide - Page 61
le distributeur qui vous a vendu l'imprimante ou le centre d'assistance Canon le plus proche (répertorié dans la liste des adresses fournie dans l'ordinateur ou l'imprimante. L'imprimante commence automatiquement l'impression des images de l'appareil photo après avoir terminé l'impression en cours. - Canon PowerShot S1 IS | Direct Print User Guide - Page 62
cette étape, suivez les procédures de la section Impression Canon Direct avec les imprimantes CP (page 8) pour imprimer vos images. Cependant, veuillez noter que certains menus et précautions diffè erreurs signalées, veuillez vous reporter au guide d'utilisation de l'imprimante Bulle d'encre. 28 - Canon PowerShot S1 IS | Direct Print User Guide - Page 63
Carte 3], [LTR] ou [A4] Pour le type de papier pouvant être utilisé, veuillez vous reporter au guide d'utilisation de l'imprimante Bulle d'encre. Bordures sans bords avec bords Permet d'imprimer l'image jusqu'aux bords de la page. Permet d'imprimer avec une bordure. On Date Off Permet d'ajouter - Canon PowerShot S1 IS | Direct Print User Guide - Page 64
Canon Impression Vérifiez que s'affiche dans le coin supérieur gauche du 1 moniteur LCD. Après cette étape, suivez les procédures de la section Impression PictBridge avec les imprimantes bulle d'encre (page 16) pour imprimer vos images au guide d'utilisation fourni avec votre imprimante. 30 - Canon PowerShot S1 IS | Direct Print User Guide - Page 65
tre définis avec l'appareil photo Imprimantes CP Canon/ Imprimantes bulle d'encre Canon (Lorsque ou apparaît sur le moniteur LCD au cours d'une connexion) Options d'impression sélectionnables avec l'appareil photo Nombre d'impressions 1 à 99 1 image Image Multiple Style Papier Carte 1, Carte - Canon PowerShot S1 IS | Direct Print User Guide - Page 66
Réglages pouvant être définis avec l'appareil photo (suite) Imprimantes bulle d'encre Canon (Lorsque apparaît sur le moniteur LCD au cours d'une connexion) Certains paramètres ne sont pas disponibles avec certaines imprimantes bulle d'encre. Options d'impression sélectionnables - Canon PowerShot S1 IS | Direct Print User Guide - Page 67
Guía del usuario de impresión directa Impresión mediante una conexión directa entre una cámara y una impresora ESPAÑOL - Canon PowerShot S1 IS | Direct Print User Guide - Page 68
el icono que aparece en la parte superior izquierda de la pantalla LCD y consulte las páginas correspondientes en cada caso. Impresora Impresoras Canon Impresoras CP Compatible con PictBridge*1 Canon Compatible con Direct Print Cable Pantalla LCD Cable Interfaz USB*2 (incluido con la cámara - Canon PowerShot S1 IS | Direct Print User Guide - Page 69
marca Canon*3 Cable Interfaz USB (incluido con la cámara) Consulte la guía de usuario de su impresora por inyección de burbujas. Cable Interfaz a un laboratorio fotográfico. * Formato de orden de impresión digital o DPOF (Digital Print Order Format) Consulte la Guía de usuario de la cámara - Canon PowerShot S1 IS | Direct Print User Guide - Page 70
mal funcionamiento de la cámara, el software, las tarjetas de memoria, los ordenadores o los dispositivos periféricos, o al uso de tarjetas de memoria que no sean de la marca Canon. Reconocimiento de marcas comerciales z Canon y PowerShot son marcas comerciales de Canon, Inc. z Es posible que otros - Canon PowerShot S1 IS | Direct Print User Guide - Page 71
guía de usuario que se incluía con ésta. Impresión Use los controles de la cámara para seleccionar los ajustes e iniciar la impresión. Algunas impresoras disponen a las conexiones entre las impresoras y las cámaras Canon, consulte la siguiente dirección URL: http://web.canon.jp/Imaging/BeBit-e.html http://www - Canon PowerShot S1 IS | Direct Print User Guide - Page 72
la cámara a la impresora. A la impresora Cámara: Conecte el cable al terminal DIGITAL. Impresora:Consulte la guía de 1 usuario de la impresora. Terminal DIGITAL Esta ilustración muestra la PowerShot S400 DIGITAL ELPH/DIGITAL IXUS 400 como ejemplo. 2 Encienda la impresora. Ajuste el modo - Canon PowerShot S1 IS | Direct Print User Guide - Page 73
. • Reproducción de películas. • Los ajustes de idioma que usan los botones SET y MENU [Menú]. Desconexión de la cámara y la impresora 1. Desconecte el cable de la impresora. 2. Apague la cámara. 3. Desconecte el cable de la cámara. • Para desconectar el cable, sostenga el enchufe y no tire del - Canon PowerShot S1 IS | Direct Print User Guide - Page 74
Impresión Canon Direct con impresoras CP Impresión Compruebe que aparece en la confirmación. Seleccione [OK] y presione el botón SET. Errores de impresión z Si se produce algún error durante el proceso de impresión, aparecerá un mensaje de error. Seleccione [Detener] o [Resumen] y presione el bot - Canon PowerShot S1 IS | Direct Print User Guide - Page 75
Selección de ajustes de impresión „ Selección del número de copias En la pantalla de orden de impresión, seleccione 1 [Copias] e indique el número de copias. Puede especificar de 1 a 99 copias. „ Ajuste del estilo de impresión Puede elegir entre los estilos de impresión siguientes. Imagen Está - Canon PowerShot S1 IS | Direct Print User Guide - Page 76
(PowerShot A60) en la Guía de usuario de la cámara. En la pantalla de orden de impresión, seleccione [recortar] y presione el botón SET. 1 El marco de recorte aparecerá en el centro de la imagen. Si ya se seleccionó un ajuste de recorte para la imagen, el marco aparecerá alrededor de la parte - Canon PowerShot S1 IS | Direct Print User Guide - Page 77
múltiple o los botones de dirección (arriba, abajo, derecha e izquierda). Giro del marco de recorte z Puede girar el marco de recorte si presiona el botón DISP. o DISPLAY [Pantalla]. 3a Pulse el botón SET para cerrar el menú de ajuste. Pulse el botón MENU [Menú] para cancelar el ajuste. 11 - Canon PowerShot S1 IS | Direct Print User Guide - Page 78
Impresión Canon Direct con impresoras CP (continuacion) Recorte la imagen. Cambio del tamaño del marco de recorte z Pulse los botones de dirección arriba recorte para otra imagen. • Cuando se cierra el modo de impresión (al apagar la cámara, cambiar de modo o desconectar el cable de conexión). 12 - Canon PowerShot S1 IS | Direct Print User Guide - Page 79
z Los ajustes de imagen, papel y borde seleccionados determinan la forma del marco de recorte. z Use la pantalla LCD para establecer los ajustes de recorte. Puede que el marco de recorte no se muestre correctamente en una pantalla de televisión. Impresión con los ajustes de impresión DPOF Para - Canon PowerShot S1 IS | Direct Print User Guide - Page 80
Impresión Canon Direct con impresoras CP (continuacion) z Para imprimir la fecha, las pilas gastadas, encienda nuevamente la cámara. Errores de impresión z Si se produce algún error durante el proceso de impresión, aparecerá un mensaje de error. Seleccione [Detener] o [Resumen] y presione el - Canon PowerShot S1 IS | Direct Print User Guide - Page 81
la impresión. El papel se cambió después de que apareciera el menú de impresión. La batería de la impresora está descargada. Se ha producido un error de transmisión de datos en la impresora. Intenta imprimir la imagen con un estilo diferente del que se utilizó al establecer los ajustes de recorte - Canon PowerShot S1 IS | Direct Print User Guide - Page 82
Impresión PictBridge con impresoras por inyección de burbujas Impresión PictBridge Compruebe que aparece en la esquina superior izquierda de la 1 pantalla LCD. Si aparece en la pantalla LCD, consulte Impresión Bubble Jet Direct con impresoras por inyección de burbujas (p. 28). Muestre las - Canon PowerShot S1 IS | Direct Print User Guide - Page 83
. Consulte Lista de mensajes (p. 26) para obtener más información. z En las impresoras por inyección de burbujas equipadas con un panel de control, aparece un número de error en éste. Consulte la guía de usuario de la impresora de inyección de burbuja para obtener información sobre las soluciones - Canon PowerShot S1 IS | Direct Print User Guide - Page 84
Impresión PictBridge con impresoras por inyección de burbujas (continuacion) „ Ajuste de la opción de impresión de fecha Seleccione [ ] y establezca [On], [Off] o [Predeter]. 1 „ Ajuste del efecto de impresión Esta función usa la información de disparo de la cámara para optimizar los datos de - Canon PowerShot S1 IS | Direct Print User Guide - Page 85
aparecerá en el centro de la imagen. Si ya se seleccionó un ajuste de recorte para la imagen, el marco aparecerá alrededor de la parte seleccionada previamente. La pantalla del ajuste de recorte variará en función del modelo 1 de cámara. Compruebe cuales de las siguientes pantallas aparecen antes de - Canon PowerShot S1 IS | Direct Print User Guide - Page 86
múltiple o los botones de dirección (arriba, abajo, derecha e izquierda). Giro del marco de recorte z Puede girar el marco de recorte si presiona el botón DISP. o DISPLAY [Pantalla]. 3a Pulse el botón SET para cerrar el menú de ajuste. Pulse el botón MENU [Menú] para cancelar el ajuste. 20 - Canon PowerShot S1 IS | Direct Print User Guide - Page 87
se establecen los ajustes de recorte para otra imagen. • Cuando se cierra el modo de impresión (al apagar la cámara, cambiar de modo o desconectar el cable de conexión). 21 - Canon PowerShot S1 IS | Direct Print User Guide - Page 88
Impresión PictBridge con impresoras por inyección de burbujas (continuacion) z Los ajustes de imagen, tamaño de papel y borde seleccionados determinan la forma del marco de recorte. z Use la pantalla LCD para establecer los ajustes de recorte. Puede que el marco de recorte no se muestre - Canon PowerShot S1 IS | Direct Print User Guide - Page 89
tipos de papel. Foto Imprime en papel fotográfico brillo*. 3 Foto Flash Imprime en papel fotográfico profesional*. Predeter Los ajustes de impresión varí su modelo de impresora por inyección de burbujas. * Papel Canon Aparece la pantalla Diseño Papel Seleccione un diseño. Se pueden - Canon PowerShot S1 IS | Direct Print User Guide - Page 90
Impresión PictBridge con impresoras por inyección de burbujas (continuacion) Impresión con los ajustes de impresión DPOF Para obtener instrucciones acerca de cómo establecer los ajustes de impresión DPOF, consulte la sección de ajustes de impresión DPOF de la Guía de usuario de la cámara. En esta - Canon PowerShot S1 IS | Direct Print User Guide - Page 91
. Consulte Lista de mensajes (p. 26) para obtener más información. z En las impresoras por inyección de burbujas equipadas con un panel de control, aparece un número de error en éste. Consulte la guía de usuario de la impresora de inyección de burbuja para obtener información sobre las soluciones - Canon PowerShot S1 IS | Direct Print User Guide - Page 92
sin papel. Atasco de papel El papel se atascó durante la impresión. Error papel El papel no está correctamente ajustado en la impresora. No hay tinta adquirió la impresora o en el Servicio de asistencia al cliente de Canon más cercano entre los que aparecen en la Lista de contacto facilitada - Canon PowerShot S1 IS | Direct Print User Guide - Page 93
papel Tapa impresora abierta No cabezal impresión Error Hard Error Fichero Apague la impresora y vuelva a encenderla. Si el error continúa, consulte al proveedor donde adquirió la impresora o al Servicio de asistencia al cliente de Canon más cercano (enumerado en la Lista de contacto suministrada - Canon PowerShot S1 IS | Direct Print User Guide - Page 94
este paso, siga los procedimientos descritos en la sección Impresión Canon Direct con impresoras CP (p. 8) para imprimir sus imágenes. ón se reiniciará automáticamente si se soluciona el error. z El número de error aparece en el panel de control de la impresora de inyección de burbuja. Consulte la - Canon PowerShot S1 IS | Direct Print User Guide - Page 95
p. 9 „ Ajuste del estilo de impresión Puede elegir entre los estilos de impresión siguientes. Papel Seleccione el tamaño de papel entre los siguientes. [Tarjeta 1], [Tarjeta 2], [Tarjeta 3], [LTR] o [A4]. Para saber el tipo de papel que debe utilizar, consulte la guía de usuario de la impresora - Canon PowerShot S1 IS | Direct Print User Guide - Page 96
Impresión PictBridge con impresoras que no son de la marca Canon Impresión Compruebe que aparece en la esquina superior izquierda de la 1 pantalla LCD. Tras este paso, siga los procedimientos descritos en la sección Impresión PictBridge - Canon PowerShot S1 IS | Direct Print User Guide - Page 97
Ajustes que se pueden establecer con la cámara Impresoras Canon CP/ Impresoras Canon por inyección de burbujas (Cuando o aparece en la pantalla LCD de la cámara durante una conexión) Opciones de impresión que se pueden seleccionar con la cá - Canon PowerShot S1 IS | Direct Print User Guide - Page 98
pueden establecer con la cámara (continuacion) Impresoras Canon por inyección de burbujas (Cuando aparece en 11" o A4 A3 13" × 19" o A3+ Parám. papel Tipo papel Predeter Foto Predeter Foto Flash Diseño Papel Sin bordes Bordeado Predeter * Los tamaños de papel varían de un país a otro. 32 - Canon PowerShot S1 IS | Direct Print User Guide - Page 99
- Canon PowerShot S1 IS | Direct Print User Guide - Page 100
CDI-M118-010 XXXXXXXX © 2004 CANON INC. PRINTED IN JAPAN IMPRIMÉ AU JAPON
-
 1
1 -
 2
2 -
 3
3 -
 4
4 -
 5
5 -
 6
6 -
 7
7 -
8
-
9
-
10
-
11
-
12
-
13
-
14
-
15
-
16
-
17
-
18
-
19
-
20
-
21
-
22
-
23
-
24
-
25
-
26
-
27
-
28
-
29
-
30
-
31
-
32
-
33
-
34
-
35
-
36
-
37
-
38
-
39
-
40
-
41
-
42
-
43
-
44
-
45
-
46
-
47
-
48
-
49
-
50
-
51
-
52
-
53
-
54
-
55
-
56
-
57
-
58
-
59
-
60
-
61
-
62
-
63
-
64
-
65
-
66
-
67
-
68
-
69
-
70
-
71
-
72
-
73
-
74
-
75
-
76
-
77
-
78
-
79
-
80
-
81
-
82
-
83
-
84
-
85
-
86
-
87
-
88
-
89
-
90
-
91
-
92
-
93
-
94
-
95
-
96
-
97
-
98
-
99
-
100
 |
 |
Direct Print User Guide
Printing Using a Direct Camera/Printer Connection
Guide d’utilisation de l’impression directe
Imprimer au moyen d’une connexion directe appareil
photo/imprimante
Guía del usuario de impresión directa
Impresión mediante una conexión directa entre una
cámara y una impresora
Depending on your camera model, some printing instructions may also be
included in the
Camera User Guide
. However, you must read this guide as well
for complete printing instructions.
Selon le modèle d’appareil photo, certaines instructions d’impression peuvent
aussi se trouver dans le
Guide d’utilisation de l’appareil photo
. Vous devez
cependant lire également le présent guide pour disposer de l’ensemble des
instructions d’impression.
Dependiendo de su modelo de cámara, algunas instrucciones de impresión
también pueden aparecer en la
Guía de usuario de la cámara
. Sin embargo, deberá
leer también esta guía para tener unas instrucciones de impresión completas.
ESPAÑOL
FRANÇAIS
ENGLISH