Canon PowerShot S1 IS Software Starter Guide Ver.16
Canon PowerShot S1 IS Manual
 |
View all Canon PowerShot S1 IS manuals
Add to My Manuals
Save this manual to your list of manuals |
Canon PowerShot S1 IS manual content summary:
- Canon PowerShot S1 IS | Software Starter Guide Ver.16 - Page 1
Software Starter Guide For Version 16/17 Software Starter Guide (For the Canon Digital Camera Solution Disk Version 16/17) You must install the software bundled on the Canon Digital Camera Solution Disk before connecting the camera to the computer. Install the software. Connect the camera - Canon PowerShot S1 IS | Software Starter Guide Ver.16 - Page 2
and complete, no liability can be accepted for any errors or omissions. Canon reserves the right to change the specifications of the hardware and software described herein at any time without prior notice. • No part of this guide may be reproduced, transmitted, transcribed, stored in a retrieval - Canon PowerShot S1 IS | Software Starter Guide Ver.16 - Page 3
or to more than one user. With respect to the sound and image data ("Data") contained in the Software, which are to be downloaded to the applicable Canon digital camera product, Canon grants you a personal, nonexclusive license to use the Data on a single Canon digital camera product only. YOU SHALL - Canon PowerShot S1 IS | Software Starter Guide Ver.16 - Page 4
OR DEATH RESULTING FROM NEGLIGENCE ON THE PART OF THE SELLER, SO THE ABOVE DISCLAIMERS Government End Users shall acquire the SOFTWARE with only those rights set forth herein. Manufacturer is Canon Inc./30-2, CONTROLLING LAW: The terms of this Agreement as it relates to purchases of the Software in - Canon PowerShot S1 IS | Software Starter Guide Ver.16 - Page 5
on the Windows Platform - Preparations 10 Installing the Software and USB Driver 10 Using the Software on the Windows Platform - The Basics 15 Downloading Images to the Computer 15 Printing Images 19 Using the Software on the Windows Platform - Advanced Techniques 24 The ZoomBrowser - Canon PowerShot S1 IS | Software Starter Guide Ver.16 - Page 6
Software 79 Memory Card Folder Structure 82 Troubleshooting 83 Information about Your Camera 92 Information Common to All Models 92 PowerShot Pro 1 94 PowerShot S1 IS 95 PowerShot S500 DIGITAL ELPH/DIGITAL IXUS 500 96 PowerShot S410 DIGITAL ELPH/DIGITAL IXUS 430 97 PowerShot SD110 DIGITAL - Canon PowerShot S1 IS | Software Starter Guide Ver.16 - Page 7
This chapter explains what you can accomplish using the camera with the software contained on the Canon Digital Camera Solution Disk. It also lists the computer system configurations required to use the software. About this Guide • The explanations in this guide are based on Windows XP and Mac OS - Canon PowerShot S1 IS | Software Starter Guide Ver.16 - Page 8
4 It's so Simple! Make Prints Right at Home Like a Pro It's so Simple! Make Prints Right at Home Like a Pro Shoot the images See your Camera User Guide for shooting instructions. Install the software on the computer Just install the software once at the beginning. - Canon PowerShot S1 IS | Software Starter Guide Ver.16 - Page 9
5 Connect the camera to the computer Download images to the computer Print the images - Canon PowerShot S1 IS | Software Starter Guide Ver.16 - Page 10
Possibilities with Entertaining Software Print a Variety of Layouts Print with the diverse layouts available in PhotoRecord (Windows) and ImageBrowser (Macintosh). The examples shown are from PhotoRecord (Windows). Make your own photo album of precious moments. Confirm all your images in one glance - Canon PowerShot S1 IS | Software Starter Guide Ver.16 - Page 11
as an E-mail Attachment Attach an image to an e-mail message by starting your mail software from within ZoomBrowser EX (Windows) or ImageBrowser (Macintosh). Operate the Camera Shutter from the Computer Release the camera's shutter from the computer with ZoomBrowser EX (Windows) or ImageBrowser - Canon PowerShot S1 IS | Software Starter Guide Ver.16 - Page 12
software is compatible with Mac OS X (v10.1/v10.2), it cannot be used with disks formatted with the Unix File System (UFS). Windows OS Computer Model CPU RAM Interface Free Hard Disk Space Display 40 MB or more •Canon Camera TWAIN Driver: 25 MB or more •Canon Camera WIA Driver: 25 MB or more - Canon PowerShot S1 IS | Software Starter Guide Ver.16 - Page 13
Model CPU RAM Interface Free Hard Disk Space Display 9 Mac OS 9.0 - 9.2, Mac OS X (v10.1/v10.2) The above OS should be pre-installed on computers with built-in USB ports. PowerPC Mac OS 9.0 - 9.2: 64 MB or more of application memory Mac OS X (v10.1/v10.2): 128 MB or more USB •Canon Utilities - Canon PowerShot S1 IS | Software Starter Guide Ver.16 - Page 14
the software before you connect the camera to the computer. • Users of Windows XP and Windows 2000 must first log in as an Administrator (computer system administrator) to install programs. Items to Prepare • Your camera and computer • Canon Digital Camera Solution Disk • Interface cable supplied - Canon PowerShot S1 IS | Software Starter Guide Ver.16 - Page 15
select [Open]. 3. Double-click the [Setup.exe] icon. (Some computers may not display the [.exe] file name extension as shown above.) 4 Click the Digital Camera Software [Install] button. Installer Panel Follow any instructions to restart your computer, if they appear. If the following window appears - Canon PowerShot S1 IS | Software Starter Guide Ver.16 - Page 16
USB driver (the software for connecting) is required when the camera is connected to the computer with an interface cable. Ensure that you select a USB driver from below (the appropriate one for your operating system). •Windows 2000/Windows 98: Canon Camera TWAIN Driver •Windows Me: Canon Camera WIA - Canon PowerShot S1 IS | Software Starter Guide Ver.16 - Page 17
now.] and click [Finish]. Users of Windows XP and Windows 2000 driver, so far the required files have only been copied to your computer. You must now connect the camera to the computer with the interface cable to complete the installation and prepare the driver for use. See Uninstalling the Software - Canon PowerShot S1 IS | Software Starter Guide Ver.16 - Page 18
14 Installing the Software and USB Driver 11 Attach the camera to the computer with the interface cable and set it to the correct mode for connecting. Procedures for attaching the camera to the computer and placing it in the correct mode for connecting vary between camera models. See Information - Canon PowerShot S1 IS | Software Starter Guide Ver.16 - Page 19
ZoomBrowser EX's main window and selecting [Auto-download setting]. • You can also display an index of the camera or memory card images to check them before downloading or download them selectively. For instructions, see Checking Images before Downloading (p. 26). A window stating that the server is - Canon PowerShot S1 IS | Software Starter Guide Ver.16 - Page 20
will display if a camera and a memory card reader are connected at the same time. Confirm that your model name or "Canon Camera" is displayed and click [OK]. 2. Click [Set]. You must repeat Steps 1 and 2 above the next time you connect when you select the Don't Set option. 2 Download the images. Use - Canon PowerShot S1 IS | Software Starter Guide Ver.16 - Page 21
whether your camera model supports the Direct Transfer function. Since sound memos cannot be downloaded using a camera operation, click [Download images to computer] to download sound memos. Set the Direct Transfer settings with the camera. • See the Camera User Guide for instructions regarding - Canon PowerShot S1 IS | Software Starter Guide Ver.16 - Page 22
manual for the memory card for its connection and handling instructions. (2) Insert the loaded adapter into the slot. (1) Place the memory card in an adapter if required. 2 Double-click the [ZoomBrowser EX] icon on the desktop. 3 Click [Camera & Memory Card], followed by [Browse & Download Images - Canon PowerShot S1 IS | Software Starter Guide Ver.16 - Page 23
19 The memory card images download to the computer. The downloaded images are saved into folders according to the shooting date. When the download is complete, the thumbnails (tiny versions) of the downloaded images display in ZoomBrowser EX's main window. • See Memory Card Folder Structure (p. 82) - Canon PowerShot S1 IS | Software Starter Guide Ver.16 - Page 24
. In addition, the steps that will take you through the printing process will display on the left side. Follow the steps in order to proceed. Album Window The selected images display here. The printing procedures display here. The next steps differ according to whether you select Full Page Print - Canon PowerShot S1 IS | Software Starter Guide Ver.16 - Page 25
21 Full Page Print This option prints one image per page. 1 Click [2 Select Printer & Album Type]. Once you have chosen a printer, select [Others] in the Album Type category, followed by [One Photo Per Page]. 2 - Canon PowerShot S1 IS | Software Starter Guide Ver.16 - Page 26
Layout and Print This option prints multiple images on a single page as in a photo album. 1 Click [2 Select the paper size and orientation. 3 Click [Decorate Album] and change the design of the image background and border as required. Click the [Themes], [Backgrounds], [Photo Frames], [Text - Canon PowerShot S1 IS | Software Starter Guide Ver.16 - Page 27
and select [Contact Sheet Print] instead of [Layout Print], you can print image thumbnails along with the Exif data* (shooting information). * There is a advanced techniques. Using the Software on the Windows Platform - Advanced Techniques (p. 24). • A PDF-format manual for ZoomBrowser EX is also - Canon PowerShot S1 IS | Software Starter Guide Ver.16 - Page 28
EX procedures in the Using the Software on the Windows Platform - The Basics chapter. The ZoomBrowser EX Windows ZoomBrowser EX has two windows: the Main Window and the Camera Window. Main Window This window can be used for more than just organizing downloaded images. For example, you can use it - Canon PowerShot S1 IS | Software Starter Guide Ver.16 - Page 29
to view images in the camera (or memory card) and download the images to the computer as you confirm them. A window allowing you to specify the download destination opens when you select images and click the [Download image] button. The images from the camera (or memory card) display here. Task - Canon PowerShot S1 IS | Software Starter Guide Ver.16 - Page 30
Images before Downloading Checking Images before Downloading You can check camera or memory card images in the Camera Window before processing them. You can also choose to download only the images you select in the Camera Window. 1 Display the Download Image window. To download images from a camera - Canon PowerShot S1 IS | Software Starter Guide Ver.16 - Page 31
Specify the destination folder for the image(s). (You can change the destination folder by clicking [Browse] and selecting a new destination.) Select [Create new folder] to create a new folder within the one specified above, and select a naming option. The downloaded images will appear in the main - Canon PowerShot S1 IS | Software Starter Guide Ver.16 - Page 32
Users leaflet for details. * Windows Me (with the USB driver installed) It is easy to download images using the Scanners and Cameras Wizard or Windows Explorer. All you need do is connect the camera to the computer with an interface cable. See the Windows Help , which may not support this file type. - Canon PowerShot S1 IS | Software Starter Guide Ver.16 - Page 33
Set the Canon Digital Camera Solution Disk in the CD-ROM drive. The installer panel will automatically appear. (Display it with the procedures in How to Display the Installer Panel (p. 11) if it does not appear.) 2 Click the QuickTime 6.3 [Install] button. Follow the onscreen instructions to proceed - Canon PowerShot S1 IS | Software Starter Guide Ver.16 - Page 34
it. Follow these steps to proceed. Click this button for detailed operational instructions. Guidance Click this button to play the movie being edited. Storyboard Area Displays thumbnails of the selected images. Links images in order from left to right. Transition Effects Box Appears between - Canon PowerShot S1 IS | Software Starter Guide Ver.16 - Page 35
option, select the keywords. Sets whether images are searched according to all the parameters or images to another folder. The images will display in this folder until ZoomBrowser EX is closed or another search is performed. Folder containing the images satisfying the search parameters Images - Canon PowerShot S1 IS | Software Starter Guide Ver.16 - Page 36
the Favorites Box Adding a check mark to the Favorites box makes it easy to perform searches on images later. 1 Select the image in the Browser Area and click The Properties window will display. 2 Click the [Favorite Photo] box to add a check mark and close the Properties window. This concludes the - Canon PowerShot S1 IS | Software Starter Guide Ver.16 - Page 37
JPEG. • See Information about Your Camera (p. 92) to determine whether your camera model supports this function. • See the Camera User Guide for information about the camera settings for shooting RAW images. Procedures for Converting RAW Images 1 Select a RAW image in ZoomBrowser EX's Browser Area - Canon PowerShot S1 IS | Software Starter Guide Ver.16 - Page 38
Mark Main Window If the navigator window or the Image Quality Adjustment Window do not display, click the [View] menu and select [Show Navigator] or [Show Image Quality Adjustment Window]. 3 Adjust the image quality as required in the Image Quality Adjustment Window. This window is explained in - Canon PowerShot S1 IS | Software Starter Guide Ver.16 - Page 39
mark here. Restores all settings to the settings stored in the camera at the time of shooting. Applies the settings to the displayed image You can change the coloration of the image to your preferred settings when you convert a RAW image. You can also select preset color schemes, such as Positive - Canon PowerShot S1 IS | Software Starter Guide Ver.16 - Page 40
to control the shutter of a connected camera. This is particularly useful for checking images on the larger display of the computer as you record them and for high volume photography without worrying about filling the camera's memory card. Preparing for Remote Shooting 1 Ensure that the camera is - Canon PowerShot S1 IS | Software Starter Guide Ver.16 - Page 41
button while a connection to the camera is open to display the image appearing in the camera's viewfinder. Start/Stop Viewfinder Button Starts or stops the viewfinder display. Refresh Button Resets the exposure, focus and white balance. Set the basic camera settings here. • The settings available - Canon PowerShot S1 IS | Software Starter Guide Ver.16 - Page 42
] button. The recorded image is saved to the folder that was displayed in the window when the remote shooting procedures were initiated. • You can release the shutter by pressing the camera's shutter button or the keyboard's space key. • The zoom controls and other camera buttons and switches - Canon PowerShot S1 IS | Software Starter Guide Ver.16 - Page 43
also change the number of digits and the starting number. The recorded images are saved to this folder. Selecting [Computer only] in the "Save Images On" category allows you to shoot when there is no memory card in the camera or when the camera's memory card is full. Displaying the Subject in the - Canon PowerShot S1 IS | Software Starter Guide Ver.16 - Page 44
the images. 3 Merge the images following the instructions in the guidance panel at the top of the PhotoStitch window. • QuickTime 3.0 or a later version is required to save the merged image in the QuickTime VR format. (QuickTime is supplied on the Canon Digital Camera Solution Disk.) • Images shot - Canon PowerShot S1 IS | Software Starter Guide Ver.16 - Page 45
start PhotoStitch by clicking the mark shown on images shot in Stitch Assist mode. • See the Camera User Guide for information about shooting in Stitch Assist mode. Saving Images on CD-R/RW Disks (Windows XP Only) You can copy and save ZoomBrowser EX images to CD-R/RW disks. The shooting information - Canon PowerShot S1 IS | Software Starter Guide Ver.16 - Page 46
. You can add your favorite images and sounds from your computer to the My Camera Settings. This topic explains how to upload the My Camera Settings saved onto your computer to the camera and vice versa. Displaying the My Camera Window 1 Connect the camera to the computer and start ZoomBrowser - Canon PowerShot S1 IS | Software Starter Guide Ver.16 - Page 47
be overwritten. Repeat steps 1-3 as required. To use this data on the camera, change the start-up image and sound settings on the camera itself. Please see the Camera User Guide for these instructions. Saving the Camera's My Camera Settings to the Computer 1 Select the [Setup as a theme] tab in the - Canon PowerShot S1 IS | Software Starter Guide Ver.16 - Page 48
it to the computer. Create the file in the JPEG format at a size of (w) 320 x (h) 240 pixels. 1 Open the My Camera window, click the [Set individually] tab, select [Startup Image] from [Data Type] and click the [Add File] button. 2 Select the file you created and click [Open]. This concludes the - Canon PowerShot S1 IS | Software Starter Guide Ver.16 - Page 49
finishing switches can be erased by clicking the [Cut] button. Volume Control Finishing position of sound (red switch) Starting position of sound ( 9 Click to close the My Camera Sound Maker window. This concludes the process of adding a sound file as a My Camera settings file to the computer. You - Canon PowerShot S1 IS | Software Starter Guide Ver.16 - Page 50
sound as an 11.025 kHz or 8.000 kHz, 8 bit, mono sound in the WAV format. The following chart shows standard time lengths for My Camera Sounds. Type Duration in Seconds 11.025 kHz 8.000 kHz Start-Up Sound 1.0 sec. or less 1.3 sec. or less Shutter Sound 0.3 sec. or less 0.4 sec - Canon PowerShot S1 IS | Software Starter Guide Ver.16 - Page 51
for the first time. Installing the Software Start by installing the software from the Canon Digital Camera Solution Disk. Items to Prepare • Your camera and computer • Canon Digital Camera Solution Disk • Interface cable supplied with the camera Installation Procedures 1 Close any programs that - Canon PowerShot S1 IS | Software Starter Guide Ver.16 - Page 52
Installation] to select programs individually for installation. 6 Read the software license agreement and click [Agree] if you consent to all the conditions. 7 Review the installation settings and click [Next]. Follow the onscreen instructions to proceed. 8 When the installation is over, click [OK - Canon PowerShot S1 IS | Software Starter Guide Ver.16 - Page 53
49 See Uninstalling the Software (p. 81) to delete the software installed with these procedures. Continue by downloading images to the computer (p. 50). - Canon PowerShot S1 IS | Software Starter Guide Ver.16 - Page 54
to whether you are connecting the camera to the computer or using a memory card reader. Camera to Computer Connection Mac OS X 1 Attach the supplied interface cable to the computer's USB port and the camera's Digital Terminal. Prepare the camera for communication with the computer. Procedures - Canon PowerShot S1 IS | Software Starter Guide Ver.16 - Page 55
[USB port] is selected as the port option and that your camera model name or [Canon Camera] are selected as the detected camera. Click [Set]. iPhoto or Image Capture may automatically start up at the same time as the Camera Window. Step 6 is not required when neither program starts up automatically - Canon PowerShot S1 IS | Software Starter Guide Ver.16 - Page 56
the program selection window. 3. Close Image Capture. ImageBrowser will start automatically from the next connection onward. Mac OS 9 1 Attach the supplied interface cable to the computer's USB port and the camera's Digital Terminal. Prepare the camera for communication with the computer. Procedures - Canon PowerShot S1 IS | Software Starter Guide Ver.16 - Page 57
]. Select [Download images marked for transferring] and click [OK]. The Communication Settings dialog will display. This dialog only appears the first time the camera is connected. 3 Confirm that [USB port] is selected as the port option and that your camera model name or [Canon Camera] are selected - Canon PowerShot S1 IS | Software Starter Guide Ver.16 - Page 58
[OK]. How to Set ImageBrowser to Not Start Automatically 1. Click the Apple menu and select [Control Panels] and [Canon ImageBrowser Auto Launch]. The Settings for USB Connection dialog will display. 2. Click [The application program below will start] to clear the check mark. 3. Click the close - Canon PowerShot S1 IS | Software Starter Guide Ver.16 - Page 59
followed by the [Canon Utilities] and [ImageBrowser] folders and the [ImageBrowser] file. 3 Double-click the [DCIM] folder in the Explorer View Section. Explorer View Section The images from the memory card will display as thumbnails (tiny versions) in the Camera Window. Camera Window Thumbnail - Canon PowerShot S1 IS | Software Starter Guide Ver.16 - Page 60
Computer See Memory Card Folder Structure (p. 82) for information about memory card folder structures and file names. Next, download images to the computer (p. 56). Downloading Images to the Computer Creating a Folder to Receive Downloaded Images Create a new folder for downloaded images with the - Canon PowerShot S1 IS | Software Starter Guide Ver.16 - Page 61
folder. Downloading Images Download images to the new folder created in Creating a Folder to Receive Downloaded Images. 1 Click the Camera Window to bring it to the forefront. 2 Click the images to download. A blue frame appears around selected images. Thumbnail The movie icon displays on movie - Canon PowerShot S1 IS | Software Starter Guide Ver.16 - Page 62
(PTP). With the PTP protocol and Mac OS X, you can easily download images by connecting the camera to the computer with an interface cable and using the software preinstalled on your operating system, such as iPhoto and Image Capture. (You do not even need to install ImageBrowser.) However, there - Canon PowerShot S1 IS | Software Starter Guide Ver.16 - Page 63
print. A blue frame appears around selected images. Movie images cannot be printed. 2 Click the [Print] button and select [Layout printing] from the displayed menu. This displays the Layout Options dialog and the Print window. Layout Options dialog 59 Print window The next steps differ according - Canon PowerShot S1 IS | Software Starter Guide Ver.16 - Page 64
adding text. 4 Click the [Print] button in the Print window. This will display the Print dialog. 5 Click [Print] to start printing. • You can print dialog. • Images shot with Exif 2.2-compliant cameras (Exif Print) incorporate information about the shooting settings, such as the camera modes and - Canon PowerShot S1 IS | Software Starter Guide Ver.16 - Page 65
Options window. Displays the Print dialog. This chapter explained the ImageBrowser basics. Once you have mastered them, read the following chapter to try the advanced techniques. Using the Software on the Macintosh Platform - Advanced Techniques (p. 62). A PDF-format manual for ImageBrowser is - Canon PowerShot S1 IS | Software Starter Guide Ver.16 - Page 66
to this chapter once you have mastered the basic ImageBrowser procedures in the Using the Software on the Macintosh Platform - The Basics chapter. Replaying Movies 1 Double-click an image with a movie icon in ImageBrowser's Browser Area. QuickTime Player will start. 2 Click the play button - Canon PowerShot S1 IS | Software Starter Guide Ver.16 - Page 67
have been downloaded to your computer, add background music, superimpose titles and other text, and apply various effects to the movies. 1 Select the image(s) to instructions. Click this button to play the movie being edited. Storyboard Area Displays thumbnails of the selected images. Links images - Canon PowerShot S1 IS | Software Starter Guide Ver.16 - Page 68
or JPEG. • See Information about Your Camera (p. 92) to determine whether your camera model supports this function. • See the Camera User Guide for information about the camera settings for shooting RAW images. Procedures for Converting RAW Images 1 Select a RAW image in ImageBrowser's Browser Area - Canon PowerShot S1 IS | Software Starter Guide Ver.16 - Page 69
set the settings for adaptive noise control, false color filter and the color space for the output. (Click the arrow to display the tab) If you cannot set the desired setting with the slider on the left, directly enter the setting here. Applies the settings to the displayed image You can change the - Canon PowerShot S1 IS | Software Starter Guide Ver.16 - Page 70
to control the shutter of a connected camera. This is particularly useful for checking images on the larger display of the computer as you record them and for high volume photography without worrying about filling the camera's memory card. Preparing for Remote Shooting 1 Ensure that the camera is - Canon PowerShot S1 IS | Software Starter Guide Ver.16 - Page 71
. Rotation Settings Sets the rotation parameters for images after they are captured. Release Button Releases the shutter. Slide this to zoom the camera in or out. Start/Stop Viewfinder Button Starts or stops the viewfinder display. Refresh Button Resets the exposure, focus and white balance. Set - Canon PowerShot S1 IS | Software Starter Guide Ver.16 - Page 72
] button. The recorded image is saved to the folder that was displayed in the window when the remote shooting procedures were initiated. • You can release the shutter by pressing the camera's shutter button or the keyboard's space key. • The zoom controls and other camera buttons and switches - Canon PowerShot S1 IS | Software Starter Guide Ver.16 - Page 73
You can also change the number of digits and the starting number. Selecting [Computer only] in the "Save Images On" category allows you to shoot when there is no memory card in the camera or when the camera's memory card is full. Displaying the Subject in the Camera's LCD Monitor You can view the - Canon PowerShot S1 IS | Software Starter Guide Ver.16 - Page 74
the images following the instructions in the guidance panel at the top of the PhotoStitch window. Images shot in Stitch Assist mode with a wide converter, teleconverter or close-up lens cannot be merged accurately. Images Shot in Stitch Assist Mode It is easy to merge images shot with the camera - Canon PowerShot S1 IS | Software Starter Guide Ver.16 - Page 75
the My Camera Window 1 Connect the camera to the computer, start ImageBrowser and display the Camera Window. For starting instructions for ImageBrowser, see Starting ImageBrowser (p. 50). 2 Click [Setup Options] in the Camera Window and select [My Camera]. 3 Select [Start-up Image, Start-up - Canon PowerShot S1 IS | Software Starter Guide Ver.16 - Page 76
For example, the start-up image that starts with "Animal~" shows an animal picture while the similarly named sound files feature animal sounds. Do not detach the interface cable, turn the camera power off or disconnect the camera from the computer while the My Camera Settings are being saved to the - Canon PowerShot S1 IS | Software Starter Guide Ver.16 - Page 77
concludes the process of saving the My Camera Settings to the camera. To use this data on the camera, change the start-up image and sound settings on the camera itself. Please see the Camera User Guide for these instructions. Saving the Camera's My Camera Settings to the Computer 1 Select the type - Canon PowerShot S1 IS | Software Starter Guide Ver.16 - Page 78
Enjoy Customizing Your Camera with the My Camera Settings Add an Original Sound File Use a program such as ArcSoft VideoImpression to change the file format to the WAV format after you have copied the sound file. Then proceed with the steps as described in Create an Original Start-up Image File and - Canon PowerShot S1 IS | Software Starter Guide Ver.16 - Page 79
to uninstall the programs. Read the Troubleshooting section in this chapter if you experience a problem using the programs. About the CD-ROMs Supplied with the Solution Disk Apart from the Canon Digital Camera Solution Disk, additional CD-ROMs containing image editing programs may be supplied with - Canon PowerShot S1 IS | Software Starter Guide Ver.16 - Page 80
Camera Suite 2.1 Special Effects and Image Editing for Various Purposes •ArcSoft PhotoStudio This program can be used to correct image color or brightness, apply special effects, and edit and print images . Windows 2000, Windows Me and Windows 98 users should double-click the [My Computer] icon on - Canon PowerShot S1 IS | Software Starter Guide Ver.16 - Page 81
with ArcSoft Camera Suite 1.3 Special Effects and Image Editing for users should double-click the [My Computer] icon on the desktop, followed by the [ARCSOFT] and [Setup.exe] icons . Macintosh •Installing ArcSoft PhotoImpression 1 Close all programs that are running. 2 Place the ArcSoft Camera - Canon PowerShot S1 IS | Software Starter Guide Ver.16 - Page 82
. 2 Restart the computer after the installation is complete. Starting the ArcSoft Camera Suite Software The Arcsoft Camera Suite software can be started from ZoomBrowser EX or ImageBrowser. For Windows 1 After you select an image to edit, click [View & Modify] in the main window, followed by - Canon PowerShot S1 IS | Software Starter Guide Ver.16 - Page 83
to delete the programs from your computer or when reinstallation is required to fix corrupted files. Uninstalling the Software (Windows) Software Installed from the Canon Digital Camera Solution Disk This explanation uses ZoomBrowser EX to demonstrate how to uninstall a program. 1 Click the Windows - Canon PowerShot S1 IS | Software Starter Guide Ver.16 - Page 84
80 Uninstalling the Software 1 Attach the supplied interface cable to the computer's USB port and the camera's Digital Terminal. Prepare the camera for communication with the computer. For interface cable connection instructions, see Information about Your Camera (p. 92). A dialog allowing you to - Canon PowerShot S1 IS | Software Starter Guide Ver.16 - Page 85
, Events dialog won't display or images will not download to the computer (p. 84) of the Troubleshooting section. 6 Click the Windows [Start] menu and select [Programs] or [All Programs], followed by [Canon Utilities], [Camera TWAIN Driver x.x] and [Uninstall TWAIN Driver]. (A version number appears - Canon PowerShot S1 IS | Software Starter Guide Ver.16 - Page 86
82 Memory Card Folder Structure Memory Card Folder Structure The images on a memory card are placed in the [DCIM] folder in subfolders labeled [xxxCANON], where the "xxx" represents a number in the range 100 - 998. DCIM xxxCANON IMG_xxxx.JPG (JPEG format images) _MG_xxxx.JPG (JPEG format images - Canon PowerShot S1 IS | Software Starter Guide Ver.16 - Page 87
the software. Start by Checking This Investigate the following points first if you encounter a problem. Does your computer meet the following requirements? Computer systems that fail to meet the following requirements to accommodate a camera connected by an interface cable are not supported. Please - Canon PowerShot S1 IS | Software Starter Guide Ver.16 - Page 88
dialog won't display or images will not download to the computer (when camera is connected to the computer via an interface cable) Cause 1: There is a problem with one of the items in the Start by Checking This section (p. 83). Solution: Resolve the problem. Cause 2: The USB driver is not installed - Canon PowerShot S1 IS | Software Starter Guide Ver.16 - Page 89
the procedures in Installing the Software and USB Driver (p. 10). Then connect the camera to the computer with the interface cable and prepare it to transfer data. If the USB driver is already installed, uninstall it first and then reinstall it. Solution 2: If the problem is not resolved with the - Canon PowerShot S1 IS | Software Starter Guide Ver.16 - Page 90
86 Troubleshooting There are other potential reasons for the problem if the "Other devices" or "Imaging devices" categories do not appear or your camera model name or [Canon Camera] does not appear. Proceed to Step 6, temporarily quit the procedures and investigate the other potential causes. 4. - Canon PowerShot S1 IS | Software Starter Guide Ver.16 - Page 91
the Software and USB Driver (p. 10). Windows Me/Windows 98 1. Click the [Start] menu and select [Settings], followed by [Control Panel]. Double-click the [System] icon. This will display the - Canon PowerShot S1 IS | Software Starter Guide Ver.16 - Page 92
88 Troubleshooting 3. Click the symbol beside the [Other devices] and/or [Imaging devices] category. Your camera model name or [Canon Camera] will display in these categories if it is being recognized as an "other" device. There are other potential reasons for the problem if the "Other devices" or " - Canon PowerShot S1 IS | Software Starter Guide Ver.16 - Page 93
. 9. In the [Inf] folder, double-click the [Other] folder to open it. 10. Find and delete the [Canon.IncCAP_xxx.Inf] file. (The xxx represents numerals.) You do not need to delete anything if none of the above files are the wrong files, you may be unable to restart Windows. - Canon PowerShot S1 IS | Software Starter Guide Ver.16 - Page 94
90 Troubleshooting 11.Reinstall the driver with the procedures in Installing the Software and USB Driver (p. 10). "Server Busy" Displays During Image Download Use the following procedures if a window similar to the one below appeared when you downloaded images with ZoomBrowser EX running on Windows - Canon PowerShot S1 IS | Software Starter Guide Ver.16 - Page 95
Windows Explorer to copy the folder and the images it contains from the [Program Files] folder to another folder. (e.g. Copy the image folders in C:\Program Files\Canon\ZoomBrowser EX\Library One to another location.) The moved folder images can now be selected and displayed with ZoomBrowser EX 4. - Canon PowerShot S1 IS | Software Starter Guide Ver.16 - Page 96
Systems The CD-ROM labeled "Canon Digital Camera Solution Disk" is provided with all models. It contains the following programs. Compatible Operating System Program Windows Macintosh 98 Me 2000 XP OS 9 OS X ZoomBrowser EX ImageBrowser TWAIN Driver WIA Driver PhotoRecord PhotoStitch - Canon PowerShot S1 IS | Software Starter Guide Ver.16 - Page 97
the software from the supplied Canon Digital Camera Solution Disk before you connect the camera to the computer. Item to Prepare • Your camera and computer • Canon Digital Camera Solution Disk • Interface cable supplied with the camera • Use the interface cable to attach the camera directly - Canon PowerShot S1 IS | Software Starter Guide Ver.16 - Page 98
94 PowerShot Pro 1 PowerShot Pro 1 How to Connect the Camera to a Computer and Prepare to Transfer Data 1 Attach the supplied interface cable to the computer's USB port and the camera's DIGITAL terminal as shown below. USB Port To the DIGITAL Terminal Interface Cable 1. Open the terminal cover - Canon PowerShot S1 IS | Software Starter Guide Ver.16 - Page 99
95 PowerShot S1 IS How to Connect the Camera to a Computer and Prepare to Transfer Data 1 Attach the supplied interface cable to the computer's USB port and the camera's DIGITAL terminal as shown below. USB Port To the DIGITAL Terminal Interface Cable 1. Slip a fingernail in the terminal cover's - Canon PowerShot S1 IS | Software Starter Guide Ver.16 - Page 100
PowerShot S500 DIGITAL ELPH/DIGITAL IXUS 500 PowerShot S500 DIGITAL ELPH/DIGITAL IXUS 500 How to Connect the Camera to a Computer and Prepare to Transfer Data 1 Attach the supplied interface cable to the computer's USB port and the camera's DIGITAL terminal as shown below. USB Port To the DIGITAL - Canon PowerShot S1 IS | Software Starter Guide Ver.16 - Page 101
97 PowerShot S410 DIGITAL ELPH/DIGITAL IXUS 430 How to Connect the Camera to a Computer and Prepare to Transfer Data 1 Attach the supplied interface cable to the computer's USB port and the camera's DIGITAL terminal as shown below. USB Port To the DIGITAL Terminal Interface Cable 1. Slip a - Canon PowerShot S1 IS | Software Starter Guide Ver.16 - Page 102
98 PowerShot SD110 DIGITAL ELPH/DIGITAL IXUS II s PowerShot SD110 DIGITAL ELPH/DIGITAL IXUS II s How to Connect the Camera to a Computer and Prepare to Transfer Data 1 Attach the supplied interface cable to the computer's USB port and the camera's DIGITAL terminal as shown below. USB Port To the - Canon PowerShot S1 IS | Software Starter Guide Ver.16 - Page 103
99 PowerShot A75 How to Connect the Camera to a Computer and Prepare to Transfer Data 1 Attach the supplied interface cable to the computer's USB port and the camera's DIGITAL terminal as shown below. USB Port Interface Cable To the DIGITAL Terminal 1. Open the terminal cover by slipping a - Canon PowerShot S1 IS | Software Starter Guide Ver.16 - Page 104
100 PowerShot A310 PowerShot A310 How to Connect the Camera to a Computer and Prepare to Transfer Data 1 Attach the supplied interface cable to the computer's USB port and the camera's DIGITAL terminal as shown below. USB Port To the DIGITAL Terminal Interface Cable 1. Open the terminal cover by - Canon PowerShot S1 IS | Software Starter Guide Ver.16 - Page 105
DIGITAL IXUS 500 96 DIGITAL IXUS II s 98 Direct Transfer Function 17 Download Image Window 26 Downloading Images Macintosh 56 Windows 15 E E-mail 7 Events Dialog 16, 84 Exif 2.2 (Exif Print) Macintosh 60 Windows 19 Explorer View 50, 55, 56 Main Window 24 Memory Card Folder Structure 82 Memory Card - Canon PowerShot S1 IS | Software Starter Guide Ver.16 - Page 106
102 Index P PDF Manuals 2 PhotoRecord 6, 20 PhotoStitch 6 Macintosh 70 Windows 40 PowerShot A310 100 PowerShot A75 99 PowerShot Pro 1 94 PowerShot S1 IS 95 PowerShot S410 DIGITAL ELPH 97 PowerShot S500 DIGITAL ELPH 96 PowerShot SD110 DIGITAL ELPH 98 Print Layout Settings Macintosh 61 Print Window 59
-
 1
1 -
 2
2 -
 3
3 -
 4
4 -
 5
5 -
 6
6 -
 7
7 -
8
-
9
-
10
-
11
-
12
-
13
-
14
-
15
-
16
-
17
-
18
-
19
-
20
-
21
-
22
-
23
-
24
-
25
-
26
-
27
-
28
-
29
-
30
-
31
-
32
-
33
-
34
-
35
-
36
-
37
-
38
-
39
-
40
-
41
-
42
-
43
-
44
-
45
-
46
-
47
-
48
-
49
-
50
-
51
-
52
-
53
-
54
-
55
-
56
-
57
-
58
-
59
-
60
-
61
-
62
-
63
-
64
-
65
-
66
-
67
-
68
-
69
-
70
-
71
-
72
-
73
-
74
-
75
-
76
-
77
-
78
-
79
-
80
-
81
-
82
-
83
-
84
-
85
-
86
-
87
-
88
-
89
-
90
-
91
-
92
-
93
-
94
-
95
-
96
-
97
-
98
-
99
-
100
-
101
-
102
-
103
-
104
-
105
-
106
 |
 |
Windows
Macintosh
p. 10
p. 47
• This guide explains how to install the software programs and
briefly introduces their functions and operating procedures.
•
Please read the software license agreement in this guide before
using the software. By using the software, you agree to be
bound by the terms of the agreement.
Software Starter Guide
(For the Canon Digital Camera Solution Disk Version 16/17)
CDI-E116-010
XX03CHXX
© 2004 CANON INC.
PRINTED IN JAPAN
Windows/Macintosh
Windows
Macintosh
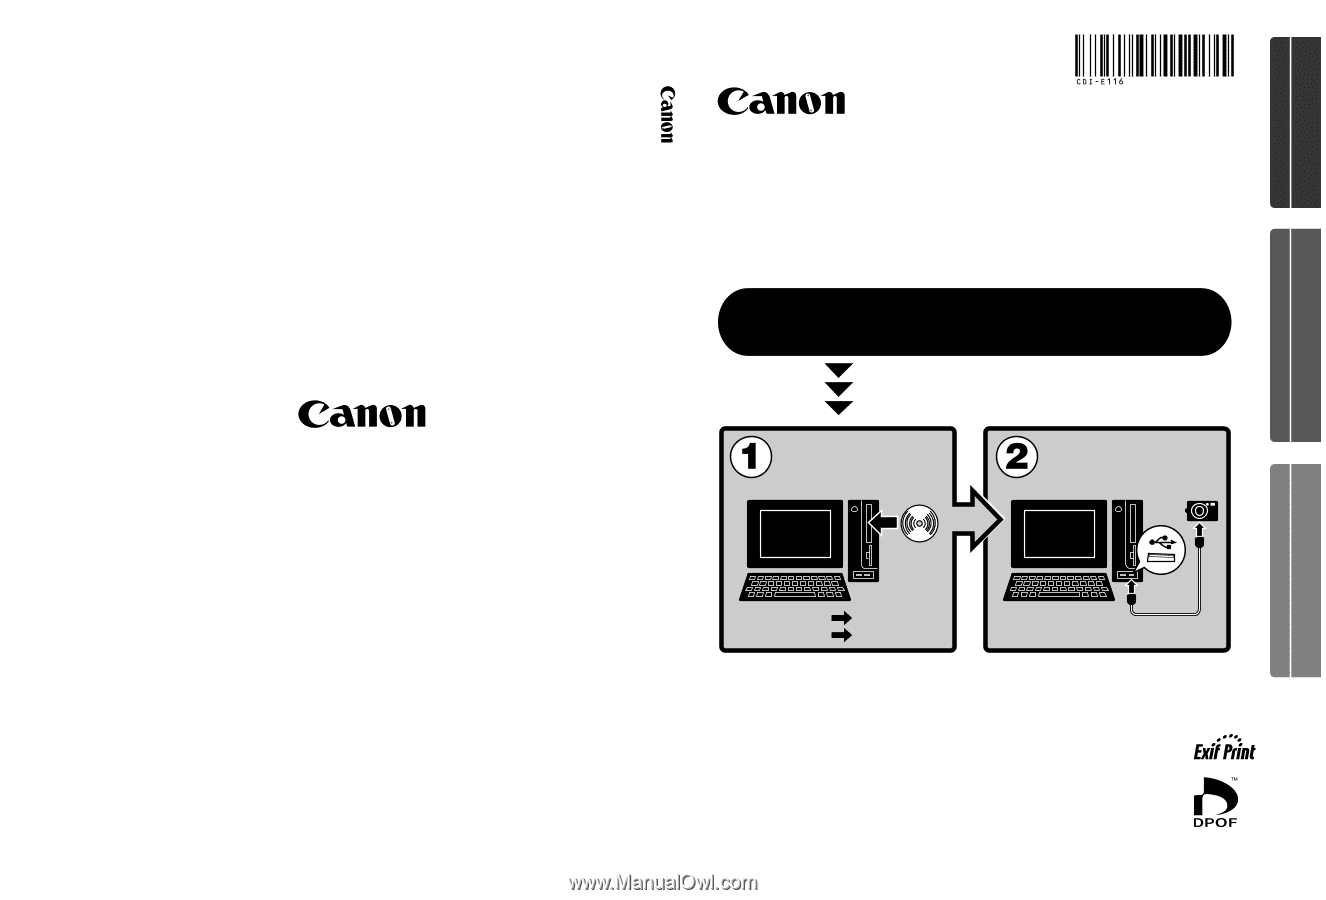
Software Starter Guide For Version 16/17
You must install the software bundled on the Canon
Digital Camera Solution Disk before connecting the
camera to the computer.
Install the software.
Connect the camera
to the computer.