Canon PowerShot SD4000 IS PowerShot SD4000 IS / IXUS 300 HS Camera User Guide - Page 24
Taking Pictures Smart Auto
 |
View all Canon PowerShot SD4000 IS manuals
Add to My Manuals
Save this manual to your list of manuals |
Page 24 highlights
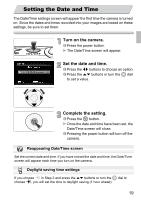
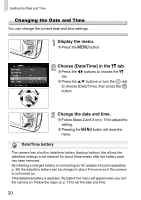
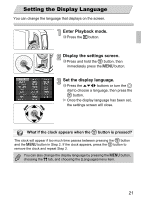
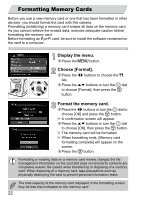
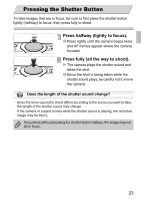
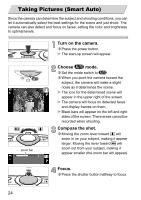
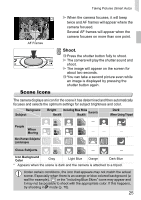
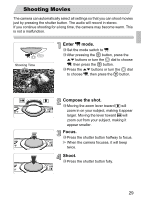
Taking Pictures (Smart Auto) Since the camera can determine the subject and shooting conditions, you can let it automatically select the best settings for the scene and just shoot. The camera can also detect and focus on faces, setting the color and brightness to optimal levels. Turn on the camera. ∆ Press the power button. The start-up screen will appear. Zoom bar Choose A mode. ∆ Set the mode switch to A. ∆ When you point the camera toward the subject, the camera will make a slight noise as it determines the scene. The icon for the determined scene will appear in the upper right of the screen. The camera will focus on detected faces and display frames on them. Black bars will appear on the left and right sides of the screen. There areas cannot be recorded when shooting. Compose the shot. ∆ Moving the zoom lever toward i will zoom in on your subject, making it appear larger. Moving the lever toward j will zoom out from your subject, making it appear smaller (the zoom bar will appear). Focus. ∆ Press the shutter button halfway to focus. 24
-
 1
1 -
2
-
3
-
4
-
5
-
6
-
7
-
8
-
9
-
10
-
11
-
12
-
13
-
14
-
15
-
16
-
17
-
18
-
 19
19 -
 20
20 -
 21
21 -
 22
22 -
 23
23 -
 24
24 -
 25
25 -
 26
26 -
 27
27 -
 28
28 -
 29
29 -
30
-
31
-
32
-
33
-
34
-
35
-
36
-
37
-
38
-
39
-
40
-
41
-
42
-
43
-
44
-
45
-
46
-
47
-
48
-
49
-
50
-
51
-
52
-
53
-
54
-
55
-
56
-
57
-
58
-
59
-
60
-
61
-
62
-
63
-
64
-
65
-
66
-
67
-
68
-
69
-
70
-
71
-
72
-
73
-
74
-
75
-
76
-
77
-
78
-
79
-
80
-
81
-
82
-
83
-
84
-
85
-
86
-
87
-
88
-
89
-
90
-
91
-
92
-
93
-
94
-
95
-
96
-
97
-
98
-
99
-
100
-
101
-
102
-
103
-
104
-
105
-
106
-
107
-
108
-
109
-
110
-
111
-
112
-
113
-
114
-
115
-
116
-
117
-
118
-
119
-
120
-
121
-
122
-
123
-
124
-
125
-
126
-
127
-
128
-
129
-
130
-
131
-
132
-
133
-
134
-
135
-
136
-
137
-
138
-
139
-
140
-
141
-
142
-
143
-
144
-
145
-
146
-
147
-
148
-
149
-
150
-
151
-
152
-
153
-
154
-
155
-
156
-
157
-
158
-
159
-
160
-
161
-
162
-
163
-
164
-
165
-
166
-
167
-
168
-
169
-
170
-
171
-
172
-
173
-
174
-
175
-
176
-
177
-
178
-
179
-
180
 |
 |
