Canon PowerShot SD700 IS Direct Print User Guide
Canon PowerShot SD700 IS Manual
 |
View all Canon PowerShot SD700 IS manuals
Add to My Manuals
Save this manual to your list of manuals |
Canon PowerShot SD700 IS manual content summary:
- Canon PowerShot SD700 IS | Direct Print User Guide - Page 1
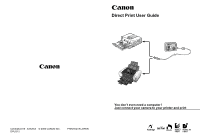
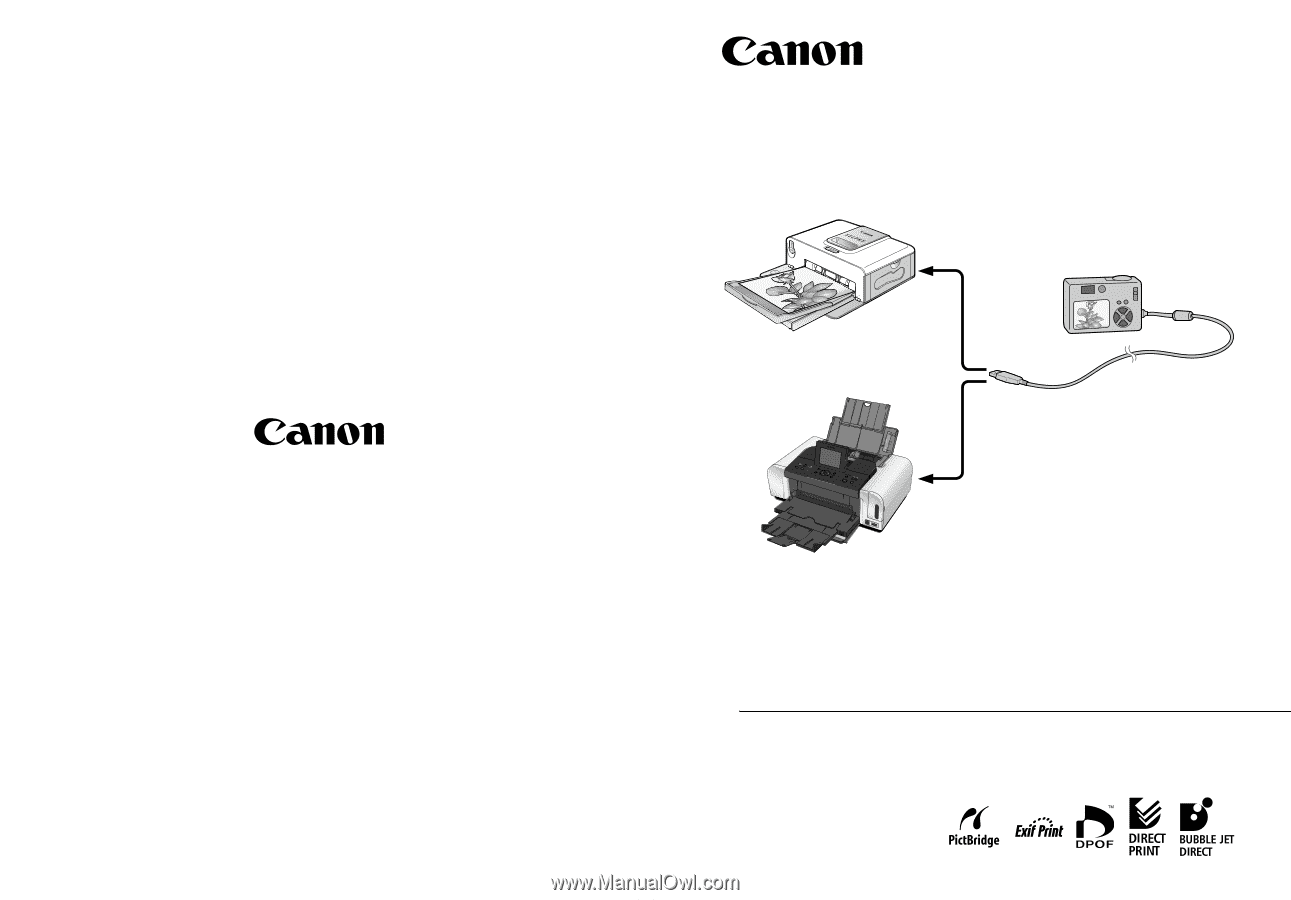
Direct Print User Guide CDI-E234-010 XXXXXX © 2006 CANON INC. DPUG12 PRINTED IN JAPAN You don't even need a computer ! Just connect your camera to your printer and print - Canon PowerShot SD700 IS | Direct Print User Guide - Page 2
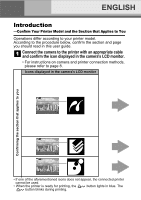
below, confirm the section and page you should read in this user guide. Connect the camera to the printer with an appropriate cable and confirm the icon displayed in the camera's LCD monitor. • For instructions on camera and printer connection methods, please refer to page 8. Icons displayed in - Canon PowerShot SD700 IS | Direct Print User Guide - Page 3
52 " Printing with Non-Canon, PictBridge Compliant Printers" SELPHY CP series Page 53 " Printing with SELPHY CP Series Printers using Canon Direct Print" Bubble Jet printers Page 71 " Printing with Bubble Jet Printers using Bubble Jet Direct" * Please also refer to the user guide that came with - Canon PowerShot SD700 IS | Direct Print User Guide - Page 4
contained in this guide is accurate and complete, no liability can be accepted for any errors or omissions. • Canon makes no warranties for damages resulting from corrupted or lost data due to a mistaken operation or malfunction of the camera, the software, the memory cards, personal computers - Canon PowerShot SD700 IS | Direct Print User Guide - Page 5
to the Printer 8 Disconnecting the Camera and the Printer 9 Printing with SELPHY CP Series Printers using PictBridge . . .10 Printing 10 Easy Print 10 Print after Changing the Print Settings 11 Selecting Print Settings 13 Setting the Date and the File Number Printing Option . . . . 13 Setting - Canon PowerShot SD700 IS | Direct Print User Guide - Page 6
Print 53 If you use Canon Compact Photo Printer SELPHY CP710/CP510 53 Printing 53 Easy Print 53 Print after Changing the Print Settings 54 Selecting Print Settings 55 Setting the Number of Copies 55 Setting the Print Style (Image, Borders and Date) . . . . .55 Setting the Printing - Canon PowerShot SD700 IS | Direct Print User Guide - Page 7
Printing with Bubble Jet Printers using Bubble Jet Direct . .71 Printing 71 Setting the Print Style 72 Settings that Can Be Set with the Camera 74 SELPHY CP Series Printers using PictBridge 74 Bubble Jet Printers (PIXMA series/SELPHY DS series) using PictBridge 75 SELPHY CP Series Printers - Canon PowerShot SD700 IS | Direct Print User Guide - Page 8
the appropriate cable. Image selection and printing is operated from the camera. Various Printing Operations Can Be Performed* Prints to cover the entire surface of the paper. Or, prints with a border. 03/03/2006 Add the date. Specify which portion of the image to print. (Trimming) Multiple - Canon PowerShot SD700 IS | Direct Print User Guide - Page 9
Printers using PictBridge (Including non-Canon Printers) (This function is camera button controls. The settings are recorded to a memory card. Please refer to the Camera User Guide for instructions on setting procedure. This guide explains how to print images with DPOF print settings. DPOF=Digital - Canon PowerShot SD700 IS | Direct Print User Guide - Page 10
the printer with the appropriate interface cable supplied with the camera. DIGITAL terminal Camera: Connect the cable to the DIGITAL terminal. Printer: Refer to the printer's user guide. This illustration shows the PowerShot SD600 DIGITAL ELPH/ DIGITAL IXUS 60 as an example. Some printers require - Canon PowerShot SD700 IS | Direct Print User Guide - Page 11
Disconnecting the Camera and the Printer Detach the cable from the printer. Pull out the cable while holding the connector plug. Do not pull out by the cable. Turn the camera's power off. Detach the cable from the camera. Pull out the cable while holding the connector plug. Do not pull out by the - Canon PowerShot SD700 IS | Direct Print User Guide - Page 12
Printing with SELPHY CP Series Printers using PictBridge Printing Easy Print You can print images by pressing only one button after connecting the camera to the printer. Make sure that displays in the upper left corner of the LCD monitor. 1 Display the images you wish to print and press - Canon PowerShot SD700 IS | Direct Print User Guide - Page 13
, please refer to Printing with SELPHY CP Series Printers using Canon Direct Print (p. 53). Display the images you wish Sets the print to print and press the SET effect (p. 14) button. Sets the date The print order screen appears. and the file number for printing (p. 13) - Canon PowerShot SD700 IS | Direct Print User Guide - Page 14
play back or print images shot with a different camera. • You may not be able to print if the memory card holds a large number of images (about 1000). Cancel paper. Printing Errors • An error message appears if an error occurs for some reason during the printing process. When the error is resolved, - Canon PowerShot SD700 IS | Direct Print User Guide - Page 15
Selecting Print Settings Depending on the camera model, the screens that will be displayed will vary. Please also refer to the user guide that came with your printer. Default Setting • The Default option is a fixed setting of the printer. • The [Date/File No.], [Print Effect], paper setting [Paper - Canon PowerShot SD700 IS | Direct Print User Guide - Page 16
to optimize the image data, yielding high quality prints. You can select the following print effects. On Off Default Uses the camera's shooting information to deliver optimum prints. Prints without any effects. Print settings differ according to your printer model. Select [ ] and choose - Canon PowerShot SD700 IS | Direct Print User Guide - Page 17
been selected for the image, the frame will appear around the previously selected portion. The trimming setting screen differs depending on the camera model. Check which of the following screens 1 appear before selecting settings. a b Trimming Frame Steps 2a and 3a Steps 2b and 3b * Proceed - Canon PowerShot SD700 IS | Direct Print User Guide - Page 18
When screen a displays Trim the image. Changing the Size of the Trimming Frame • Press the zoom lever or the zoom button to adjust the size of the trimming frame. • The trimming frame can be changed to a minimum selection of approximately half the displayed image (in width and height) or a maximum - Canon PowerShot SD700 IS | Direct Print User Guide - Page 19
When screen b displays Trim the image. Changing the Size of the Trimming Frame • Press the up and down buttons to adjust the size of the trimming frame. • The trimming frame can be changed to a minimum selection of approximately half the displayed image (in width and height) or a maximum selection - Canon PowerShot SD700 IS | Direct Print User Guide - Page 20
another image. • When you close the Print mode (when you turn the camera power off, change the camera mode, or detach the connection cable). • The shooting date or part of the date which has been embedded in images using a camera with the Postcard Print mode may not be printed properly depending on - Canon PowerShot SD700 IS | Direct Print User Guide - Page 21
Selecting the Paper Settings Select [Paper Settings] and press the SET button. The paper size setting screen 1 appears. Select a paper size and press the SET button. The default settings and specified 2 paper cassette size are displayed. The paper type setting screen appears. * Paper - Canon PowerShot SD700 IS | Direct Print User Guide - Page 22
or a whole image as an ID photo (p. 22) Fixed Size Prints by specifying the print size of the image on a sheet of paper (p. 24). * Credit card size paper only 20 - Canon PowerShot SD700 IS | Direct Print User Guide - Page 23
or a label sheet. * This option can only be selected when printing on credit card size paper. [Printing example 1] Printing 3 copies of image A in 2-up Number of Image A: [2] copies Image B: [1] copies 4 * Please refer to the Camera User Guide for instructions on DPOF print setting method. 21 - Canon PowerShot SD700 IS | Direct Print User Guide - Page 24
photo. Refer to the party (organization) or administration requiring the photo. The print size can be specified for only L (Large) resolution images in the camera connected to the printer. Select [ID Photo], then press the SET button. T Specify the print size by selecting the length of the long side - Canon PowerShot SD700 IS | Direct Print User Guide - Page 25
16 and p. 17) on how to trim the image. Trimming Frame The trimming setting screen differs depending on the camera model. Follow the steps according to the screen that displays on your camera. • The shape of the trimming frame varies depending on the specified print size. • Use the LCD monitor to - Canon PowerShot SD700 IS | Direct Print User Guide - Page 26
of paper. Select the fixed print size required. Depending on the paper size, you can select print sizes as follows: Paper size Print size Credit Card 9 × 13 cm (L size) You cannot select the print size. 89 mm × 55 mm Default 10 × 14.8 cm (Postcard size) 4 in. × 8 in./ 10 × 20 cm (Wide - Canon PowerShot SD700 IS | Direct Print User Guide - Page 27
Display the frame you wish to print on the LCD monitor, select (Print), then press the SET button. Refer to Viewing Movies section of the Camera User Guide on how to display the movie frame you wish to print. Select and choose [Single]. 3 Select and set the number of prints. 1 to 99 copies - Canon PowerShot SD700 IS | Direct Print User Guide - Page 28
at the same time. 5 Select [Print] and press the SET button. It may not be possible to play back or print movies shot with a different camera. 26 - Canon PowerShot SD700 IS | Direct Print User Guide - Page 29
Depending on the number of seconds in the movie, there are cases when the number of frames indicated below will not be printed.) • Credit card size: 20 frames • L size: 42 frames • Postcard size: 63 frames • Wide size: 84 frames • Selecting [Paper Settings] and pressing the SET button in Step - Canon PowerShot SD700 IS | Direct Print User Guide - Page 30
(Print) menu, you can specify and print multiple images or all the images on a memory card. For instructions on how to specify images, please refer to Setting the DPOF Print Settings section of the Camera User Guide. In this section, we will explain how to print images after specifying them. In the - Canon PowerShot SD700 IS | Direct Print User Guide - Page 31
to [Index], the [Date] and [File No.] cannot be printed at the same time. • The ID photo print function cannot be used. • You cannot print movies. • The maximum number of images printed on one page in the Index print type depends on the selected paper size. • Credit card size: 20 images • L size - Canon PowerShot SD700 IS | Direct Print User Guide - Page 32
space on the memory card when printing is canceled, it may not be possible to restart printing. • If printing is canceled because the camera battery is depleted, it may not be possible to restart printing. (Replace with a fully charged battery pack or new batteries, then turn the camera power on - Canon PowerShot SD700 IS | Direct Print User Guide - Page 33
camera and printer connection. (Depending on the printer model, some messages may not display.) Please refer to the printer's user guide for solutions. No Paper No Ink Paper and ink do not match Paper Jam Paper Error Ink Error Recharge the printer battery Readjust trimming Hardware Error File Error - Canon PowerShot SD700 IS | Direct Print User Guide - Page 34
Bubble Jet Printers (PIXMA series/ SELPHY DS series) using PictBridge Printing Easy Print You can print images by pressing only one button after connecting the camera to the printer. Make sure that displays in the upper left corner of the LCD monitor. 1 Display the images you wish to print and press - Canon PowerShot SD700 IS | Direct Print User Guide - Page 35
using Bubble Jet Direct (p. 71). Display the images you wish Sets the print to print and press the SET effect (p. 36) button. Sets the date and The print order screen appears. the file number for printing (p. 35) 2 Depending on the printer model, some setting options may not display. Sets - Canon PowerShot SD700 IS | Direct Print User Guide - Page 36
to play back or print images shot with a different camera. • You may not be able to print if the memory card holds a large number of images (about 1000). Cancel panel, an error number or message displays on the panel. Please refer to the printer user guide for the remedies corresponding to the - Canon PowerShot SD700 IS | Direct Print User Guide - Page 37
. For details, please refer to the printer user guide. Setting the Date and the File Number Printing Option Select [ ], then select the date and the file number printing option. You can set the date and the file number printing as follows: Date Prints the date. 1 File No. Prints only the file - Canon PowerShot SD700 IS | Direct Print User Guide - Page 38
If you select an image which has had the shooting date embedded in it using a camera with the Postcard Print mode, [ ] will be set to [Off]. If you select [Date], [File No.] or [Both], the date/file number will be printed on the embedded information which is also printed. Setting the Print Effect - Canon PowerShot SD700 IS | Direct Print User Guide - Page 39
Setting the Number of Copies Select [ ] and set the number of prints. 1 to 99 copies can be set. 1 37 - Canon PowerShot SD700 IS | Direct Print User Guide - Page 40
been selected for the image, the frame will appear around the previously selected portion. The trimming setting screen differs depending on the camera model. Check which of the following screens 1 appear before selecting settings. a b Trimming Frame Steps 2a and 3a Steps 2b and 3b * Proceed - Canon PowerShot SD700 IS | Direct Print User Guide - Page 41
When screen a displays Trim the image. Changing the Size of the Trimming Frame • Press the zoom lever or the zoom button to adjust the size of the trimming frame. • The trimming frame can be changed to a minimum selection of approximately half the displayed image (in width and height) or a maximum - Canon PowerShot SD700 IS | Direct Print User Guide - Page 42
When screen b displays Trim the image. Changing the Size of the Trimming Frame • Press the up and down buttons to adjust the size of the trimming frame. • The trimming frame can be changed to a minimum selection of approximately half the displayed image (in width and height) or a maximum selection - Canon PowerShot SD700 IS | Direct Print User Guide - Page 43
another image. • When you close the Print mode (when you turn the camera power off, change the camera mode, or detach the connection cable). • The shooting date or part of the date which has been embedded in images using a camera with the Postcard Print mode may not be printed properly depending on - Canon PowerShot SD700 IS | Direct Print User Guide - Page 44
paper sizes* are available: 4" u 6", 5" u 7", 13 u 18 cm, 8.5" u 11", A4, 2 CreditCard, 8" u 10", A3, A3+/ 13" u 19" and Default. • Some sizes are not available with certain cameras and printer models. The paper type setting screen appears. * Paper sizes vary according to region. 42 - Canon PowerShot SD700 IS | Direct Print User Guide - Page 45
printer model. * Canon brand paper • Other kind of paper may be used. For the usable paper, please also refer to the printer user guide. • The option and you select [4" × 6"] in [Paper Size]. *2Prints the camera name, shooting mode, shutter speed, aperture value, exposure compensation, ISO - Canon PowerShot SD700 IS | Direct Print User Guide - Page 46
. [Printing example 2] Printing 3 copies of image A and 2 copies of image B in 9-up DPOF print settings* (p. 47) Layout Image A: [3] copies Image B: [2] copies 9 * Please refer to the Camera User Guide for instructions on DPOF print setting method. 44 - Canon PowerShot SD700 IS | Direct Print User Guide - Page 47
to the print order screen. • Images will print with borders, even if [Borderless] was selected with the camera in the following cases: •When [Plain] is selected in the camera's [Paper Type] (cannot be selected depending on the connected printer model) •With printers equipped with an operation - Canon PowerShot SD700 IS | Direct Print User Guide - Page 48
), then press the SET button. Refer to Viewing Movies section of the Camera User Guide on how to display the movie frame you wish to print. Select and It may not be possible to play back or print movies shot with a different camera. • If you press the button instead of the SET button in Step 1, - Canon PowerShot SD700 IS | Direct Print User Guide - Page 49
(Print) menu, you can specify and print multiple images or all the images on a memory card. For instructions on how to specify images, please refer to Setting the DPOF Print Settings section of the Camera User Guide. In this section, we will explain how to print images after specifying them. In the - Canon PowerShot SD700 IS | Direct Print User Guide - Page 50
in [Print Settings] on the screen in Step 1 to [On]. You cannot set the date in Step 2. • When the print type is set to [Index], both the [Date] and [File No.] cannot be printed depending on the printer. • When the print type is set to [Standard], the [File No.] cannot be printed - Canon PowerShot SD700 IS | Direct Print User Guide - Page 51
space on the memory card when printing is canceled, it may not be possible to restart printing. • If printing is canceled because the camera battery is depleted, it may not be possible to restart printing. (Replace with a fully charged battery pack or new batteries, then turn the camera power on - Canon PowerShot SD700 IS | Direct Print User Guide - Page 52
your nearest Canon Customer Support center listed in the Contact List provided with the printer or in the user guide. There is a problem with the ink. If the printer's error lamp is blinking and an error message is displayed, please refer to the printer's user guide to ascertain the problem and its - Canon PowerShot SD700 IS | Direct Print User Guide - Page 53
. If the printer's error lamp is blinking and an error message is displayed, please refer to the printer's user guide to ascertain the problem and its remedy. You tried to print an image that is not compatible with PictBridge. Some images that have been recorded with another camera or modified using - Canon PowerShot SD700 IS | Direct Print User Guide - Page 54
Printing with Non-Canon, PictBridge Compliant Printers Printing 1 Make sure that displays in the upper left corner of the LCD monitor. Vivid], [NR], [Vivid+NR], [Face ] • Paper Size (p. 42):[A3+/13" × 19"] and [5" × 7"/13 ×18cm] Please also refer to the user guide that came with your printer. 52 - Canon PowerShot SD700 IS | Direct Print User Guide - Page 55
Photo Printer SELPHY CP710/CP510 When printing, on wide-size paper, an image that has been shot using a Canon digital camera's (wide) size, select from [Print Method] on the camera's (Set up) menu. After this, see Printing with SELPHY CP Series Printers using PictBridge (p. 10). Printing Easy Print - Canon PowerShot SD700 IS | Direct Print User Guide - Page 56
printing will not take place. • You cannot print the RAW images. • It may not be possible to play back or print images shot with a different camera. 54 - Canon PowerShot SD700 IS | Direct Print User Guide - Page 57
70) for details. The [Resume] option may not appear with some types of errors. In that case, select [Stop]. Selecting Print Settings Setting the Number of Copies On Date Off Adds the date to the print. Prints without the date. * This option can only be selected when printing on credit card size - Canon PowerShot SD700 IS | Direct Print User Guide - Page 58
select [Style] and press the SET button. Select [Image], [Borders], or [Date]. 2 Select settings as needed. 3 4 Print Area Frame Press the MENU an image which has had the shooting date embedded in it using a camera with the Postcard Print mode, [Date] in the [Style] menu will be set to [Off]. - Canon PowerShot SD700 IS | Direct Print User Guide - Page 59
image gets printed. Please set the Print Style (Image, Borders and Date) before setting the trimming settings. If the print style is changed previously selected portion. The trimming setting screen differs depending on the camera model. Check which of the following screens 1 appear before selecting - Canon PowerShot SD700 IS | Direct Print User Guide - Page 60
When screen a displays Trim the image. Changing the Size of the Trimming Frame • Press the zoom lever or the zoom button to adjust the size of the trimming frame. • The trimming frame can be changed to a minimum selection of approximately half the displayed image (in width and height) or a maximum - Canon PowerShot SD700 IS | Direct Print User Guide - Page 61
When screen b displays Trim the image. Changing the Size of the Trimming Frame • Press the up and down buttons to adjust the size of the trimming frame. • The trimming frame can be changed to a minimum selection of approximately half the displayed image (in width and height) or a maximum selection - Canon PowerShot SD700 IS | Direct Print User Guide - Page 62
. • When you close the Print mode (when you turn the camera power off, change the camera mode, or detach the connection cable). • The shooting date or part of the date which has been embedded in images using a camera with the Postcard Date Imprint mode may not be printed properly depending on the - Canon PowerShot SD700 IS | Direct Print User Guide - Page 63
photo. Refer to the party (organization) or administration requiring the photo. The print size can be specified for only L (Large) resolution images in the camera connected to the printer. In the print order screen, select [Style] and press the SET button. 1 Select [Image], then select [ID Photo - Canon PowerShot SD700 IS | Direct Print User Guide - Page 64
. See Step 2 of Setting the Printing Area (Trimming) (p. 58 and p. 59) on how to trim the image. The trimming setting screen differs depending on the camera model. Follow the steps according to the screen that displays on your - Canon PowerShot SD700 IS | Direct Print User Guide - Page 65
following operations: • When you set the print size settings for another image. • When you close the Print mode (when you turn the camera power off, change the camera mode, or detach the connection cable). • The shape of the trimming frame varies depending on the specified print size. • Use the LCD - Canon PowerShot SD700 IS | Direct Print User Guide - Page 66
Display the frame you wish to print on the LCD monitor, select (Print), then press the SET button. Refer to Viewing Movies section of the Camera User Guide on how to display the movie frame you wish to print. Select and choose [Single]. 3 4 64 Select and set the number of prints. 1 to 99 - Canon PowerShot SD700 IS | Direct Print User Guide - Page 67
at the same time. 5 Select [Print] and press the SET button. It may not be possible to play back or print movies shot with a different camera. 65 - Canon PowerShot SD700 IS | Direct Print User Guide - Page 68
(Depending on the number of seconds in the movie, there are cases when the number of frames indicated below will not be printed.) • Credit card size: 20 frames • L size: 42 frames • Postcard size: 63 frames • Wide size: 63 frames • Selecting [Style] and pressing the SET button in Step 4 will - Canon PowerShot SD700 IS | Direct Print User Guide - Page 69
(Print) menu, you can specify and print multiple images or all the images on a memory card. For instructions on how to specify images, please refer to Setting the DPOF Print Settings section of the Camera User Guide. In this section, we will explain how to print images after specifying them. In the - Canon PowerShot SD700 IS | Direct Print User Guide - Page 70
space on the memory card when printing is canceled, it may not be possible to restart printing. • If printing is canceled because the camera battery is depleted, it may not be possible to restart printing. (Replace with a fully charged battery pack or new batteries, then turn the camera power on - Canon PowerShot SD700 IS | Direct Print User Guide - Page 71
Printing Errors • An error message appears if an error occurs for some reason during the printing process. Select [Stop] or [Resume] and press the SET button. * The [Resume] option may not appear with some types of errors. In that case, select [Stop]. 69 - Canon PowerShot SD700 IS | Direct Print User Guide - Page 72
of Messages The following messages may appear on the camera's LCD monitor when an error occurs during a camera and printer connection. (Depending on the printer model, some messages may not display.) • Please refer to the printer's user guide for solutions. No Paper No Ink Incompatible paper size - Canon PowerShot SD700 IS | Direct Print User Guide - Page 73
series/ SELPHY DS series) using PictBridge (p. 32). After this step, follow the procedures in the section Printing with SELPHY CP Series Printers using Canon Direct Print (p. 53) to print your images. However, please note that some menus and precautions differ, as listed below. See pages 54 and - Canon PowerShot SD700 IS | Direct Print User Guide - Page 74
to the printer user guide for the remedies corresponding to the error numbers. See page 55. Setting the Print Style You can select from among the following print styles. Paper Borders Date Borderless Bordered On Off Select the paper size from the following: [Card #1], [Card #2], [Card #3], [LTR - Canon PowerShot SD700 IS | Direct Print User Guide - Page 75
function cannot be used. • If you select an image which has had the shooting date embedded in it using a camera with the Postcard Print mode, [Date] in the [Style] menu will be set to [Off]. If you set [Date] to [On], dates will appear twice on the printed image. See page 68. • To print the - Canon PowerShot SD700 IS | Direct Print User Guide - Page 76
SELPHY CP Series Printers using PictBridge (When appears on the camera's LCD monitor during a connection ) Print Options Selectable with the Camera Date File No. Date/File No. Both Off Default Off Print Effect On Default Number of Prints 1 to 99 Trimming CreditCard 9 × 13 cm Paper - Canon PowerShot SD700 IS | Direct Print User Guide - Page 77
series/ SELPHY DS series) using PictBridge (When appears on the camera's LCD monitor during a connection) Some settings are not available with certain cameras and printers. Print Options Selectable with the Camera Date File No. Date Both Off Default Off On Vivid Print Effect NR Vivid+NR - Canon PowerShot SD700 IS | Direct Print User Guide - Page 78
4" u 6" 13 u 18 cm 5" u 7" A4 Paper Size*1 8.5" u 11" CreditCard 8" u 10" A3 A3+/13" u 19" Paper Settings Default Photo Paper Type Fast Photo Plain Default Bordered Borderless Page Layout N-up*2 2/4/9/16 Bordered (print with the shooting information) Default *1 Paper sizes vary - Canon PowerShot SD700 IS | Direct Print User Guide - Page 79
) Print Options Selectable with the Camera SELPHY CP series Printers using Canon Direct Print Bubble Jet Printers using Bubble Jet Direct Number of Prints 1 to 99 { { 1 image { - Image Multiple {*1 - ID Photo { - Style Card #1, Card #2, Paper Card #3, Letter (LTR) -*2 { or A4 - Canon PowerShot SD700 IS | Direct Print User Guide - Page 80
MEMO 78 - Canon PowerShot SD700 IS | Direct Print User Guide - Page 81
MEMO 79 - Canon PowerShot SD700 IS | Direct Print User Guide - Page 82
MEMO 80
-
 1
1 -
 2
2 -
 3
3 -
 4
4 -
 5
5 -
 6
6 -
 7
7 -
8
-
9
-
10
-
11
-
12
-
13
-
14
-
15
-
16
-
17
-
18
-
19
-
20
-
21
-
22
-
23
-
24
-
25
-
26
-
27
-
28
-
29
-
30
-
31
-
32
-
33
-
34
-
35
-
36
-
37
-
38
-
39
-
40
-
41
-
42
-
43
-
44
-
45
-
46
-
47
-
48
-
49
-
50
-
51
-
52
-
53
-
54
-
55
-
56
-
57
-
58
-
59
-
60
-
61
-
62
-
63
-
64
-
65
-
66
-
67
-
68
-
69
-
70
-
71
-
72
-
73
-
74
-
75
-
76
-
77
-
78
-
79
-
80
-
81
-
82
 |
 |
CDI-E234-010
XXXXXX
© 2006 CANON INC.
PRINTED IN JAPAN
DPUG12
Direct Print User Guide
You don’t even need a computer !
Just connect your camera to your printer and print