Canon PowerShot SX260 HS PowerShot SX260 HS / SX240 HS Camera User Guide - Page 95
Choose, Choose white balance., Adjust the setting., Correcting White Balance
 |
View all Canon PowerShot SX260 HS manuals
Add to My Manuals
Save this manual to your list of manuals |
Page 95 highlights
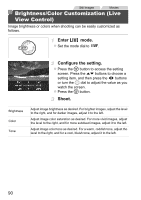
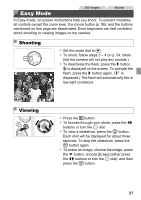
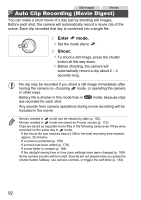
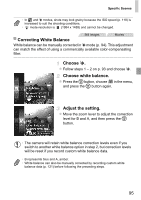
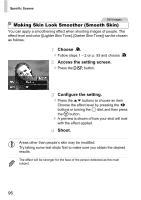
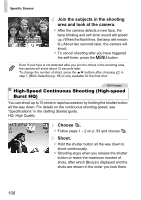
Specific Scenes • In and S modes, shots may look grainy because the ISO speed (p. 118) is increased to suit the shooting conditions. • mode resolution is (1984 x 1488) and cannot be changed. Still Images Movies Correcting White Balance White balance can be manually corrected in S mode (p. 94). This adjustment can match the effect of using a commercially available color-compensating filter. Choose S. z Follow steps 1 - 2 on p. 93 and choose S. Choose white balance. z Press the m button, choose in the menu, and press the m button again. Adjust the setting. z Move the zoom lever to adjust the correction level for B and A, and then press the m button. • The camera will retain white balance correction levels even if you switch to another white balance option in step 2, but correction levels will be reset if you record custom white balance data. • B represents blue and A, amber. • White balance can also be manually corrected by recording custom white balance data (p. 121) before following the preceding steps. 95
-
 1
1 -
2
-
3
-
4
-
5
-
6
-
7
-
8
-
9
-
10
-
11
-
12
-
13
-
14
-
15
-
16
-
17
-
18
-
19
-
20
-
21
-
22
-
23
-
24
-
25
-
26
-
27
-
28
-
29
-
30
-
31
-
32
-
33
-
34
-
35
-
36
-
37
-
38
-
39
-
40
-
41
-
42
-
43
-
44
-
45
-
46
-
47
-
48
-
49
-
50
-
51
-
52
-
53
-
54
-
55
-
56
-
57
-
58
-
59
-
60
-
61
-
62
-
63
-
64
-
65
-
66
-
67
-
68
-
69
-
70
-
71
-
72
-
73
-
74
-
75
-
76
-
77
-
78
-
79
-
80
-
81
-
82
-
83
-
84
-
85
-
86
-
87
-
88
-
89
-
 90
90 -
 91
91 -
 92
92 -
 93
93 -
 94
94 -
 95
95 -
 96
96 -
 97
97 -
 98
98 -
 99
99 -
 100
100 -
101
-
102
-
103
-
104
-
105
-
106
-
107
-
108
-
109
-
110
-
111
-
112
-
113
-
114
-
115
-
116
-
117
-
118
-
119
-
120
-
121
-
122
-
123
-
124
-
125
-
126
-
127
-
128
-
129
-
130
-
131
-
132
-
133
-
134
-
135
-
136
-
137
-
138
-
139
-
140
-
141
-
142
-
143
-
144
-
145
-
146
-
147
-
148
-
149
-
150
-
151
-
152
-
153
-
154
-
155
-
156
-
157
-
158
-
159
-
160
-
161
-
162
-
163
-
164
-
165
-
166
-
167
-
168
-
169
-
170
-
171
-
172
-
173
-
174
-
175
-
176
-
177
-
178
-
179
-
180
-
181
-
182
-
183
-
184
-
185
-
186
-
187
-
188
-
189
-
190
-
191
-
192
-
193
-
194
-
195
-
196
-
197
-
198
-
199
-
200
-
201
-
202
-
203
-
204
-
205
-
206
-
207
-
208
-
209
-
210
-
211
-
212
-
213
-
214
-
215
-
216
-
217
-
218
-
219
-
220
-
221
-
222
-
223
-
224
-
225
-
226
-
227
-
228
-
229
-
230
-
231
-
232
-
233
-
234
-
235
-
236
-
237
-
238
-
239
-
240
-
241
-
242
-
243
-
244
-
245
-
246
 |
 |