Canon PowerShot SX40 HS PowerShot SX40 HS Camera User Guide - Page 35
Transferring and Viewing Images - camera how to use
 |
View all Canon PowerShot SX40 HS manuals
Add to My Manuals
Save this manual to your list of manuals |
Page 35 highlights
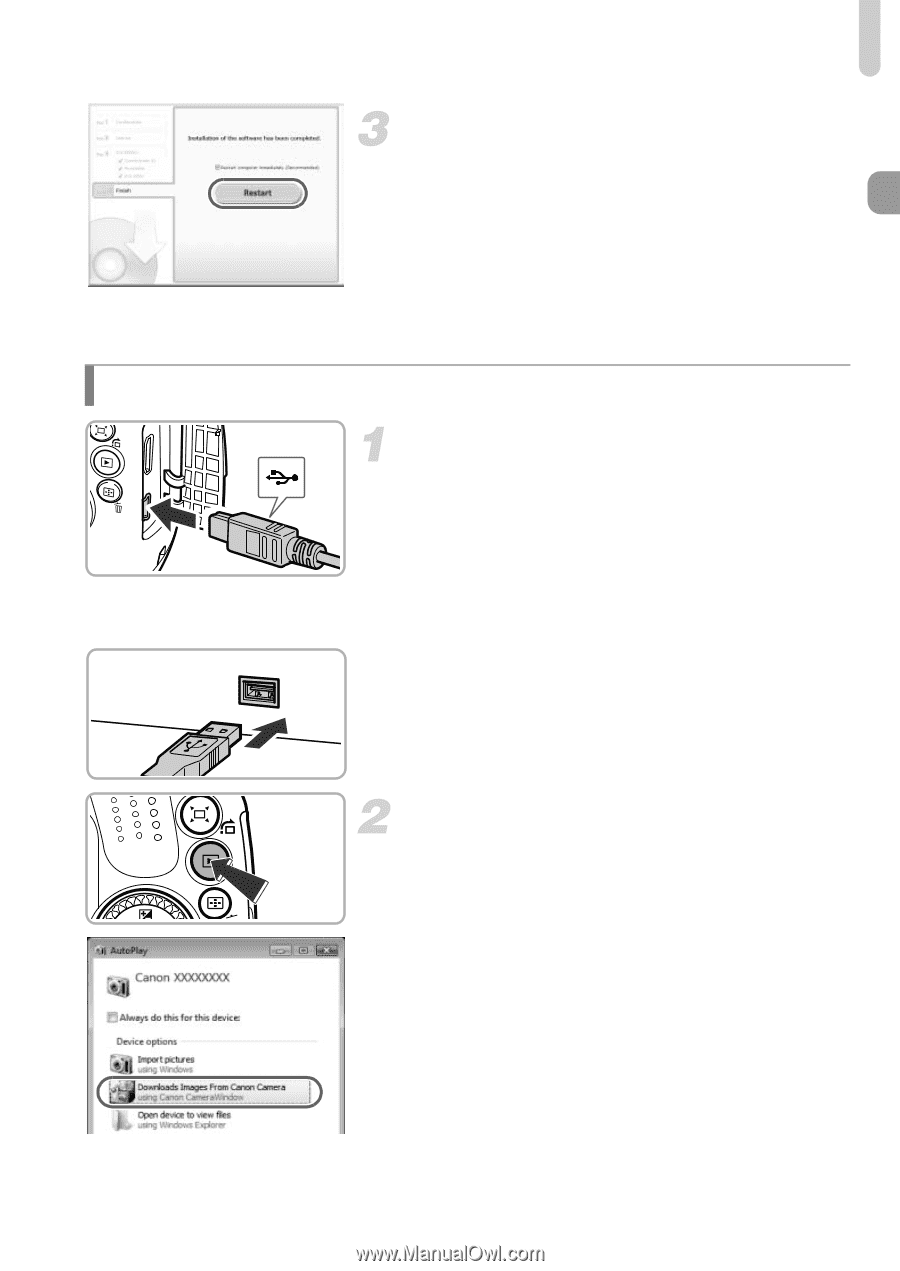
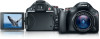
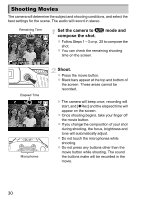
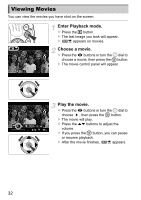
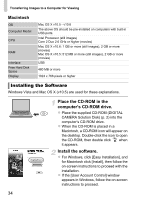
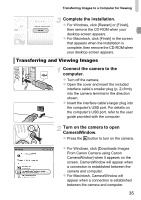
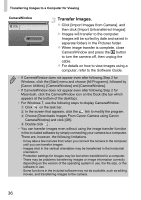
Transferring Images to a Computer for Viewing Complete the installation. z For Windows, click [Restart] or [Finish], then remove the CD-ROM when your desktop screen appears. z For Macintosh, click [Finish] in the screen that appears when the installation is complete, then remove the CD-ROM when your desktop screen appears. Transferring and Viewing Images Connect the camera to the computer. z Turn off the camera. z Open the cover and insert the included interface cable's smaller plug (p. 2) firmly into the camera terminal in the direction shown. z Insert the interface cable's larger plug into the computer's USB port. For details on the computer's USB port, refer to the user guide provided with the computer. Turn on the camera to open CameraWindow. z Press the 1 button to turn on the camera. z For Windows, click [Downloads Images From Canon Camera using Canon CameraWindow] when it appears on the screen. CameraWindow will appear when a connection is established between the camera and computer. z For Macintosh, CameraWindow will appear when a connection is established between the camera and computer. 35
-
 1
1 -
2
-
3
-
4
-
5
-
6
-
7
-
8
-
9
-
10
-
11
-
12
-
13
-
14
-
15
-
16
-
17
-
18
-
19
-
20
-
21
-
22
-
23
-
24
-
25
-
26
-
27
-
28
-
29
-
 30
30 -
 31
31 -
 32
32 -
 33
33 -
 34
34 -
 35
35 -
 36
36 -
 37
37 -
 38
38 -
 39
39 -
 40
40 -
41
-
42
-
43
-
44
-
45
-
46
-
47
-
48
-
49
-
50
-
51
-
52
-
53
-
54
-
55
-
56
-
57
-
58
-
59
-
60
-
61
-
62
-
63
-
64
-
65
-
66
-
67
-
68
-
69
-
70
-
71
-
72
-
73
-
74
-
75
-
76
-
77
-
78
-
79
-
80
-
81
-
82
-
83
-
84
-
85
-
86
-
87
-
88
-
89
-
90
-
91
-
92
-
93
-
94
-
95
-
96
-
97
-
98
-
99
-
100
-
101
-
102
-
103
-
104
-
105
-
106
-
107
-
108
-
109
-
110
-
111
-
112
-
113
-
114
-
115
-
116
-
117
-
118
-
119
-
120
-
121
-
122
-
123
-
124
-
125
-
126
-
127
-
128
-
129
-
130
-
131
-
132
-
133
-
134
-
135
-
136
-
137
-
138
-
139
-
140
-
141
-
142
-
143
-
144
-
145
-
146
-
147
-
148
-
149
-
150
-
151
-
152
-
153
-
154
-
155
-
156
-
157
-
158
-
159
-
160
-
161
-
162
-
163
-
164
-
165
-
166
-
167
-
168
-
169
-
170
-
171
-
172
-
173
-
174
-
175
-
176
-
177
-
178
-
179
-
180
-
181
-
182
-
183
-
184
-
185
-
186
-
187
-
188
-
189
-
190
-
191
-
192
-
193
-
194
-
195
-
196
-
197
-
198
-
199
-
200
-
201
-
202
-
203
-
204
-
205
-
206
-
207
-
208
-
209
-
210
-
211
-
212
-
213
-
214
-
215
-
216
-
217
-
218
-
219
-
220
 |
 |