Canon PowerShot SX50 HS User Guide - Page 64
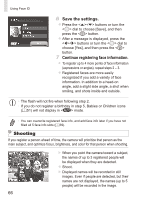
Register face information., Save the settings., choose [Add a New Face].
 |
View all Canon PowerShot SX50 HS manuals
Add to My Manuals
Save this manual to your list of manuals |
Page 64 highlights
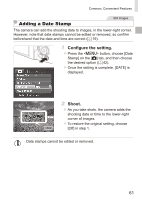
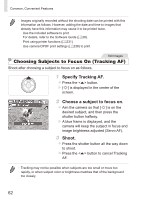
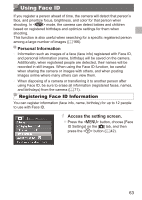
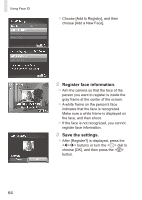
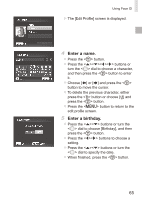
Using Face ID zzChoose [Add to Registry], and then choose [Add a New Face]. 2 Register face information. zzAim the camera so that the face of the person you want to register is inside the gray frame at the center of the screen. zzA white frame on the person's face indicates that the face is recognized. Make sure a white frame is displayed on the face, and then shoot. zzIf the face is not recognized, you cannot register face information. 3 Save the settings. zzAfter [Register?] is displayed, press the buttons or turn the dial to choose [OK], and then press the button. 64
-
 1
1 -
2
-
3
-
4
-
5
-
6
-
7
-
8
-
9
-
10
-
11
-
12
-
13
-
14
-
15
-
16
-
17
-
18
-
19
-
20
-
21
-
22
-
23
-
24
-
25
-
26
-
27
-
28
-
29
-
30
-
31
-
32
-
33
-
34
-
35
-
36
-
37
-
38
-
39
-
40
-
41
-
42
-
43
-
44
-
45
-
46
-
47
-
48
-
49
-
50
-
51
-
52
-
53
-
54
-
55
-
56
-
57
-
58
-
 59
59 -
 60
60 -
 61
61 -
 62
62 -
 63
63 -
 64
64 -
 65
65 -
 66
66 -
 67
67 -
 68
68 -
 69
69 -
70
-
71
-
72
-
73
-
74
-
75
-
76
-
77
-
78
-
79
-
80
-
81
-
82
-
83
-
84
-
85
-
86
-
87
-
88
-
89
-
90
-
91
-
92
-
93
-
94
-
95
-
96
-
97
-
98
-
99
-
100
-
101
-
102
-
103
-
104
-
105
-
106
-
107
-
108
-
109
-
110
-
111
-
112
-
113
-
114
-
115
-
116
-
117
-
118
-
119
-
120
-
121
-
122
-
123
-
124
-
125
-
126
-
127
-
128
-
129
-
130
-
131
-
132
-
133
-
134
-
135
-
136
-
137
-
138
-
139
-
140
-
141
-
142
-
143
-
144
-
145
-
146
-
147
-
148
-
149
-
150
-
151
-
152
-
153
-
154
-
155
-
156
-
157
-
158
-
159
-
160
-
161
-
162
-
163
-
164
-
165
-
166
-
167
-
168
-
169
-
170
-
171
-
172
-
173
-
174
-
175
-
176
-
177
-
178
-
179
-
180
-
181
-
182
-
183
-
184
-
185
-
186
-
187
-
188
-
189
-
190
-
191
-
192
-
193
-
194
-
195
-
196
-
197
-
198
-
199
-
200
-
201
-
202
-
203
-
204
-
205
-
206
-
207
-
208
-
209
-
210
-
211
-
212
-
213
-
214
-
215
-
216
-
217
-
218
-
219
-
220
-
221
-
222
-
223
-
224
-
225
-
226
-
227
-
228
-
229
-
230
-
231
-
232
-
233
-
234
-
235
-
236
-
237
-
238
-
239
-
240
-
241
-
242
-
243
-
244
-
245
-
246
-
247
-
248
-
249
-
250
-
251
-
252
-
253
-
254
-
255
-
256
-
257
-
258
-
259
-
260
-
261
-
262
-
263
-
264
-
265
-
266
-
267
-
268
-
269
-
270
-
271
-
272
-
273
-
274
-
275
-
276
-
277
-
278
-
279
-
280
-
281
-
282
-
283
 |
 |

64
Using Face ID
z
Choose [Add to Registry], and then
choose [Add a New Face].
2
Register face information.
z
Aim the camera so that the face of the
person you want to register is inside the
gray frame at the center of the screen.
z
A white frame on the person’s face
indicates that the face is recognized.
Make sure a white frame is displayed on
the face, and then shoot.
z
If the face is not recognized, you cannot
register face information.
3
Save the settings.
z
After [Register?] is displayed, press the
<
q
><
r
> buttons or turn the <
5
> dial to
choose [OK], and then press the <
m
>
button.