Canon RC-IP100 Remote Camera Controller User Manual
Canon RC-IP100 Manual
 |
View all Canon RC-IP100 manuals
Add to My Manuals
Save this manual to your list of manuals |
Canon RC-IP100 manual content summary:
- Canon RC-IP100 | Remote Camera Controller User Manual - Page 1
Remote Camera Controller User Manual Make sure to read through this User Manual before using the product. Regarding the functions changed/added by the latest firmware, the actual operation and the contents on this document may differ. Please - Canon RC-IP100 | Remote Camera Controller User Manual - Page 2
2 - Canon RC-IP100 | Remote Camera Controller User Manual - Page 3
Settings 16 Camera Network Settings 16 Network Settings on This Controller 16 Tally Setup 17 Tally Control Interface 17 Others Troubleshooting 18 Third-party Software 18 Connection Diagram 18 Specifications 19 Make sure to read through the "Safety Precautions" items in User Manual (Basic - Canon RC-IP100 | Remote Camera Controller User Manual - Page 4
camera. Also enables smooth pan/tilt operation. Controls up to 100 remote camera units This unit can be used to control up to a maximum of 100 remote camera units. One of the remote cameras can be connected or controlled company names indicated in this manual are trademarks or registered trademarks - Canon RC-IP100 | Remote Camera Controller User Manual - Page 5
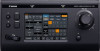
up while the power is turned on. H Control lever For operating pan/tilt of the remote camera. I F3 knob For adjusting the assigned features. adapter. D LAN terminal For connecting a LAN cable. E SERVICE terminal For use during servicing. F TALLY terminal Used for TALLY connection. G SETTING switch - Canon RC-IP100 | Remote Camera Controller User Manual - Page 6
the preset group. Tap the [Group] button again. When the light of the button goes off, the preset number can be changed. M [Camera No./Camera Group] button A camera number or camera group can be selected. To change the camera group, tap the [Group] button. While the button is lit, tap one of the - Canon RC-IP100 | Remote Camera Controller User Manual - Page 7
[CONTROLLER]. 0 The IP address setting screen appears. D Enter the IP address and tap [ENTER]. 3 Configure the camera settings. 0 Configure the camera [CAMERA REGISTRATION]. D Perform registration according to the camera to be connected. 0 IP camera: Select [AUTO] or [Manual] 0 Serial camera: - Canon RC-IP100 | Remote Camera Controller User Manual - Page 8
to turn off the button's light, followed by tapping a camera number. Operating a Camera Operating the PTZ (pan/ tilt/ zoom) 1 Select a camera to operate. (A P8 "Selecting a Camera") 2 Tilt the control lever toward the direction you want the camera to move (pan/ tilt operation). 0 Tilt the lever - Canon RC-IP100 | Remote Camera Controller User Manual - Page 9
setting is referred to as a "preset". Up to 100 presets can be registered for a remote camera. This product manages the presets by dividing them into 10 groups. For example, the first preset of the camera corresponds to the first preset of Group 1 on this product, while the 11th preset corresponds - Canon RC-IP100 | Remote Camera Controller User Manual - Page 10
AWB"/"Daylight"/"Tungsten"/"Kelv"/ "Manual"/"SetA"/"SetB". Tapping the selected CAMERA CONTROL 1 Select a camera to operate. (A P8 "Selecting a Camera") 2 Tap the [CAMERA CONTROL] camera. 5 Tap the [Stop Rec] button to register the operations. Memo : 0 This function is only supported on IP cameras. - Canon RC-IP100 | Remote Camera Controller User Manual - Page 11
Configure the IP address of the connected device according to the system configuration. (A P16 "Network Settings") 2 Camera setup Set up the connected camera. (A P15 "Camera Settings Menu") 3 Remote control settings For configuring the functions to be assigned to the buttons and knobs of this unit - Canon RC-IP100 | Remote Camera Controller User Manual - Page 12
figures below. Normal Menu Screen VIEW Screen This screen is used for selecting a camera, selecting a camera preset, operating a camera and performing tracing. Home Screen . VIEW Screen CAMERA/PRESET Screen CAMERA CONTROL Screen TRACE Screen FUNC Screen STORE Screen This screen is used for - Canon RC-IP100 | Remote Camera Controller User Manual - Page 13
Settings DELETE Screen This screen is used for deleting a camera preset or tracing. Home Screen . DELETE Screen CAMERA/PRESET Screen TRACE Screen BUTTON CUSTOMIZATION Screen For assigning functions to the buttons and knobs of this unit. Home Screen . BUTTON CUSTOMIZATION Screen (*) Home - Canon RC-IP100 | Remote Camera Controller User Manual - Page 14
to return to the home screen. (A P11 "Settings Menu") Home Screen . Video Screen ALL CAMERAS Screen SETTINGS Screen MENU Control Screen Function Screen CAMERA Group Screen Single Screen Network Screen CAMERA REGISTRATION Screen Touch Screen Screen CONTROLLER Screen 14 Menu Screen Flow - Canon RC-IP100 | Remote Camera Controller User Manual - Page 15
to "ON"/"OFF" only for cameras within the same network. 0 To control the Video output of a camera that is not within the same network, use CAMERA Group or Single. 0 When the video output of a camera is turned off, you will not be able to control the camera. Camera Settings Menu Making changes to - Canon RC-IP100 | Remote Camera Controller User Manual - Page 16
to complete the configuration. o IP Camera [Manual] Tapping the [Manual] button displays the manual settings screen for IP address. 0 camera. o [Serial Deactivate] Serial Camera Deactivation To deactivate the use of a serial camera, select [Serial Deactivate]. Network Settings on This Controller - Canon RC-IP100 | Remote Camera Controller User Manual - Page 17
The tally input or tally output supports camera number 1 to 5 of camera group 1. To use the tally input or tally output, assign the cameras to these numbers. For details met. Voltage : Maximum DC 24 V Current : Maximum 50 mA RC-IP100 (Maximum voltage 24 V) TALLY OUT (Maximum current 50 mA) LED - Canon RC-IP100 | Remote Camera Controller User Manual - Page 18
-party software modules. For the licensing terms of the respective modules, please refer to [HOME]>[SETTINGS]>[Open Source License]. Connection Diagram Serial camera IP camera IP camera HUB LAN cable RS-422 cable RC-IP100 . * Up to 100 cameras can be connected concurrently. 18 Troubleshooting - Canon RC-IP100 | Remote Camera Controller User Manual - Page 19
Specifications For the latest information on the product (firmware, User Manual, etc.), please visit our website. General Item Description Power DC (M3) Accessories Compatible Cameras Please refer to "About Cameras Compatible to the Remote Camera Controller RC-IP100"on the website. Please - Canon RC-IP100 | Remote Camera Controller User Manual - Page 20
possible to change the direction in which the camera moves when using the pan or tilt with the control lever. ■ Function Pan Direction/Tilt Direction When operating the camera with the control lever, the user can set the direction in which the camera operates when the lever is tilted. When [Pan - Canon RC-IP100 | Remote Camera Controller User Manual - Page 21
The functions available on this device may differ depending on the camera and connection method. BIE-7290-002 © CANON INC. 2021
-
 1
1 -
 2
2 -
 3
3 -
 4
4 -
 5
5 -
 6
6 -
 7
7 -
8
-
9
-
10
-
11
-
12
-
13
-
14
-
15
-
16
-
17
-
18
-
19
-
20
-
21
 |
 |

Remote Camera Controller
User Manual
Make sure to read through this User Manual before using the product.
Regarding the functions changed/added by the latest firmware,
the actual operation and the contents on this document may differ.
Please check the "Updated Information" in this document
for new functions and specification changes.
ENGLISH