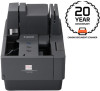
Canon RP10 for CR-120/150 imageFORMULA CR-150 / CR-120 User Manual
Canon RP10 for CR-120/150 Manual
 |
View all Canon RP10 for CR-120/150 manuals
Add to My Manuals
Save this manual to your list of manuals |
Canon RP10 for CR-120/150 manual content summary:
- Canon RP10 for CR-120/150 | imageFORMULA CR-150 / CR-120 User Manual - Page 1
User Manual Please read this manual before operating this scanner. - Canon RP10 for CR-120/150 | imageFORMULA CR-150 / CR-120 User Manual - Page 2
and used in accordance with the instructions, may cause harmful interference to or modifications to the equipment unless otherwise specified in the manual. If such changes or modifications should be made, you scheme or your household waste disposal service. For more information regarding return and - Canon RP10 for CR-120/150 | imageFORMULA CR-150 / CR-120 User Manual - Page 3
Trademarks • Canon and the Canon logo are registered trademarks, of Canon Inc. in the United States and may also be trademarks or registered trademarks in other countries. • imageFORMULA is a trademark of CANON ELECTRONICS INC. • Microsoft, Windows, Windows 7, Windows 8.1 and Windows 10 are - Canon RP10 for CR-120/150 | imageFORMULA CR-150 / CR-120 User Manual - Page 4
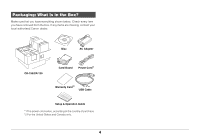
are missing, contact your local authorized Canon dealer. Disc AC Adapter CR-150/CR-120 Card Guard Power Cord*1 Warranty Card*2 USB Cable Setup & Operation Guide *1 The power cord varies, according to the country of purchase. *2 For the United States and Canada only. 4 - Canon RP10 for CR-120/150 | imageFORMULA CR-150 / CR-120 User Manual - Page 5
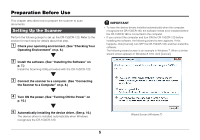
Preparation Before Use This chapter describes how to prepare the scanner to scan documents. Setting Up the Scanner Perform the following steps to set up the CR-150/CR-120. Refer to the section for each step for details about that step. A Check your operating environment. (See "Checking Your - Canon RP10 for CR-120/150 | imageFORMULA CR-150 / CR-120 User Manual - Page 6
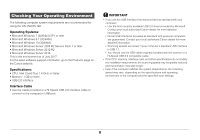
• Microsoft Windows 10 (32/64bit) • Microsoft Windows Server 2008 R2 Service Pack 1 or later • Microsoft Windows Server 2012 R2 • Microsoft Windows 2016 This is the environment as of July 2017. For the latest software support information, go to the Products page on the Canon website. Specifications: - Canon RP10 for CR-120/150 | imageFORMULA CR-150 / CR-120 User Manual - Page 7
website. There are 3 usable software applications. For the latest software support information, go to the Products page on the Canon website. ISIS functions mentioned in this manual may not be operated in some applications. Installing the Scanning Utility Follow the instructions below to install the - Canon RP10 for CR-120/150 | imageFORMULA CR-150 / CR-120 User Manual - Page 8
. For details, see p. 23. • *USB Port (CR-150N/120N only) The scanner can be connected to a dedicated port of an optional device. Refer to the manual of the optional device for details. NOTE Connect the type B plug (square) to the scanner and connect the type A plug (flat) to the USB port - Canon RP10 for CR-120/150 | imageFORMULA CR-150 / CR-120 User Manual - Page 9
. • The settings method and configuration of network devices such as routers vary depending on the environment in which they are being used. Refer to the manual of the network device for details. WARNING When connecting the power cord, follow these precautions. Failure to do so may cause a fire or - Canon RP10 for CR-120/150 | imageFORMULA CR-150 / CR-120 User Manual - Page 10
does not work, or the power LED continues to flash, there is a problem with the scanner. Turn OFF the power, and contact your local authorized Canon dealer or service representative to have the scanner serviced. WARNING If you hear strange sounds, detect smoke or abnormal heat, sense a vibration - Canon RP10 for CR-120/150 | imageFORMULA CR-150 / CR-120 User Manual - Page 11
Turning OFF the Power A Press and hold the Power Button to turn off the power. CAUTION For your safety, disconnect the power plug from the power outlet if you are not using the scanner for a long period of time. NOTE The scanner's auto power off setting is enabled by default, and the scanner will - Canon RP10 for CR-120/150 | imageFORMULA CR-150 / CR-120 User Manual - Page 12
Guide. For details on the CR-150/CR-120, refer to the User Manual (electronic manual). User Manual (Electronic Manual): This Manual Describes how to use the scanner, and includes instructions for configuring the scanner settings, as well as handling, maintenance, and troubleshooting information - Canon RP10 for CR-120/150 | imageFORMULA CR-150 / CR-120 User Manual - Page 13
ON and OFF the Power 10 Turning ON the Power 10 Turning OFF the Power 11 INTRODUCTION 12 Manuals for the CR-150/CR-120 12 Symbols Used in This Manual 12 Important Safety Instructions 15 Handling 15 Installation Location 16 Power Supply 17 Moving the Scanner 18 Introduction to the CR-150 - Canon RP10 for CR-120/150 | imageFORMULA CR-150 / CR-120 User Manual - Page 14
Troubleshooting 54 When the Scanner Is Not Recognized 54 Network Trouble 54 Clearing Paper Jams 55 Feeding Trouble 57 When the Scanned Image Is Not Normal 59 Maintenance 60 Daily Cleaning 60 Cleaning the Main Unit 60 Cleaning the Feed Path 60 Cleaning - Canon RP10 for CR-120/150 | imageFORMULA CR-150 / CR-120 User Manual - Page 15
Important Safety Instructions Handling WARNING ■ Never install and operate the scanner near flammable cord from the power outlet. Contact your local authorized Canon dealer or service representative to have the scanner serviced. ■ Handle the scanner with care. Avoid shock and vibration to the - Canon RP10 for CR-120/150 | imageFORMULA CR-150 / CR-120 User Manual - Page 16
■ When you remove the power cord, grip it by the power plug head. Never attempt to disconnect the power cord from the power outlet by pulling on the power cord. Doing so may damage or expose the cord's internal wiring, and cause a fire or electrical shock. ■ Keep the area around the power outlet - Canon RP10 for CR-120/150 | imageFORMULA CR-150 / CR-120 User Manual - Page 17
the current requirements of the scanner. • If you are unsure of anything relating to the power supply, contact your local authorized Canon dealer or service representative for further information. • Never place an object on top of the power cord or step on the power cord. • Never bundle the power - Canon RP10 for CR-120/150 | imageFORMULA CR-150 / CR-120 User Manual - Page 18
Moving the Scanner When you move the CR-150/CR-120, hold it firmly with both hands and carry it carefully. Do not hold the scanner by the eject stopper or the Card Guard. The scanner weighs approximately 3.2 kg (7.05 lb) . WARNING When moving the scanner, the warnings below should be observed - Turn - Canon RP10 for CR-120/150 | imageFORMULA CR-150 / CR-120 User Manual - Page 19
-120: 120 cpm CR-120N: 120 cpm CR-120 UV: 120 cpm (UV Scan mode) Supports Large Documents Documents up to 108 mm x 245 mm (4.3" x 9.6") can be scanned. High OCR-B, and check writer are recognized as characters by the OCR function. Supports UV scanning (UV models only) CR-120 UV can scan images that - Canon RP10 for CR-120/150 | imageFORMULA CR-150 / CR-120 User Manual - Page 20
Drop-Out Color This function enables drop-out scanning of a specific color in the document. Imprinter Is Standard Equipment An imprinter mechanism, which prints text (5 lines) or a bitmap on documents as they are scanned, comes standard equipped with the scanner. The imprinter's ink cartridge is not - Canon RP10 for CR-120/150 | imageFORMULA CR-150 / CR-120 User Manual - Page 21
Part Names This section describes the names and functions of each part. Before you connect the CR-150/CR-120, familiarize yourself with its parts and their functions. Front View Left Maintenance Cover Open this cover to clear paper jams or to clean the scanner. Operation Buttons Power Button Press - Canon RP10 for CR-120/150 | imageFORMULA CR-150 / CR-120 User Manual - Page 22
Scanner Unit This unit scans the documents. Built-in Nozzle Cleaning Unit Eject Pocket Card Slot Eject Stopper Pull out the Eject Stopper to prevent documents from falling off the output tray. Document Feed/Eject Tray Document Feeder Adjustment Dial Cover Ultrasonic Sensor When this sensor detects - Canon RP10 for CR-120/150 | imageFORMULA CR-150 / CR-120 User Manual - Page 23
. (See "USB Connections," on p. 8.) USB Port (CR-150N/120N only) The scanner can be connected to a dedicated port of an optional device. Refer to the manual of the optional device for details. CAUTION To avoid overheating and causing a fire, never block the air vents on the back of the scanner. 23 - Canon RP10 for CR-120/150 | imageFORMULA CR-150 / CR-120 User Manual - Page 24
Exterior Dimensions Units: millimeters (units in parenthesis are inches) 360.4 mm (14.2") (with the eject stopper open) 298.5 mm (11.8") 238.2 mm (9.4") 56 mm (2.2") Remove and attach the Eject Stopper The Eject Stopper can be extended or removed as shown in the figure. Adjust the stopper in - Canon RP10 for CR-120/150 | imageFORMULA CR-150 / CR-120 User Manual - Page 25
Preparing the Ink Cartridge This section describes how to prepare the ink cartridge so that you can use the imprinter to print text or a bitmap on scanned documents. About the Ink Cartridge The ink cartridge is not included with the scanner. Purchase an ink cartridge separately, as shown below. - Canon RP10 for CR-120/150 | imageFORMULA CR-150 / CR-120 User Manual - Page 26
C Remove the ink cartridge from its bag. Ink Jet Nozzle Tag Contacts IMPORTANT Do not touch the ink cartridge contacts. This can cause a bad electrical contact and reduced print quality. D Grasp the tag and then peel off the tape covering the ink jet nozzle. E Place the ink cartridge shown in the - Canon RP10 for CR-120/150 | imageFORMULA CR-150 / CR-120 User Manual - Page 27
F Push the ink cartridge in the direction of the arrow until it clicks into place. IMPORTANT Make sure that the ink cartridge is securely in place. G Close the Nozzle cleaning Unit. H Carefully replace the Top Cover. 27 - Canon RP10 for CR-120/150 | imageFORMULA CR-150 / CR-120 User Manual - Page 28
Utility A Click the Start button, and then click [All Programs]. The procedure in Windows 8.1/10 is different from the ones described in this manual. Refer to the Windows 8.1/10 "Help and Support Center" to select [Run]. B Click [Scanning Utility for CR-120&150]. C Start the Scanning Utility. 28 - Canon RP10 for CR-120/150 | imageFORMULA CR-150 / CR-120 User Manual - Page 29
NOTE The basic operation of the Scanning Utility is noted in the Scanning Utility help file. On the [Help] menu, click [Help] to view the explanation. IMPORTANT Confirm that your scanner is correctly connected to the computer, and that the scanner and computer are both turned on. B Select a - Canon RP10 for CR-120/150 | imageFORMULA CR-150 / CR-120 User Manual - Page 30
Scanning Methods A Select [Scanner Setting] from the [File] menu. NOTE For information about the settings for the scan conditions, click [Help] on the Settings dialog box to open the Help file. C Select the scanning method from the [File] menu and start scanning. The Settings dialog box appears. B - Canon RP10 for CR-120/150 | imageFORMULA CR-150 / CR-120 User Manual - Page 31
Be sure to Log On as the administrator. B Download usable software from the Canon Website. After executing the downloaded file, follow the instructions on the screen to complete the installation. IMPORTANT • The displayed screen, type, file name, and folder name will differ depending on your - Canon RP10 for CR-120/150 | imageFORMULA CR-150 / CR-120 User Manual - Page 32
sure to Log On as the Administrator. • The procedure in Windows 8.1/10 is different from the ones described in this manual. Refer to the Windows 8.1/10 "Help and Support Center" to uninstall the software. A Click the Start button, and then click [Control Panel]. B Click [Uninstall a program]. The - Canon RP10 for CR-120/150 | imageFORMULA CR-150 / CR-120 User Manual - Page 33
box appears. If you selected "Canon Driver for CR-120/CR-150," the above dialog box appears. E Click [Yes], and the uninstaller starts. Follow the instructions on the screen to finish uninstalling the software. 33 - Canon RP10 for CR-120/150 | imageFORMULA CR-150 / CR-120 User Manual - Page 34
Network Settings (CR-150N/120N only) Network settings can be configured in the settings screen of this scanner. NOTE [IP Address] This is an identifier assigned to each computer, network device, and other devices that are connected to the network. [DHCP] Automatically assigns an IP address to a - Canon RP10 for CR-120/150 | imageFORMULA CR-150 / CR-120 User Manual - Page 35
[Scanner Name] Set an original name for the scanner so that it can be correctly identified on the network. NOTE • Scanner Name must be 1 to 15 characters in length. The following arbitrary characters can be entered. Numerals: 0 to 9* Alphabetic characters: A to Z , a to z and hyphen (-) * * The - Canon RP10 for CR-120/150 | imageFORMULA CR-150 / CR-120 User Manual - Page 36
How to confirm the IP address The imageFORMULA Utility network settings are displayed when the scanner and the computer are connected via USB. IMPORTANT Log On to Windows as an Administrator. A Click the Start button, and then click [All Programs], [Canon CR-150] or [Canon CR-120], and [Canon - Canon RP10 for CR-120/150 | imageFORMULA CR-150 / CR-120 User Manual - Page 37
Scanner Name Password Setting IP Address DHCP Subnet Mask Default Gateway MAC Address Filtering Use mDNS The first two characters are displayed as "CR" and the "CR" is followed by "MAC Address". EX. CR112233445566 "112233445566" is the examples of MAC Address. canoncr150 --ON ----OFF ON WEB MENU - Canon RP10 for CR-120/150 | imageFORMULA CR-150 / CR-120 User Manual - Page 38
NOTE For details on the admin password, see "imageFORMULA Utility [Password Setting]" on p. 35. C The Home screen is displayed. [Initialize] [Initialize] screen is displayed. [Scanner Name Setting] A [Scanner Name Setting] [Scanner Name Setting] screen is displayed. [Network Setting] [Network - Canon RP10 for CR-120/150 | imageFORMULA CR-150 / CR-120 User Manual - Page 39
• When searching for scanners on the network to select a scanner with Scanning Utility, the Scanner Name is displayed here. For details, see "How to Use the Scanning Utility" on p. 28 [mDNS Setting] [Network Setting] A A B C D E [DHCP] A Check (ON) to automatically assign the IP address of the - Canon RP10 for CR-120/150 | imageFORMULA CR-150 / CR-120 User Manual - Page 40
[MAC Address Filtering] A B [Password Setting] A B C C [MAC Address Filtering] A Check (ON) to enable MAC Address Filtering, and to register a computer for controlling the scanner. [MAC Address] B Up to 5 computers can be registered. [OK] C Click [OK] to send settings to the scanner. D The admin - Canon RP10 for CR-120/150 | imageFORMULA CR-150 / CR-120 User Manual - Page 41
[Initialize] A [Initialize] A The scanner's network settings are reset to initial values (factory default). NOTE The initial values of each item in WEB MENU are as follows. Scanner Name DHCP IP Address Subnet Mask Default Gateway Password Setting MAC Address Filtering mDNS The first two - Canon RP10 for CR-120/150 | imageFORMULA CR-150 / CR-120 User Manual - Page 42
How to check the version information You can check the version information of the scanner. A Click button while the Home screen is displayed. see "How to open the WEB MENU and Log On" on p. 37 B Version information is on page. 3. A B NOTE • Click • Click button to proceed to the next page. - Canon RP10 for CR-120/150 | imageFORMULA CR-150 / CR-120 User Manual - Page 43
Document Feeding and Scanning This chapter describes precautions regarding documents that can be handled on this scanner and scanning operations. Documents This section describes the types of documents that can be used and how to place them. CAUTION Treat the documents carefully. The paper edges may - Canon RP10 for CR-120/150 | imageFORMULA CR-150 / CR-120 User Manual - Page 44
Wrinkled or creased paper Curled paper Carbon backed paper Coated paper or fax recording paper Torn paper Extremely thin paper Paper with clips or staples Paper with binding holes NOTE • Note that mixing documents of different thickness may cause a malfunction during feeding. • Curled, - Canon RP10 for CR-120/150 | imageFORMULA CR-150 / CR-120 User Manual - Page 45
Using Ultrasonic Double Feed Detection The double feed detection function that the scanner is equipped with uses the penetration of ultrasonic waves to detect when two or more documents are fed at the same time. If false detections happen too often, disable the double feed detection function. NOTE - Canon RP10 for CR-120/150 | imageFORMULA CR-150 / CR-120 User Manual - Page 46
software application. NOTE • When Using the Accompanying Scanning Utility for CR-120/CR-150: There are three scanning methods as follows. Follow the each instruction. Scan 1 page Click [Scan Page] from the [File] menu. Scan Batch to File A Click [Scan Batch to File] from the [File] menu. B Input the - Canon RP10 for CR-120/150 | imageFORMULA CR-150 / CR-120 User Manual - Page 47
Scan Batch to Printer A Click [Scan Batch to Printer] from the [File] menu. B Select Simplex or Duplex, and then click [Start Scanning]. • You can also start scanning with pressing the Start Button. F Scanning starts. When printing with the imprinter, ink may get on the leading edge of the document - Canon RP10 for CR-120/150 | imageFORMULA CR-150 / CR-120 User Manual - Page 48
Loading cards About the Card Guard When scanning plastic cards, use of card guard is recommended. Attach the card guard to the back of the unit (Rear Card Slot) as shown in the figure below. A Orient the front side of the card toward the left, and insert the card straight into the card slot. B - Canon RP10 for CR-120/150 | imageFORMULA CR-150 / CR-120 User Manual - Page 49
CAUTION • Keep the area around the rear card slot clear of objects. • When you want to insert a card in the card slot, remove any documents from the feed tray. • Embossed cards may not be scanned correctly, depending on the type of embossment. C After a plastic card is scanned, it is ejected into - Canon RP10 for CR-120/150 | imageFORMULA CR-150 / CR-120 User Manual - Page 50
Separation OFF Mode Use this separation OFF mode when you want to scan the following documents: • Thick documents • Documents that contain two or more pages together as one document • Documents that have a rough surface • Duplicate forms that have sticky edges Feed these documents one by one and - Canon RP10 for CR-120/150 | imageFORMULA CR-150 / CR-120 User Manual - Page 51
C Select or clear the [Turn off automatically after 4 hours] check box. Example (CR-150/120/120UV): Example (CR-150N/120N): D Click [OK] to close the scanner properties. 51 - Canon RP10 for CR-120/150 | imageFORMULA CR-150 / CR-120 User Manual - Page 52
Language settings for Magnetic Swipe Reader (MSR):(Option) The CR-150/CR-120 includes the Magnetic Swipe Reader (MSR) function (Option). When this function is enabled, you can select the MSR language. To enable or disable this setting, follow the procedure below. IMPORTANT Log On to Windows as an - Canon RP10 for CR-120/150 | imageFORMULA CR-150 / CR-120 User Manual - Page 53
Example (CR-150N/120N): NOTE The [HID] check box is displayed when you are using a USB connection. D Click [OK] to close the scanner properties. 53 - Canon RP10 for CR-120/150 | imageFORMULA CR-150 / CR-120 User Manual - Page 54
Troubleshooting This chapter describes the problems 120 is enabled. If it is enabled, disable it. Network Trouble Common errors that occur while connecting to the network as well for the computer and the network device, please refer to the manual of each device. If the power of the scanner or the - Canon RP10 for CR-120/150 | imageFORMULA CR-150 / CR-120 User Manual - Page 55
Cause and Remedy Other Causes Condition Cause and Remedy Condition Cause and Remedy Condition Cause and Remedy Check Canon imageFORMULA Utility and set the correct IP address. The IP address might already be in use by another device. Check Canon imageFORMULA Utility and set the correct IP Address. - Canon RP10 for CR-120/150 | imageFORMULA CR-150 / CR-120 User Manual - Page 56
D Press the Open Button, and push the Left Maintenance Cover open to the left. NOTE If the above procedure does not clear the paper jam, perform the following to remove the jammed document. C Pull the Open Button, and pull the Right Maintenance Cover open to the right. E Remove the paper that has - Canon RP10 for CR-120/150 | imageFORMULA CR-150 / CR-120 User Manual - Page 57
. Feeding Trouble If the document is not fed properly or the detection functions do not work properly, remedy the problem by checking not replaceable, contact your local authorized Canon dealer or service representative to have the scanner serviced. • The Separation Roller gap is too wide. Adjust - Canon RP10 for CR-120/150 | imageFORMULA CR-150 / CR-120 User Manual - Page 58
representative to have the scanner serviced. • The MICR text is on the back of the document. Load the side with the MICR characters facing right in the document tray. • Some of the MICR characters are scratched or missing. Splattered MICR ink or toner may also be the problem. The imprinter is not - Canon RP10 for CR-120/150 | imageFORMULA CR-150 / CR-120 User Manual - Page 59
7. For details on how to install the application, see the applications instruction manual. Memory becomes insufficient and scanning stops. If you configure scanning conditions that do not rectify the problem, contact your local authorized Canon dealer or service representative to have the scanner - Canon RP10 for CR-120/150 | imageFORMULA CR-150 / CR-120 User Manual - Page 60
Maintenance This chapter describes how to clean and maintain the scanner. Daily Cleaning To ensure high-quality image scanning, regularly clean your CR-150/ CR-120 as described below. CAUTION • Before you clean the scanner, turn OFF the scanner and computer, and disconnect the power cord from the - Canon RP10 for CR-120/150 | imageFORMULA CR-150 / CR-120 User Manual - Page 61
IMPORTANT If you notice paper dust in the feed path when you open the Maintenance Cover, clean it out with a clean dry cloth or cotton swabs. B Press the Open Button, and push the Left Maintenance Cover open to the left. D Close the Left Maintenance Cover. Make sure that it is completely closed - Canon RP10 for CR-120/150 | imageFORMULA CR-150 / CR-120 User Manual - Page 62
Cleaning the Scanning Glass and Rollers If stripes appear on scanned images or if dirt appears on scanned documents, clean the scanning glass and rollers. Clean the scanning glass and rollers regularly. A Remove the Top Cover. C Press the Open Button, and push the Left Maintenance Cover open to the - Canon RP10 for CR-120/150 | imageFORMULA CR-150 / CR-120 User Manual - Page 63
E Spin the rollers while wiping them clean with a firmly wrung cloth dampened with water. There are 14 roller positions, as shown in the diagram below. F Use a clean dry cloth to clean the entire scanning glass. Scanning Glass չ ո շ վ ս ճ պ ջռ ն յ ձ ղ մ G Close the Left Maintenance - Canon RP10 for CR-120/150 | imageFORMULA CR-150 / CR-120 User Manual - Page 64
be changed. Some rollers are replaceable. (See "Replacing the Rollers," on p. 73.) If the rollers are not replaceable, contact your local authorized Canon dealer or service representative to have the scanner - Canon RP10 for CR-120/150 | imageFORMULA CR-150 / CR-120 User Manual - Page 65
Cleaning the Magnetic Head If the magnetic head is dirty, then MICR characters cannot be scanned correctly. Periodically, clean the magnetic head with a commercially available audio head cleaner. A Pull the Open Button, and pull the Right Maintenance Cover open to the right. B Use a commercially - Canon RP10 for CR-120/150 | imageFORMULA CR-150 / CR-120 User Manual - Page 66
Cleaning the Ink Jet Nozzles Ink that collects around the ink jet nozzles may stain your documents or cause the text or bitmap to appear as scratched. Clean the area around the ink jet nozzles periodically. Cleaning the ink jet nozzles is also efficient action when the printed text or bitmap becomes - Canon RP10 for CR-120/150 | imageFORMULA CR-150 / CR-120 User Manual - Page 67
cleaning card. Using a cleaning card will minimize the frequent cleaning as instructed in this manual. It is best to perform a cleaning at beginning or end of States. • Contact your local authorized Canon dealer or service representative for the available cleaning card. Prepare for the Cleaning - Canon RP10 for CR-120/150 | imageFORMULA CR-150 / CR-120 User Manual - Page 68
Check Path Cleaning Follow the procedures below to perform check path cleaning. A Confirm that the scanner is set to the cleaning mode. (See "Prepare for the Cleaning mode," on p. 67) B Press the Separation OFF Mode Button. Separation OFF Mode Button C Place the cleaning card (for Check Path - Canon RP10 for CR-120/150 | imageFORMULA CR-150 / CR-120 User Manual - Page 69
NOTE If you press the Function Button shortly in Step 2, the scanner is set to the Check Path Cleaning mode. In this case, the POWER LED is blinking and the Start LED is ON. (The light of the Function Button is off.) C Insert the cleaning card (for Card Path Cleaning) into the Card slot. If you do - Canon RP10 for CR-120/150 | imageFORMULA CR-150 / CR-120 User Manual - Page 70
Maintenance Make the following adjustments to maintain scanning quality. Replacing the Ink Cartridge The ink cartridge needs to be replaced if the printed text becomes scratchy or faint even if you have cleaned the ink jet nozzle. Replace the ink cartridge according to the following procedure below. - Canon RP10 for CR-120/150 | imageFORMULA CR-150 / CR-120 User Manual - Page 71
C Push the ink cartridge backward, and then remove the ink cartridge. Replacing the Ink Disposal Tank When the following conditions appear, you have to replace the ink disposal tank according to the following procedure. • When the ink cartridge is replaced. • When clumpy ink appears on the ink - Canon RP10 for CR-120/150 | imageFORMULA CR-150 / CR-120 User Manual - Page 72
B Remove the ink disposal tank. C Attach the ink disposal tank. Ink Disposal Tank WARNING Do not print without the ink disposal tank. Doing so may cause a malfunction. NOTE • Be careful not to get dirty with ink. • When you discard the ink disposal tank, put it in the plastic bag in the box of - Canon RP10 for CR-120/150 | imageFORMULA CR-150 / CR-120 User Manual - Page 73
Replacing the Rollers When rollers are worn, paper jams and double feeds tend to occur. You can replace the rollers (Pickup Roller, Feed Roller, and Separation Roller) according to the following procedure. The exchange roller kit is not included with the scanner. Purchase an exchange roller kit - Canon RP10 for CR-120/150 | imageFORMULA CR-150 / CR-120 User Manual - Page 74
D While pushing up the Separation OFF Lever, pinch the edge of the Feed Roller and the fixing lever, and then remove the roller. Fixing Lever E Pinch the Separation Roller at the rim and the fixing lever, and then remove it. Fixing Lever NOTE If the Feed Roller (Separation Roller) is not removed - Canon RP10 for CR-120/150 | imageFORMULA CR-150 / CR-120 User Manual - Page 75
G Attach the Pickup Roller. Align the notch on the roller axis with the hole on the roller. I Attach the Feed Roller. Align the notch on the roller axis with the hole on the roller. IMPORTANT Push down the roller until it clicks into place. H Attach the Separation Roller. Align the notch on the - Canon RP10 for CR-120/150 | imageFORMULA CR-150 / CR-120 User Manual - Page 76
Adjusting the Separation Roller Gap If double feed should occur too often, adjust the Separation Roller gap according to the following procedure. A Pull up the Adjustment Dial Cover. CAUTION Do not use the Adjustment Dial any other time except when adjusting the Separation Roller gap. Turning the - Canon RP10 for CR-120/150 | imageFORMULA CR-150 / CR-120 User Manual - Page 77
Specifications Scanner Specifications Type Document size Card Document feeding Scanning method Light source Scanning side Scanning mode Desktop sheet feed Height: 60 to 108 mm (2.4" to 4.3") Length: 90 to 245 mm (3.5" to 9.6") (You can scan documents up to 2,000 mm (78.7") long by setting the - Canon RP10 for CR-120/150 | imageFORMULA CR-150 / CR-120 User Manual - Page 78
the imprinter. ■ You can use the functions noted above if your software supports them. ■ These functions may not work depending on your computer's capabilities and p. 71) • Contact your local authorized Canon dealer or service representative for detailed information about the replacement parts. 78 - Canon RP10 for CR-120/150 | imageFORMULA CR-150 / CR-120 User Manual - Page 79
Option Magnetic Swipe Reader (MSR) (Product code: 1732C003) This is the optional item to scan the magnetic card. 79 - Canon RP10 for CR-120/150 | imageFORMULA CR-150 / CR-120 User Manual - Page 80
documents 45 Double Feed Detection 45 E Eject Pocket 22 Eject Stopper 22 Exterior Dimensions 24 F Features of the CR-150/CR-120 19 Feeding Trouble 57 H Handling 15 I imageFORMULA Utility 34 Ink Cartridge 22, 25, 70 Ink Disposal Tank Pocket 23, 71 Ink Jet Nozzle 66 Installation Location - Canon RP10 for CR-120/150 | imageFORMULA CR-150 / CR-120 User Manual - Page 81
50 Separation OFF Mode Button 21, 50, 68 Software How to Use the Software 28 Install 7 Uninstall 32 Specifications 77 T Top Cover 21 Troubleshooting 54 Turning OFF the Power 11 Turning ON the Power 10 U Ultrasonic Sensor 22 Unpacking the scanner 4 USB Connections 8, 54 USB Connector 23 - Canon RP10 for CR-120/150 | imageFORMULA CR-150 / CR-120 User Manual - Page 82
CANON ELECTRONICS INC. 3-5-10 SHIBAKOEN, MINATO-KU, TOKYO 105-0011, JAPAN CANON U.S.A. INC. ONE CANON PARK, MELVILLE, NY 11747, U.S.A. CANON CANADA INC. 8000 MISSISSAUGA ROAD, BRAMPTON, ONTARIO L6Y 5Z7, CANADA CANON EUROPA N.V. BOVENKERKERWEG 59, 1185 XB AMSTELVEEN, THE NETHERLANDS CANON AUSTRALIA
-
 1
1 -
 2
2 -
 3
3 -
 4
4 -
 5
5 -
 6
6 -
 7
7 -
8
-
9
-
10
-
11
-
12
-
13
-
14
-
15
-
16
-
17
-
18
-
19
-
20
-
21
-
22
-
23
-
24
-
25
-
26
-
27
-
28
-
29
-
30
-
31
-
32
-
33
-
34
-
35
-
36
-
37
-
38
-
39
-
40
-
41
-
42
-
43
-
44
-
45
-
46
-
47
-
48
-
49
-
50
-
51
-
52
-
53
-
54
-
55
-
56
-
57
-
58
-
59
-
60
-
61
-
62
-
63
-
64
-
65
-
66
-
67
-
68
-
69
-
70
-
71
-
72
-
73
-
74
-
75
-
76
-
77
-
78
-
79
-
80
-
81
-
82
 |
 |

Please read this manual before operating this scanner.
User Manual