Canon S10 User Guide for ImageBrowser version 3.6
Canon S10 - PowerShot S10 2MP Digital Camera Manual
 |
UPC - 082966161926
View all Canon S10 manuals
Add to My Manuals
Save this manual to your list of manuals |
Canon S10 manual content summary:
- Canon S10 | User Guide for ImageBrowser version 3.6 - Page 1
1 ImageBrowser Software User Guide - Canon S10 | User Guide for ImageBrowser version 3.6 - Page 2
46 Adding Computer Images to the Camera 47 Checking and Modifying the Camera Settings 49 Other Functions of the Camera Window 50 2 ImageBrowser Software User Guide - Canon S10 | User Guide for ImageBrowser version 3.6 - Page 3
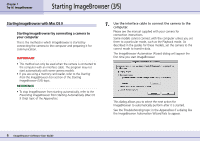
Computer 89 Stitching Panoramic Images with PhotoStitch 93 Appendices Supported File Formats 94 Starting ImageBrowser Automatically (Mac OS the Camera 104 Print Settings 105 Troubleshooting 107 Index Index 108 3 ImageBrowser Software User Guide NOTE • This guide uses Mac OS X (v10.2) - Canon S10 | User Guide for ImageBrowser version 3.6 - Page 4
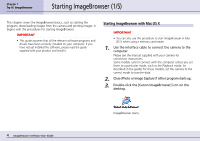
to the computer. Please see the manual supplied with your camera for connection instructions. Some models cannot connect with the guides for these models, set the camera to the correct mode to transfer data. 2. Close iPhoto or Image Capture if either program starts up. 3. Double-click the [Canon - Canon S10 | User Guide for ImageBrowser version 3.6 - Page 5
, the Canon ImageBrowser icon Canon Utilities] folder, then open the [ImageBrowser] folder and double-click on the [ImageBrowser] icon. 4. Click [Canon started.) Your camera model name or [Canon Camera] and the USB port number that your camera model name or [Canon Camera] is selected in the - Canon S10 | User Guide for ImageBrowser version 3.6 - Page 6
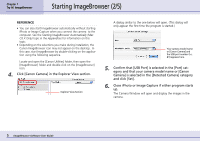
. Please see the manual supplied with your camera for connection instructions. Some models cannot connect with the computer unless you set them to a particular mode, such as the Playback mode. As described in the guides . See the Troubleshooting topic in the Appendices - Canon S10 | User Guide for ImageBrowser version 3.6 - Page 7
camera that you are using appears here. 3. Click [Set]. The Camera window will open and display the camera's images. 7 ImageBrowser Software User Guide The previously selected option will display. • See the Automation Wizard Feature at Startup (Mac OS 9 Only) topic in the Appendices for information - Canon S10 | User Guide for ImageBrowser version 3.6 - Page 8
it after exiting. 1. Double-click the [Canon ImageBrowser] icon on the desktop. ImageBrowser starts. REFERENCE selections you make during installation, the Canon ImageBrowser icon may not appear on the the following sequence. Locate and open the [Canon Utilities] folder, then open the [ImageBrowser] folder - Canon S10 | User Guide for ImageBrowser version 3.6 - Page 9
appears. If the Camera Window does not appear even when you prepare the camera for communication, click [Canon Camera] at the bottom left of the Browser Window and select the appropriate port and camera model. [Download Images] in the ImageBrowser Automation Wizard. 9 ImageBrowser Software User Guide - Canon S10 | User Guide for ImageBrowser version 3.6 - Page 10
to your computer display in the Explorer View area. REFERENCE • With Mac OS 9, select [Macintosh HD] in the Explorer View section. 10 ImageBrowser Software User Guide - Canon S10 | User Guide for ImageBrowser version 3.6 - Page 11
the Browser Area of the Browser Window. Image imported from the camera Try to import all the images that you want. 11 ImageBrowser Software User Guide Next, let's try printing. REFERENCE • For detailed information on how to use the Camera Window, see Chapter 5. - Canon S10 | User Guide for ImageBrowser version 3.6 - Page 12
[Custom layout printing] option selected and click [Next]. Print Window Layout Options Dialog The Layout Options dialog and Print window open. 12 ImageBrowser Software User Guide - Canon S10 | User Guide for ImageBrowser version 3.6 - Page 13
Print window while the Layout Options dialog is open. • For details on print operations, see the Printing Images section in Chapter 6. 13 ImageBrowser Software User Guide - Canon S10 | User Guide for ImageBrowser version 3.6 - Page 14
We recommend that you memorize the following information before you begin using ImageBrowser. If You Have a Problem ImageBrowser comes with a Help file. Use it when you want to learn how to do an operation the Close Box in the Browser Window. Close Box 14 ImageBrowser Software User Guide - Canon S10 | User Guide for ImageBrowser version 3.6 - Page 15
be taken (only on models supporting remote shooting). • Convert RAW them. Some camera models do not support RAW images. Use the file management features and other text, and add background music (supported by Mac OS X only). Use the My Camera Settings." • The Canon CD-ROM supplied with your product - Canon S10 | User Guide for ImageBrowser version 3.6 - Page 16
individually using functions like the camera's Stitch Assist mode) together to form a single, large size, panoramic picture. • You can stitch shoot the surroundings in 360 degrees, you can later stitch the images to form a 360-degree cylindrical shape. By saving this stitched image in QuickTime VR - Canon S10 | User Guide for ImageBrowser version 3.6 - Page 17
that you selected above. When you move or copy images using ImageBrowser, files are moved or copied accordingly in the Finder. 17 ImageBrowser Software User Guide - Canon S10 | User Guide for ImageBrowser version 3.6 - Page 18
color space will appear unsaturated when displayed in ImageBrowser. Color space settings are only available on select camera models. 18 ImageBrowser Software User Guide Control Panel This area contains buttons that allow you to perform a variety of functions. Browser Area This is the area where - Canon S10 | User Guide for ImageBrowser version 3.6 - Page 19
. Changing the size of thumbnails By clicking or you can change the size of the thumbnails displayed in the Browser Area. 19 ImageBrowser Software User Guide - Canon S10 | User Guide for ImageBrowser version 3.6 - Page 20
brightness data) and shooting REFERENCE information. • The Information display panel can be selected when the display mode is set to Preview. 20 ImageBrowser Software User Guide - Canon S10 | User Guide for ImageBrowser version 3.6 - Page 21
Histogram (graph showing the distribution of brightness data) Shooting Information The shooting date is displayed as well as the file name. 21 ImageBrowser Software User Guide Control Panel Sound Panel - Canon S10 | User Guide for ImageBrowser version 3.6 - Page 22
ImageBrowser, try using the contextual menus in different situations and you will be impressed with their convenience. Note that, in general, this manual does not cover operations using contextual menus. (This is because explaining the many menu variations would take too many pages.) Nevertheless - Canon S10 | User Guide for ImageBrowser version 3.6 - Page 23
the mouse button to drop the image. A Drag the image that you want to move. B Drop it at the desired location. 23 ImageBrowser Software User Guide - Canon S10 | User Guide for ImageBrowser version 3.6 - Page 24
be open simultaneously. A Drag the image that you want to move. B Drop it at the desired location. The First Browser Window 24 ImageBrowser Software User Guide The Second Browser Window - Canon S10 | User Guide for ImageBrowser version 3.6 - Page 25
selected images. • You can also select/deselect all images by clicking the [Edit] menu and selecting [Select All] or [Deselect All]. 25 ImageBrowser Software User Guide - Canon S10 | User Guide for ImageBrowser version 3.6 - Page 26
it, and drag the image files from the Trash to the original folder on the desktop (not the Explorer View section). 26 ImageBrowser Software User Guide - Canon S10 | User Guide for ImageBrowser version 3.6 - Page 27
want to rotate, perform the rotation operation and all the selected images are rotated at the same time. B Click a rotation angle. 27 ImageBrowser Software User Guide - Canon S10 | User Guide for ImageBrowser version 3.6 - Page 28
images are selected in the Browser Area), and on the [File] menu click [Duplicate]. The complete folder is duplicated. B Click here. 28 ImageBrowser Software User Guide The duplicated image - Canon S10 | User Guide for ImageBrowser version 3.6 - Page 29
the file name and is preceded by a period. Click here, and wait a moment, then type the new name and press [return]. 29 ImageBrowser Software User Guide - Canon S10 | User Guide for ImageBrowser version 3.6 - Page 30
File Information dialog box, click [OK]. A Click the image for which you want to view information. B Click here. 30 ImageBrowser Software User Guide You can input a comment here. Information displayed here depends on the camera used. REFERENCE • The file information also displays below the - Canon S10 | User Guide for ImageBrowser version 3.6 - Page 31
Finder. Click the folder where you want to create a new folder, then click [New Folder] on the [File] menu. New folder 31 ImageBrowser Software User Guide - Canon S10 | User Guide for ImageBrowser version 3.6 - Page 32
your computer. Click the name of the folder and wait a moment. Type the new name for the folder and press [return]. 32 ImageBrowser Software User Guide - Canon S10 | User Guide for ImageBrowser version 3.6 - Page 33
Mac OS X or the [Special] menu in Mac OS 9 and selecting [Empty Trash]. A Click the folder to be deleted. B Click here. 33 ImageBrowser Software User Guide - Canon S10 | User Guide for ImageBrowser version 3.6 - Page 34
. Click to expand a folder. REFERENCE • You can display the Camera Window (assuming the camera is connected and ready to transfer data) by clicking [Canon Camera] in the Explorer View section. If you are using a memory card reader, open the memory card icon in the Explorer View section and - Canon S10 | User Guide for ImageBrowser version 3.6 - Page 35
an image window by selecting [Close] in the [File] menu. The size of the image (vertical x horizontal, in pixels) appears here. 35 ImageBrowser Software User Guide Click here to display or hide the toolbar at the bottom of the image window. - Canon S10 | User Guide for ImageBrowser version 3.6 - Page 36
, or by clicking [Enlarge] or [Reduce]. REFERENCE • You can select a zoom ratio of [25%] to [200%]. Reduce Enlarge Current zoom ratio 36 ImageBrowser Software User Guide - Canon S10 | User Guide for ImageBrowser version 3.6 - Page 37
image, you can save it under a different name with this function. Detailed explanations of these procedures start on the next page. 37 ImageBrowser Software User Guide - Canon S10 | User Guide for ImageBrowser version 3.6 - Page 38
you do not want. Place the mouse pointer within the image you want to crop. Drag the mouse to form a rectangular frame. Then, click (Crop) to extract the area within the frame. REFERENCE • When an area is the area that you want to crop. B Click this button. 38 ImageBrowser Software User Guide - Canon S10 | User Guide for ImageBrowser version 3.6 - Page 39
. In the dialog box, you can adjust the hue, saturation and lightness, and click [OK]. Decrease Hue Decrease Saturation Decrease Lightness 39 ImageBrowser Software User Guide Click here. Increase Hue Increase Saturation Increase Lightness - Canon S10 | User Guide for ImageBrowser version 3.6 - Page 40
information, such as the shooting data. Files in this format can be handled in the same fashion as conventional JPEG files. 40 ImageBrowser Software User Guide - Canon S10 | User Guide for ImageBrowser version 3.6 - Page 41
After selecting an image, click the [Edit] menu and select the desired program from the [Start Application] submenu. 41 ImageBrowser Software User Guide A Select an image. B Select your application from this submenu (program names vary according to the camera model). The image editing program - Canon S10 | User Guide for ImageBrowser version 3.6 - Page 42
Canon Camera in the Explorer View Section In the Explorer View Section, click [Canon Camera] to open the Camera Window. Click here. Using the Canon Camera button Click (Canon below will start] category in the [Canon ImageBrowser Auto Launch] control panel. Click here. 42 ImageBrowser Software User - Canon S10 | User Guide for ImageBrowser version 3.6 - Page 43
■ Double-clicking You can import images by double-clicking them in the Camera Window. B Click here. Image imported from the camera 43 ImageBrowser Software User Guide - Canon S10 | User Guide for ImageBrowser version 3.6 - Page 44
at once. REFERENCE • If an image is taken in the Stitch Assist mode, it appears in the Camera Window as follows: 44 ImageBrowser Software User Guide This mark indicates that the image was taken in the Stitch Assist mode. (You can click the wavy line to start PhotoStitch.) • If an image - Canon S10 | User Guide for ImageBrowser version 3.6 - Page 45
, all the images contained in the folder are deleted at once. B Click here. A message appears. Click [OK]. The image is deleted. 45 ImageBrowser Software User Guide - Canon S10 | User Guide for ImageBrowser version 3.6 - Page 46
are selected, perform the rotation operation. All the selected images are rotated at the same time at the same rotation angle. 46 ImageBrowser Software User Guide - Canon S10 | User Guide for ImageBrowser version 3.6 - Page 47
size. • RAW format images and movie files (AVI format) cannot be added to the camera. • Image file formats are explained in more detail in the Supported File Formats topic in the Appendices. 47 ImageBrowser Software User - Canon S10 | User Guide for ImageBrowser version 3.6 - Page 48
Computer Images to the Camera (2/2) Other ways of copying images ■ Using the menu You can copy images to a camera by clicking [Upload Images] on the [Canon Camera] menu. ■ Drag-and-drop In the Browser Area, drag an image that you want to copy into the Camera Window. 48 ImageBrowser Software User - Canon S10 | User Guide for ImageBrowser version 3.6 - Page 49
here. Click this button to synchronize the camera's date and time settings with the computer. Click this button to format the camera's memory card (not supported by some camera models). You can set the date and time from here. After you have checked the camera settings and made the necessary changes - Canon S10 | User Guide for ImageBrowser version 3.6 - Page 50
button to reconnect the camera and computer after a connection is broken. 50 ImageBrowser Software User Guide Click this button to print the selected image (For detailed information on this operation, see Settings sections in the Appendices). * * Some camera models do not support this button. - Canon S10 | User Guide for ImageBrowser version 3.6 - Page 51
quality, the rougher the image becomes, but the size of the file also becomes smaller.) 6. Click [Next]. The last window appears. 51 ImageBrowser Software User Guide - Canon S10 | User Guide for ImageBrowser version 3.6 - Page 52
exists, the image is saved in that folder. 52 ImageBrowser Software User Guide • When you click [Finish], your e-mail program starts automatically if after closing" in Step 7. Please note that some e-mail programs may not support auto startup. You can send the image you just created by opening a - Canon S10 | User Guide for ImageBrowser version 3.6 - Page 53
] menu and select [Write a still image]. A dialog for selecting the export options will open. 3. Select an export option and click [Next]. 53 ImageBrowser Software User Guide - Canon S10 | User Guide for ImageBrowser version 3.6 - Page 54
Images (2/2) Chapter 6 Using Supplementary Features 4. Set the export settings. The export settings will vary with the option selected. Follow the onscreen instructions to set the settings. Whichever option you select, ensure that you note the file name and destination when exporting so that you do - Canon S10 | User Guide for ImageBrowser version 3.6 - Page 55
want the transition effects to be randomly assigned, select [Random]. 55 ImageBrowser Software User Guide Select the "Auto Play" option if you want the slide show to proceed automatically and the progress of the slide show manually. When you have completed the slide show settings, click [OK]. - Canon S10 | User Guide for ImageBrowser version 3.6 - Page 56
jump to the last image. REFERENCE • If you want to view all the images contained in the folder, click (Select All). 56 ImageBrowser Software User Guide Click here to pause the slide show (click again to resume). Click here to end the slide show. Print Settings Button Click this button during - Canon S10 | User Guide for ImageBrowser version 3.6 - Page 57
] key and clicking the mouse. This feature is available even if you selected [Auto Play] in the Slide Show Options dialog. 57 ImageBrowser Software User Guide - Canon S10 | User Guide for ImageBrowser version 3.6 - Page 58
] menu, click [Play]. The sound is played. Further, you can control playback by clicking [Pause] or [Stop] on the [Sound] menu. 58 ImageBrowser Software User Guide - Canon S10 | User Guide for ImageBrowser version 3.6 - Page 59
is created in the same folder as the image file as an AIFF format file with the [.AIF] file name extension. 59 ImageBrowser Software User Guide - Canon S10 | User Guide for ImageBrowser version 3.6 - Page 60
camera to transfer data and open the Camera Window. 2. Click [Setup Options] and select [My Camera] in the next menu. 60 ImageBrowser Software User Guide Click here. 3. Select [Start-up Image, Start-up Sound, Operation Sound, Selftimer Sound and Shutter Sound] and click [OK]. The My Camera window - Canon S10 | User Guide for ImageBrowser version 3.6 - Page 61
settings types. My Camera Settings in your camera display here. My Camera Settings that are already on your computer display here. 61 ImageBrowser Software User Guide - Canon S10 | User Guide for ImageBrowser version 3.6 - Page 62
[Library], [Preferences], [ImageBrowser UserData], and [MyCameraFiles]. In Mac OS 9, open the [Canon Utilities] folder on the disk on which ImageBrowser was installed, followed by [ImageBrowser], [ImageBrowser.Info Select a settings type. Select a settings type. 62 ImageBrowser Software User Guide - Canon S10 | User Guide for ImageBrowser version 3.6 - Page 63
the camera itself. 4. Click the [Save to Camera] button. The settings files in the Camera list are saved to the camera. 63 ImageBrowser Software User Guide - Canon S10 | User Guide for ImageBrowser version 3.6 - Page 64
to the camera. Next, change the settings on the camera itself to use the new start-up image and sounds. See the guide supplied with your camera for instructions for changing the settings. IMPORTANT • Never detach the interface cable, turn off the camera power, or do anything to stop communication - Canon S10 | User Guide for ImageBrowser version 3.6 - Page 65
320 x 240 pixels, and less than 20KB. REFERENCE • See the manual and help facility for the editing program for a detailed explanation of how to change the format to a WAV file. The detailed creation instructions are explained in the next topic. ■ Procedures for Creating a Software User Guide - Canon S10 | User Guide for ImageBrowser version 3.6 - Page 66
sound icon is added. 11. Double-click the newly added sound icon. The window will change to the sound editing window. 66 ImageBrowser Software User Guide - Canon S10 | User Guide for ImageBrowser version 3.6 - Page 67
ArcSoft VideoImpression, see its Help file, which can be opened by clicking the [?] button at the top right of its window. 67 ImageBrowser Software User Guide - Canon S10 | User Guide for ImageBrowser version 3.6 - Page 68
procedures as above, but have to comply with the specifications listed in the Create the new files before adding them section. 68 ImageBrowser Software User Guide - Canon S10 | User Guide for ImageBrowser version 3.6 - Page 69
the camera power, or do anything to stop communication between the camera and computer while the settings files are being copied. 69 ImageBrowser Software User Guide - Canon S10 | User Guide for ImageBrowser version 3.6 - Page 70
place a check mark in the [Shooting Date] and/or [File Name] options. Select images Click here Layout Options Dialog Print Window 70 ImageBrowser Software User Guide - Canon S10 | User Guide for ImageBrowser version 3.6 - Page 71
Bubble Jet printers that support Canon Perforated Paper media. You can obtain photo-like prints by simply separating images at the perforations. When you finish selecting a layout, click [OK]. A print preview displays on the right after you select a layout. 71 ImageBrowser Software User Guide - Canon S10 | User Guide for ImageBrowser version 3.6 - Page 72
can clear images from the Print window by selecting them, clicking the [Edit] menu and selecting [Clear]. Remove this check mark. 72 ImageBrowser Software User Guide - Canon S10 | User Guide for ImageBrowser version 3.6 - Page 73
click a rotation angle on the menu. REFERENCE • You can also select a rotation angle on the [Rotate] submenu on the [Edit] menu. 73 ImageBrowser Software User Guide - Canon S10 | User Guide for ImageBrowser version 3.6 - Page 74
Example Fixed Photo Size Example Specify the style Specify spacing of the font. between characters. Specify the color of the characters. 74 ImageBrowser Software User Guide - Canon S10 | User Guide for ImageBrowser version 3.6 - Page 75
can edit your text appears. Edit your text. Another way to open this window is to double-click the text box. 75 ImageBrowser Software User Guide - Canon S10 | User Guide for ImageBrowser version 3.6 - Page 76
[Clipping]. When the image appears, drag to specify the area you are clipping out and click (Mac OS X) or (Mac OS 9). 76 ImageBrowser Software User Guide Clipping area - Canon S10 | User Guide for ImageBrowser version 3.6 - Page 77
in the Appendices for information about Exif 2.2 settings. REFERENCE • Images captured by cameras that support the Exif 2.2 standard have the shooting settings data, such as the shooting conditions and shooting to all of the images printed from ImageBrowser. 77 ImageBrowser Software User Guide - Canon S10 | User Guide for ImageBrowser version 3.6 - Page 78
resolution, the larger the image is printed. Similarly, the larger you make the print resolution, the smaller the image is printed. 78 ImageBrowser Software User Guide - Canon S10 | User Guide for ImageBrowser version 3.6 - Page 79
"Find and Show Item" and no images with that date are found, the closest match to the date is displayed instead. 79 ImageBrowser Software User Guide - Canon S10 | User Guide for ImageBrowser version 3.6 - Page 80
TimeTunnel rings octagonal. Select this option to make the TimeTunnel look curved. Allows you to change the number of TimeTunnel rings. 80 ImageBrowser Software User Guide - Canon S10 | User Guide for ImageBrowser version 3.6 - Page 81
Chapter 6 Using Supplementary Features Playing Movies ImageBrowser supports movies. When you connect a camera with movie files on it to the computer and open plays the movie. Thumbnail with movie mark. QuickTime Player window 81 ImageBrowser Software User Guide Use this button to play the movie. - Canon S10 | User Guide for ImageBrowser version 3.6 - Page 82
used to link adjacent images Storyboard Area Displays thumbnails of the selected images. Links images in order from left to right 82 ImageBrowser Software User Guide - Canon S10 | User Guide for ImageBrowser version 3.6 - Page 83
and clicking this button You can set the play duration of a still image by selecting it and clicking this button 83 ImageBrowser Software User Guide You can rotate or invert the selected image You can set the transition effect between images by selecting the transition effect box in the storyboard - Canon S10 | User Guide for ImageBrowser version 3.6 - Page 84
effect for a movie or its linked audio file by selecting the movie or its linked audio file and clicking this button 84 ImageBrowser Software User Guide You can set the options for a movie file Select between [Motion-JPEG AVI] and [Quick Time Movie] as the movie file format Click here to - Canon S10 | User Guide for ImageBrowser version 3.6 - Page 85
formats. This section explains conversion procedures. IMPORTANT • Refer to the manual supplied with your camera to determine whether your camera supports RAW images or not. • Depending upon your camera model, a different , such as the image rotation Preview 85 ImageBrowser Software User Guide - Canon S10 | User Guide for ImageBrowser version 3.6 - Page 86
the destination folder for the image file You can change the image file name 5. Click the [3. Finish] tab and click [OK]. 86 ImageBrowser Software User Guide - Canon S10 | User Guide for ImageBrowser version 3.6 - Page 87
schemes (see next page for explanation) With a check mark here, settings changes in this window are immediately reflected in the image 87 ImageBrowser Software User Guide Restores all adjustments to the initial shooting settings Applies the settings to the displayed image - Canon S10 | User Guide for ImageBrowser version 3.6 - Page 88
Color image. 3. Click [Select] beside the original image, select the pre-adjustment image (original image) and click [Next]. 88 ImageBrowser Software User Guide 5. Check the Preview My Color image and click [Next]. 6. Type a name or comment and click [Create My Color]. REFERENCE • You can apply - Canon S10 | User Guide for ImageBrowser version 3.6 - Page 89
. IMPORTANT • To confirm whether your camera supports remote shooting or not, check the guides that accompanied the camera. • Ensure that the button, the camera's buttons and switches, including the zoom, cannot be manually operated while the camera is being remotely controlled. • The time lag - Canon S10 | User Guide for ImageBrowser version 3.6 - Page 90
divided into the "Field angle/ flash" tab and the "Shooting settings" tab. (the settings categories vary according to your camera model) 90 ImageBrowser Software User Guide - Canon S10 | User Guide for ImageBrowser version 3.6 - Page 91
may be set to a range from 2 seconds to 30 seconds. 91 ImageBrowser Software User Guide ■ Saving and Recalling Shooting Settings You can save the current zoom settings and the settings click [OK]. REFERENCE • See the Camera User Guide for instructions for connecting the camera to the television. - Canon S10 | User Guide for ImageBrowser version 3.6 - Page 92
more images or when it is not present. ■ Release Hotkey Tab You can release the shutter using the key specified here 92 ImageBrowser Software User Guide - Canon S10 | User Guide for ImageBrowser version 3.6 - Page 93
• You can also start PhotoStitch by clicking the wavy line above images shot in Stitch Assist mode in the Camera Window. Then, follow the instructions on the upper part of the PhotoStitch window, and stitch your images together. Decide the order in which the images should be stitched. Perform - Canon S10 | User Guide for ImageBrowser version 3.6 - Page 94
RAW files This format is a proprietary file format provided by Canon. It allows the output of the image pixels from a supported by nonMacintosh programs (such as Windows). 94 ImageBrowser Software User Guide ■ Windows Bitmap files This format is standard on Windows. Most Windows programs support - Canon S10 | User Guide for ImageBrowser version 3.6 - Page 95
. 3. Select [ImageBrowser] in the program selection window. 4. Close Image Capture. ImageBrowser will start automatically the next time the camera is connected. 95 ImageBrowser Software User Guide - Canon S10 | User Guide for ImageBrowser version 3.6 - Page 96
On (Apple menu), select [Control Panels] followed by [Canon ImageBrowser Auto Launch]. Clear the selection from "The application program start automatically on the Program Name list. However, if no other programs supported by the camera are installed, the list only contains ImageBrowser. When you - Canon S10 | User Guide for ImageBrowser version 3.6 - Page 97
access a memory card reader. To adjust ImageBrowser Automation Wizard settings, connect the camera to the computer and open the above dialog. 97 ImageBrowser Software User Guide - Canon S10 | User Guide for ImageBrowser version 3.6 - Page 98
specify the folder to which they are saved, a downloading option and a postdownloading action. 1. Click [Change]. Click here. 98 ImageBrowser Software User Guide A dialog similar to the one below will appear. 2. Select a folder for the imported images. Double-click drive and folder icons to open - Canon S10 | User Guide for ImageBrowser version 3.6 - Page 99
to this folder. The selected folder will display in the [Save to] category of the previous dialog. 4. Click [Next]. 99 ImageBrowser Software User Guide Click a downloading option. Click here to return to the previous dialog. ■ Download all images Select this to download all the images in the - Canon S10 | User Guide for ImageBrowser version 3.6 - Page 100
and the number of copies to print. • Transmission settings are made from the camera (some camera models do not support this function). • Please refer to the guide supplied with your camera for more information regarding print settings and transmission settings. 6. Click [OK]. The Camera Window will - Canon S10 | User Guide for ImageBrowser version 3.6 - Page 101
Preview window. Change the category here. Allows you to set the color of each area in the Browser Area. 101 ImageBrowser Software User Guide If you select this, when you display images in ImageBrowser, a customized icon is automatically attached to them. Specifies the program(s) displayed on the - Canon S10 | User Guide for ImageBrowser version 3.6 - Page 102
Window Dialog Allows you to set the color for the image frame of images selected in the Camera Window. Click a disk. 102 ImageBrowser Software User Guide - Canon S10 | User Guide for ImageBrowser version 3.6 - Page 103
paper] will display. Use this category to select how far the image is printed past the edge of the paper when Canon perforated paper is used. 103 ImageBrowser Software User Guide Use this to set the units used for measuring the paper size in the Print window. Web Browser Dialog REFERENCE • In - Canon S10 | User Guide for ImageBrowser version 3.6 - Page 104
how to use a slide show and display images, refer to the Camera User Guide that comes with your camera. How to set up a slide show In the select a slide show number. Select a slide show number. 104 ImageBrowser Software User Guide Drag images from the image list on the left to the area on the right - Canon S10 | User Guide for ImageBrowser version 3.6 - Page 105
the documentation that comes with your camera. How to set the DPOF print settings In the Camera Window, click (Slide/DPOF). 105 ImageBrowser Software User Guide Click here. When the following window appears, select the [Print Order (DPOF)] option that appears on the upper left part of the window - Canon S10 | User Guide for ImageBrowser version 3.6 - Page 106
Camera] to save the information. REFERENCE • The procedure described above also applies when the print type is Both (Standard/Index). 106 ImageBrowser Software User Guide Select the check box to include the image in the index print. The index print icon displays when a check mark is added to the - Canon S10 | User Guide for ImageBrowser version 3.6 - Page 107
describes how to troubleshoot problems. Camera is not connection to the camera via interface cable is only supported on Macintosh computers that are equipped with a built computer with an interface cable. Please refer to the guide supplied with your product for information regarding connecting. ■ - Canon S10 | User Guide for ImageBrowser version 3.6 - Page 108
10, 18 Control Panel 18 Explorer View Section 10, 18 View Mode 20 Buttons Canon Camera 9, 42 Close 14 Delete 45 Download 43 Rotate 46 Select 45 C Connecting 4, 6 Contextual Menus 22 Control Key 22 108 ImageBrowser Software User Guide Control Panel 18 Copy image 23 Create folder 31 Crop 38 D Delete - Canon S10 | User Guide for ImageBrowser version 3.6 - Page 109
Images 12, 70 Add text 75 Alignment 74 Canon Perforated Paper 71 Caption 74 Clipping 76 Custom layout 32 Images 29 Rotate 27, 46 109 ImageBrowser Software User Guide S Saturation 39 Send to Trash 26, 33 Slide Show 79 Tool Panel 80 Troubleshooting 107 U Undo 37 Upload image 47 USB Connection 4 Detected Camera - Canon S10 | User Guide for ImageBrowser version 3.6 - Page 110
time without prior notice. • No part of this guide may be reproduced, transmitted, transcribed, stored in a retrieval system, or translated into any language in any form, by any means, without the prior written permission of Canon. • Canon makes no warranties for damages resulting from corrupted or
-
 1
1 -
 2
2 -
 3
3 -
 4
4 -
 5
5 -
 6
6 -
 7
7 -
8
-
9
-
10
-
11
-
12
-
13
-
14
-
15
-
16
-
17
-
18
-
19
-
20
-
21
-
22
-
23
-
24
-
25
-
26
-
27
-
28
-
29
-
30
-
31
-
32
-
33
-
34
-
35
-
36
-
37
-
38
-
39
-
40
-
41
-
42
-
43
-
44
-
45
-
46
-
47
-
48
-
49
-
50
-
51
-
52
-
53
-
54
-
55
-
56
-
57
-
58
-
59
-
60
-
61
-
62
-
63
-
64
-
65
-
66
-
67
-
68
-
69
-
70
-
71
-
72
-
73
-
74
-
75
-
76
-
77
-
78
-
79
-
80
-
81
-
82
-
83
-
84
-
85
-
86
-
87
-
88
-
89
-
90
-
91
-
92
-
93
-
94
-
95
-
96
-
97
-
98
-
99
-
100
-
101
-
102
-
103
-
104
-
105
-
106
-
107
-
108
-
109
-
110
 |
 |
1
ImageBrowser Software User Guide