Canon SELPHY CP720 SELPHY CP730/CP720 Basic to Advanced Printing Guide
Canon SELPHY CP720 Manual
 |
View all Canon SELPHY CP720 manuals
Add to My Manuals
Save this manual to your list of manuals |
Canon SELPHY CP720 manual content summary:
- Canon SELPHY CP720 | SELPHY CP730/CP720 Basic to Advanced Printing Guide - Page 1
for purchasing a SELPHY Compact Photo Printer. You can start to print immediately with the items in your package. There are three easy steps: Unpack the contents, prepare them and print. 1 Unpack p. 2 2 Prepare p. 3 3 Print p. 5 Enjoy a Multitude of Functions p. 8 Installing the PDF Manual p. 11 - Canon SELPHY CP720 | SELPHY CP730/CP720 Basic to Advanced Printing Guide - Page 2
CD-ROM: Compact Photo Printer Solution Disk Printer User Guide for More Detailed Information The supplied CD-ROM contains the Printer User Guide, an electronic manual. Refer to this manual for detailed procedures or troubleshooting tips. You can install the Printer User Guide onto your computer - Canon SELPHY CP720 | SELPHY CP730/CP720 Basic to Advanced Printing Guide - Page 3
the ink and paper cassettes to prepare for printing. Although these illustrations show the CP730 model, the procedures apply equally to the CP720 model. 1. Install the ink cassette. Open the ink cassette compartment cover on the printer. Insert the starter ink cassette into the printer until - Canon SELPHY CP720 | SELPHY CP730/CP720 Basic to Advanced Printing Guide - Page 4
shown on paper cassettes and ink cassettes. Wait! Do not connect the printer to the computer until after you have installed the printer driver. ? Can I Use Standard Printer Paper and Postcards? No. Always use the genuine Canon brand "Color Ink/Paper Sets" included in SELPHY-specific paper sets - Canon SELPHY CP720 | SELPHY CP730/CP720 Basic to Advanced Printing Guide - Page 5
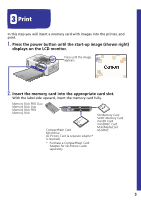
3 Print In this step you will insert a memory card with images into the printer, and print. 1. Press the power button until the start-up image (shown right) displays on the LCD monitor. Press until the image appears. 2. Insert the - Canon SELPHY CP720 | SELPHY CP730/CP720 Basic to Advanced Printing Guide - Page 6
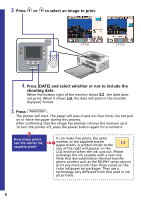
same number as the supplied starter paper sheets. A symbol similar to the one at the right will appear on the LCD monitor when the ink runs out. Please exchange the ink cassette with a new one. Note that dye-sublimation thermal transfer photo printers such as the SELPHY series cannot print any more - Canon SELPHY CP720 | SELPHY CP730/CP720 Basic to Advanced Printing Guide - Page 7
does not have a (Print/Share) button, please check its user manual. 1. Pull the cable out of the printer and attach it to the camera's DIGITAL terminal. If the connector on the cable does not fit your camera's terminal, use the USB cable supplied with your camera. Extends up to 30 cm (12 in - Canon SELPHY CP720 | SELPHY CP730/CP720 Basic to Advanced Printing Guide - Page 8
one copy of each image. DPOF Prints according to the DPOF settings set using the camera. See the user guide included with your camera for instructions regarding DPOF settings. 8 LAYOUT Button This button sets the print layout. Borderless Bordered 2 Images 4 Images 8 Images Index xxxxxx - Canon SELPHY CP720 | SELPHY CP730/CP720 Basic to Advanced Printing Guide - Page 9
memory card images and current settings information. CP730 Selected Image Image Number Print Image Number of Prints of Selected Image Total Number of Prints Installed Ink Cassette Type Printing My Colors Mode Date Imprint Print Layout CP720 Selected Image Image Number Print Image Number - Canon SELPHY CP720 | SELPHY CP730/CP720 Basic to Advanced Printing Guide - Page 10
TRIM. Button (CP730 only) This button starts the trimming mode, which lets you enlarge a portion of an image the print area as desired. 4. Press the TRIM. button to put the settings into effect. EFFECT Button (CP730 only) This button sets the My Colors function. Off B/W Sepia Vivid Neutral 10 - Canon SELPHY CP720 | SELPHY CP730/CP720 Basic to Advanced Printing Guide - Page 11
PDF Manual The Printer User Guide (PDF manual) explains information such as details about the printer, troubleshooting suggestions and instructions for connecting the printer to a computer. Use the following procedures to install the Printer User Guide on your computer. Windows 1. Place the supplied - Canon SELPHY CP720 | SELPHY CP730/CP720 Basic to Advanced Printing Guide - Page 12
CD-ROM window. 2. Click [Install] in the Application Software/User Guide section, followed by [Custom Installation] and [Next]. 3. Click [Agree], followed by [Next]. 4. Select [Printer User Guide] and click [Next]. Follow the onscreen instructions. Remove the CD-ROM when the installation is complete - Canon SELPHY CP720 | SELPHY CP730/CP720 Basic to Advanced Printing Guide - Page 13
on the region, L size items may be supplied with the printer. A Postcard Size Paper Cassette B Postcard Size Paper Package (5 sheets) C Ink Cassette for Postcard Size Separately Sold Items* *Some items are not sold in some regions. D "Color Ink/Paper Set KP-36IP" Postcard Size 36-Sheet Package - Canon SELPHY CP720 | SELPHY CP730/CP720 Basic to Advanced Printing Guide - Page 14
) Create Unique Stickers with 8-Label Sheets Required Items: J + M The CP730 can print without a cable connection if you have a mobile phone that supports the IrDA (infrared data transmission) protocol. You can also print wirelessly with the Bluetooth Unit (BU-20) if you use mobile phones and PDAs - Canon SELPHY CP720 | SELPHY CP730/CP720 Basic to Advanced Printing Guide - Page 15
Carry Your Favorite Photos Everywhere with Card Size Sheets Required Items: G + M Use the Wide Size Sheets for the Grand Appeal of Panorama Shots Required Items: H + N Use the CP730's Separately Sold Battery Pack to Print Postcards on Location 1. Open the battery cover. 2. Attach the battery. 3. - Canon SELPHY CP720 | SELPHY CP730/CP720 Basic to Advanced Printing Guide - Page 16
SELPHY-specific paper in the cassette with the shiny side upward as required? If the ink sheet becomes dusty, blow it clean with a blower brush or similar device. If narrow stripes appear, remove the ink cassette and use the supplied cleaner two or three times to clean the interior of the printer - Canon SELPHY CP720 | SELPHY CP730/CP720 Basic to Advanced Printing Guide - Page 17
, do not place more than 10 sheets of printed paper on top of the paper cassette. List of Error Symbols Cannot display image No images on memory card Cannot read image No paper Paper jam No ink Ink cassette error Low battery (CP730 only) Communication error Connection broken Other error 17 - Canon SELPHY CP720 | SELPHY CP730/CP720 Basic to Advanced Printing Guide - Page 18
manual (Printer User Guide) contained on the supplied CD-ROM. WARNINGS • Do not play the supplied CD-ROM(s) in any CD player that does not support data Canon reserves the right to change the specifications of the hardware and software described herein at any time without prior notice. • Canon - Canon SELPHY CP720 | SELPHY CP730/CP720 Basic to Advanced Printing Guide - Page 19
installation. This equipment generates, uses and can radiate radio frequency energy and, if not installed and used in accordance with the instructions the manual. If such changes or modifications should be made, you could be required to stop operation of the equipment. Canon U.S.A., Inc. One Canon - Canon SELPHY CP720 | SELPHY CP730/CP720 Basic to Advanced Printing Guide - Page 20
CDI-E262-010 xx06xxxx © 2006 CANON INC. PRINTED IN JAPAN
-
 1
1 -
 2
2 -
 3
3 -
 4
4 -
 5
5 -
 6
6 -
 7
7 -
8
-
9
-
10
-
11
-
12
-
13
-
14
-
15
-
16
-
17
-
18
-
19
-
20
 |
 |

Unpack
Prepare
Print
2
3
1
Printing Guide
Basic to Advanced
Printing
Thank you for purchasing a SELPHY Compact
Photo Printer. You can start to print immediately
with the items in your package. There are three
easy steps: Unpack the contents, prepare them
and print.
Enjoy a Multitude of
Functions
ENGLISH
p. 2
p. 3
p. 5
p. 8
Boundless
Possibilities
Troubleshooting
p. 13
p. 16
p. 11
Installing the PDF
Manual