Canon SELPHY CP800 SELPHY CP800 Printer User Guide - Page 31
Troubleshooting, Power, Printing Problems - battery
 |
View all Canon SELPHY CP800 manuals
Add to My Manuals
Save this manual to your list of manuals |
Page 31 highlights
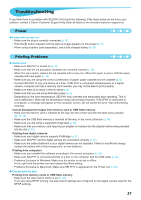
Troubleshooting If you think there is a problem with SELPHY, first check the following. If the items below do not solve your problem, contact a Canon Customer Support Help Desk as listed on the included customer support list. Power Power will not turn on • Make sure the plug is correctly connected (p. 10). • Hold the q button pressed until the start-up image appears on the screen (p. 11). • When using a battery (sold separately), use a fully charged battery (p. 29). Printing Problems Cannot print • Make sure SELPHY is turned on (p. 11). • Make sure that the ink and paper cassettes are correctly inserted (p. 10). • When the ink is spent, replace the ink cassette with a new one. When the paper is spent, refill the paper cassette with new paper (p. 14). • Make sure you are using the correct combination of paper, paper cassette and ink cassette (p. 8). • Connect SELPHY to only one device at a time. If SELPHY is connected simultaneously to a digital camera, computer and has a memory card inserted, you may not be able to print properly. • Make sure there is no slack in the ink sheet (p. 8). • Make sure that you are using dedicated paper (p. 9). • Depending on the room temperature, SELPHY may overheat and temporarily stop operating. This is not a malfunction. Wait until the temperature drops and printing resumes. If SELPHY is connected to a computer, a message will appear on the computer screen. Do not cancel the print. Wait until printing resumes. Cannot display/print images from memory card or USB flash memory • Make sure the memory card is inserted all the way into the correct slot with the label facing upward (pp. 12, 13). • Make sure the USB flash memory is inserted all the way, in the correct direction (p. 14). • Make sure you are using a supported image type (p. 12). • Make sure that any memory card requiring an adapter is inserted into the adapter before being inserted into the slot (p. 12). Printing from digital cameras • Make sure your digital camera supports PictBridge (p. 27). • Make sure SELPHY and the digital camera are connected correctly (p. 27). • Make sure the battery/batteries in your digital camera are not depleted. If there is insufficient charge, replace the battery with a fully charged one, or new batteries. Printing from computers • Make sure you installed the software according to the correct procedure (p. 23). • Make sure SELPHY is connected directly to a port on the computer with the USB cable (p. 24). • Problems Exclusive to Windows: Make sure the printer is not set to offline. If it is, right-click the printer icon and cancel the offline setting. • Problems Exclusive to Macintosh: Make sure SELPHY is registered on the Printer List (p. 24). Cannot print the date Printing from memory cards or USB flash memory • Make sure the date imprint option is set (p. 28). If you are using DPOF printing, the date imprint settings are configured on the digital camera used for the DPOF settings. 31
-
 1
1 -
2
-
3
-
4
-
5
-
6
-
7
-
8
-
9
-
10
-
11
-
12
-
13
-
14
-
15
-
16
-
17
-
18
-
19
-
20
-
21
-
22
-
23
-
24
-
25
-
 26
26 -
 27
27 -
 28
28 -
 29
29 -
 30
30 -
 31
31 -
 32
32 -
 33
33 -
 34
34 -
 35
35 -
 36
36
 |
 |