Canon SELPHY CP900 User Guide
Canon SELPHY CP900 Manual
 |
View all Canon SELPHY CP900 manuals
Add to My Manuals
Save this manual to your list of manuals |
Canon SELPHY CP900 manual content summary:
- Canon SELPHY CP900 | User Guide - Page 1
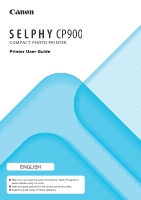
Printer User Guide ENGLISH OO Make sure you read this guide including the "Safety Precautions" section before using the printer. OO Read this guide carefully for the correct use of the printer. OO Keep this guide handy for future reference. - Canon SELPHY CP900 | User Guide - Page 2
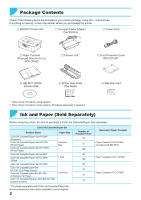
*2 □ SELPHY CP900 Solution Disk □ Printer User Guide (This Guide) □ Ink Cassette/Paper Set KP-72IN (Photo Paper) Color Ink Cassette/Paper Set KP-108IN (Photo Paper) Color Ink Cassette/Paper Set KL-36IP Color Ink Cassette/Paper Set KL-36IP 3 Pack Color Ink Cassette/Paper Set KC-36IP Color Ink - Canon SELPHY CP900 | User Guide - Page 3
's warranty is only effective in the country of sale. If there is a problem with the printer while abroad, please return it to the country of sale before proceeding with a warranty claim to a Canon Customer Support Help Desk. OO The LCD monitor is produced with extremely high-precision manufacturing - Canon SELPHY CP900 | User Guide - Page 4
equipment. OO Be sure to also check the guides included with any separately sold accessories you use. retailer or a Canon Customer Support Help Desk. OO Do not touch this printer or the power plug of your hand into the printer interior. OO Be sure to place SELPHY safely so as to avoid tripping over - Canon SELPHY CP900 | User Guide - Page 5
Canon Customer Support Help Desk in the event of a paper jam. Do not remove jammed paper by force. The printer could be damaged. OO Do not use the printer the printer or cause the printer to malfunction. Setting Up SELPHY More than the length of the paper 10 cm (4 in.) or more OO Place SELPHY on - Canon SELPHY CP900 | User Guide - Page 6
Guide Card Slots (p. 12) Paper Cassette Compartment (p. 10) Paper Cassette Compartment Cover (p. 10) USB Terminal for Computer (p. 45) Ink Cassette Lock (p. 14) Ink Cassette Compartment (p. 10) Ink setting screens, or error messages (p. 51) Turns SELPHY on or off (p. 1 1). Displays the menu - Canon SELPHY CP900 | User Guide - Page 7
is inserted into SELPHY. OO Take care not to touch the ink sheet, not to handle the ink cassette with wet hands, and not to get any dust or dirt in the ink sheet. Dirt and water drops may cause lines on photos, poor print quality, a tear in the ink sheet, or cause the printer to malfunction - Canon SELPHY CP900 | User Guide - Page 8
Cassette 1 Check the paper size. OO Check that the prepared ink cassette and the size shown on the paper cassette (POSTCARD ( to 18 sheets in the paper cassette. Inserting 19 or more sheets may damage the printer or cause malfunction. OO Hold the paper as shown in the illustration and load with - Canon SELPHY CP900 | User Guide - Page 9
in the genuine Canon brand Color Ink Cassette/Paper Sets for use in SELPHY CP series printers. Regular printing paper, regular postcards, or dedicated paper for SELPHY ES series printers cannot be used. OO Never do the following. This may damage the printer or cause the printer to malfunction - Canon SELPHY CP900 | User Guide - Page 10
covers for the ink cassette and paper cassette compartments. 2 Insert the ink cassette. OO Insert the ink cassette into the printer in the direction Connecting the Power 1 Plug the adapter cord into SELPHY. OO Fully insert the adapter plug into SELPHY. 2 Connect the power cord. OO Connect the - Canon SELPHY CP900 | User Guide - Page 11
Setting the Display Language You can change the language displayed in the LCD monitor menus and messages. The default setting is English. 1 Turn on SELPHY. OO Press and hold the q button until the screen shown on the left is displayed. OO To turn the power off, press and hold the q - Canon SELPHY CP900 | User Guide - Page 12
may not be recognized. OO Refer to the user guide included with your memory card and adapter for handling instructions. About USB Flash Memory You can print images on a commercially available USB flash memory by connecting it to SELPHY (p. 15). Images That Can Be Printed JPEG images conforming - Canon SELPHY CP900 | User Guide - Page 13
section, an SD memory card will be used as an example, but you can print from other memory cards using the same steps. 1 Turn on SELPHY. OO Press and hold the q button until the screen shown on the left is displayed. OO To turn the power off, press and hold the - Canon SELPHY CP900 | User Guide - Page 14
of SELPHY several printer does not stop ink cassette (Step 7), or press the v button to cancel printing (Step 6). Depending on print conditions, you may not be able to avoid incomplete photo prints due to the ink sheet running out in some cases even if you follow the above instructions - Canon SELPHY CP900 | User Guide - Page 15
to the user guide included with your USB flash memory for operating instructions. Printing 1 Copy of copies in Steps 4 to 5 on p. 13, SELPHY will print as specified even if you carry out the OO You can print square images on stickers using Color Ink Cassette/Square Label Set KC-18IS (p. 2). OO Set - Canon SELPHY CP900 | User Guide - Page 16
Printing All Images You can print all images on a memory card at once. 1 Display the menu. OO Press the k button. 2 Display the settings screen. OO Press the ud buttons to select [Print All Images], then press the o button. 3 Select the number of copies. OO Press the ud buttons to set the - Canon SELPHY CP900 | User Guide - Page 17
Dust and dirt may cause white lines on photos or damage the printer. OO When you have more than one ink cassette, keep one inside SELPHY, and keep the other inside the original printer to malfunction. OO If lines still appear on photos after cleaning, contact a Canon Customer Support Help Desk. 17 - Canon SELPHY CP900 | User Guide - Page 18
], press the o button to display the reset cropping screen, and then press the o button again. OO The cropping ranges are all cleared if you turn SELPHY off or remove the memory card before printing them. OO You can set up to 99 images with cropping ranges. OO You cannot crop images - Canon SELPHY CP900 | User Guide - Page 19
the cropping range (p. 18) while the [Standard] size is selected for [ID Photo], 2 lines are displayed. OO Adjust so that one line is at the top and the other line is under the chin to print a passport photo conforming to the passport standards. OO Please contact the appropriate institution for regulation - Canon SELPHY CP900 | User Guide - Page 20
Printing a Variety of Images You can use various printing features, such as imprinting the shooting date or adjusting the color of an image. You do not need to make settings for each image because once the settings are made, they are applied for all images. Making Settings 1 Display the settings - Canon SELPHY CP900 | User Guide - Page 21
with or without a border. OO Borderless (Default setting) / Bordered OO Specify [Bordered] when using Color Ink Cassette/Square Label Set KC-18IS (square stickers) (p. 2). OO Turning off SELPHY will return the setting to [ Borderless]. OO Images are printed without borders if you select [ Index] or - Canon SELPHY CP900 | User Guide - Page 22
be printed in the selected layout. OO Specify [ 8-up] when using Color Ink Cassette/ Label Set KC-18IL (8-label sheet) (p. 2). 1-up (Default setting) hold the q button until "SELPHY" is displayed on the screen. If you want SELPHY to no longer retain layouts, turn off SELPHY and then turn it on in - Canon SELPHY CP900 | User Guide - Page 23
setting) / On OO Correction may be applied to areas other than skin, producing unexpected results. OO This setting is reset to [ Off] when printing finishes, SELPHY is turned off, or the memory card is removed. OO When [ Index] is selected in [Page Layout] (p. 22), [Smooth Skin] will not be applied - Canon SELPHY CP900 | User Guide - Page 24
the battery is still consumed after printing stops until the Auto Power Down function takes effect if you are using the battery (p. 48). OO SELPHY is not turned off automatically when it is connected to other devices (including wireless communications) or an error message is displayed on the screen - Canon SELPHY CP900 | User Guide - Page 25
images stored in wireless LAN compatible smartphones and computers via wireless LANs. This printer is Wi-Fi®*1 certified. You can print images stored in Wi-Fi ready or tablet. See our website for details of the application (supported models, functions, etc.). Hereinafter "smartphones" is used as the - Canon SELPHY CP900 | User Guide - Page 26
of connection destinations registered in this product as a result of a loss or theft. OO Follow the instructions described in this guide. Use the wireless LAN functions of this product within the scope of this guide. Canon is not liable for any damage or loss resulting from the use that is not - Canon SELPHY CP900 | User Guide - Page 27
FCC/IC Notice Models:CD1100 and CD1107 (including WLAN Module Model WM317, FCC ID:AZD317) This equipment complies with FCC/IC radiation exposure limits set forth for an uncontrolled environment and meets the FCC radio frequency (RF) Exposure Guidelines in Supplement C to OET65 and RSS - 102 of the - Canon SELPHY CP900 | User Guide - Page 28
41). Ad Hoc Mode (p. 29) You can connect SELPHY to a wireless LAN and print images without an access point our website for detailed information on supported smartphones and the designated application ( facilitate directly connecting digital cameras and printers. This product is compliant with the - Canon SELPHY CP900 | User Guide - Page 29
is supported, and install the designated application. 2 Prepare SELPHY. OO Remove any inserted card or USB memory. OO Insert an ink cassette Settings], and then press the o button. 4 Check the printer name. OO Check the displayed printer name and press the o button. OO This name will be displayed - Canon SELPHY CP900 | User Guide - Page 30
icons. [ ] high, [ ] medium, [ ] low, [ ] weak or no service Printing for the Second Time OO Once you have configured settings, the second screen in Step 7 power on. All you have to do is to connect the smartphone to the printer whenever you want to print. OO You can display the screen in Step 6 - Canon SELPHY CP900 | User Guide - Page 31
Ink Cassette/Square Label Set KC-18IS (p. 2). OO Specify borderless printing in the smartphone's application (the [Borders] setting on SELPHY key) * Supported security settings are describes how to connect a printer to a wireless LAN point. Refer to the user guide supplied with your camera. OO If - Canon SELPHY CP900 | User Guide - Page 32
2 Select the wireless LAN mode. OO Display the screen on the left by carrying out Steps 2 to 4 described on p. 29. OO Press the ud buttons to select [Infrastructure], and then press the o button. 3 Select the connection method. OO Press the ud buttons to select [Search for an access point], - Canon SELPHY CP900 | User Guide - Page 33
to specify the access point manually. Follow the instruction on the screen to enter the SSID, security settings, and encryption key (p. 42). OO On the screen, wireless signal strength is indicated by the following icons. [ ] high, [ ] medium, [ ] low, [ ] weak or no service Printing for the Second - Canon SELPHY CP900 | User Guide - Page 34
or on the camera when printing on square stickers (the [Borders] setting on SELPHY will be ignored except when the border setting on the camera is at its default). Using a WPS Compatible Access Point You can connect the printer to the wireless LAN easily when your access point is WPS compatible - Canon SELPHY CP900 | User Guide - Page 35
selected [PIN Method] in Step 2, specify the PIN code displayed on the printer to the access point, press the o button on the printer, and proceed to Step 3. Printing Images from Your Computer If you connect your computer to SELPHY and use the supplied software, you can view all images at once and - Canon SELPHY CP900 | User Guide - Page 36
Pack 2 (RAM 1 GB or more), Windows XP Service Pack 3 (RAM 512 MB or more), and Mac OS X v10.6 or later. *2 Windows 7 Starter and Home Basic are not supported*3. Download Windows Media Feature Pack from the Microsoft Support page and install if you are using Windows 7 N (EU version) or Windows - Canon SELPHY CP900 | User Guide - Page 37
for these explanations. Items to Prepare OO Computer OO Supplied CD-ROM (SELPHY CP900 Solution Disk) (p. 2) Windows 1 Connect SELPHY to the wireless LAN. OO Connect SELPHY to the wireless LAN as described in "Connecting the Printer to the Wireless LAN" (p. 31). OO Check that the screen on the - Canon SELPHY CP900 | User Guide - Page 38
appears, click [Install] and follow the on-screen instructions to proceed. OO When the installation finishes, click [Yes] to restart the computer. Connect SELPHY to the wireless LAN. OO Connect SELPHY to the wireless LAN as described in "Connecting the Printer to the Wireless LAN" (p. 31). OO Check - Canon SELPHY CP900 | User Guide - Page 39
the [SELPHY Photo Print] icon in the Dock (the bar at the bottom of the desktop). 3 Display the print menu. OO Click [Print menu]. OO If printing preparations are not complete (paper cassette and ink cassette inserted), you cannot click [Print menu]. Follow the on-screen instructions to perform - Canon SELPHY CP900 | User Guide - Page 40
screen. at the top left corner OO The layout image shown in the right side of the screen that is displayed when you click [ID Photo Print] in Step 4 on p. 39 differs from the actual layout. You can check the actual layout by clicking [Preview] in the [4.Print] screen. OO If - Canon SELPHY CP900 | User Guide - Page 41
button. OO Press the EDIT button to display the screen to enter characters and enter the printer name (p. 42). Setting the IP Address Manually You can specify the printer's IP address and subnet mask manually. 1 Display the settings screen. OO Press the k button, and then press the ud buttons to - Canon SELPHY CP900 | User Guide - Page 42
button. 4 Check the settings OO Check the displayed setting details and press the o button. Resetting Wireless LAN Settings You can reset the specified printer name and access point information. OO Press the k button, and then press the ud buttons to select [Wireless LAN Settings], and press the - Canon SELPHY CP900 | User Guide - Page 43
Connecting with Other Devices Using a Cable This chapter describes how to connect the printer to a computer or camera using a USB cable. 43 - Canon SELPHY CP900 | User Guide - Page 44
Supplied CD-ROM (SELPHY CP900 Solution Disk) (p. 2) OO A commercially available USB cable shorter than 2.5 m (8.2 ft.) (SELPHY terminal requires a OO Follow the on-screen instructions to proceed. OO If the User Account Control window appears, follow the on-screen instructions to proceed. OO If - Canon SELPHY CP900 | User Guide - Page 45
memory. OO Insert an ink cassette and a paper cassette that contain paper you want to use into SELPHY (pp. 7 - 10). OO Use the USB cable to connect SELPHY to the computer. OO Refer to the user guides included with the cable and computer for handling instructions. Commercially available USB - Canon SELPHY CP900 | User Guide - Page 46
supports the PictBridge standard. A Canon brand compact digital camera will be used as an example to explain the print method. If operations are different for the digital camera you use, refer to the user guide included with your digital camera. 1 Prepare SELPHY. OO Check that SELPHY and printers. - Canon SELPHY CP900 | User Guide - Page 47
Appendix This chapter describes how to print using the separately sold battery when a power outlet is not available, troubleshooting, printer specifications, and how to maintain SELPHY. 47 - Canon SELPHY CP900 | User Guide - Page 48
is connected to it. However, the charge stops while printing. Using SELPHY with a Battery Connect the charger adapter to SELPHY. OO For cautions concerning the battery, refer to the user guide included with the battery. OO Keep SELPHY on a stable surface such as a desk while it is connected to - Canon SELPHY CP900 | User Guide - Page 49
Troubleshooting If you think there is a problem with SELPHY, first, check the following. If the items below do not solve your problem, contact a Canon Customer Support Help Desk as listed on the included customer support paper cassette and ink cassette (p. 7). • If SELPHY is connected - Canon SELPHY CP900 | User Guide - Page 50
to forcibly pull it out. Turn the printer off and on repeatedly until the paper is ejected. If you have accidentally turned off the power while printing, turn it on again and wait for the paper to be ejected. Consult your retailer or a Canon Customer Support Help Desk in the event of a paper - Canon SELPHY CP900 | User Guide - Page 51
the error message, follow the on-screen instructions. If you have an error message only, check items in "Troubleshooting" (p. 49). If these items do not solve your problem, contact a Canon Customer Support Help Desk. OO If a problem occurs while SELPHY is connected to a digital camera, an error - Canon SELPHY CP900 | User Guide - Page 52
SELPHY CP900 Printing Method Resolution/Color Representation Gradation Dye-sublimation thermal transfer (with overcoating) 300 x 300 dpi 256 shades per color Ink Paper Dedicated color ink Dimensions Weight (printer only) Borderless WPA2-PSK (AES) FAT/exFAT only supported 5 - 40 °C (41 - 104 - Canon SELPHY CP900 | User Guide - Page 53
°C (41 - 104 °F) 110.0 x 40.7 x 37.5 mm (4.33 x 1.60 x 1.48 in.) Approx. 230 g (8.11 oz.) OO All data is based on tests by Canon. OO Printer specifications or appearance are subject to change without notice. USA and Canada only: As a participant in the international Energy Star Program, we believe - Canon SELPHY CP900 | User Guide - Page 54
printer to malfunction. OO Do not expose SELPHY to insect sprays and volatile liquids. Do not allow SELPHY accordance with the instructions, may cause harmful manual. If such changes or modifications should be made, you could be required to stop operation of the equipment. Canon U.S.A., Inc. One Canon - Canon SELPHY CP900 | User Guide - Page 55
submitting changes to the project, please see CONTRIBUTIONS file for more instructions. License This software may be distributed, used, and modified under DAMAGES (INCLUDING, BUT NOT LIMITED TO, PROCUREMENT OF SUBSTITUTE GOODS OR SERVICES; LOSS OF USE, DATA, OR PROFITS; OR BUSINESS INTERRUPTION) - Canon SELPHY CP900 | User Guide - Page 56
storing in a retrieval system any part of this guide without the permission of Canon is prohibited. OO Canon reserves the right to change the contents of this guide at any time without prior notice. OO Illustrations and screenshots in this guide may differ slightly from the actual equipment. OO The
-
 1
1 -
 2
2 -
 3
3 -
 4
4 -
 5
5 -
 6
6 -
 7
7 -
8
-
9
-
10
-
11
-
12
-
13
-
14
-
15
-
16
-
17
-
18
-
19
-
20
-
21
-
22
-
23
-
24
-
25
-
26
-
27
-
28
-
29
-
30
-
31
-
32
-
33
-
34
-
35
-
36
-
37
-
38
-
39
-
40
-
41
-
42
-
43
-
44
-
45
-
46
-
47
-
48
-
49
-
50
-
51
-
52
-
53
-
54
-
55
-
56
 |
 |
Printer User Guide
ENGLISH
O
Make sure you read this guide including the “Safety Precautions”
section before using the printer.
O
Read this guide carefully for the correct use of the printer.
O
Keep this guide handy for future reference.