Canon VIXIA HF R11 VIXIA HF R10/HF R11/HF R100 Instruction Manual - Page 101
Selecting the Print Settings and Printing
 |
View all Canon VIXIA HF R11 manuals
Add to My Manuals
Save this manual to your list of manuals |
Page 101 highlights
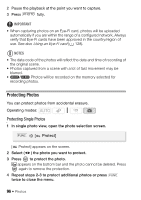
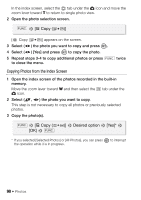
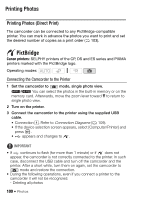
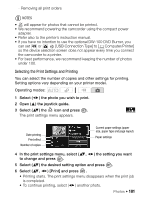
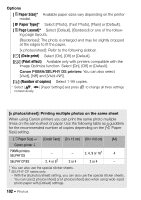
- Removing all print orders NOTES • will appear for photos that cannot be printed. • We recommend powering the camcorder using the compact power adapter. • Refer also to the printer's instruction manual. • If you have no intention to use the optional DW-100 DVD Burner, you can set or [USB Connection Type] to [ Computer/Printer] so the device selection screen does not appear every time you connect the camcorder to a printer. • For best performance, we recommend keeping the number of photos under 100. Selecting the Print Settings and Printing You can select the number of copies and other settings for printing. Setting options vary depending on your printer model. Operating modes: 1 Select ( ) the photo you wish to print. 2 Open ( ) the joystick guide. 3 Select ( ) the icon and press . The print settings menu appears. Date printing Print effect Number of copies Current paper settings (paper size, paper type and page layout) Paper settings 4 In the print settings menu, select ( , to change and press . ) the setting you want 5 Select ( ) the desired setting option and press . 6 Select ( , ) [Print] and press . • Printing starts. The print settings menu disappears when the print job is completed. • To continue printing, select ( ) another photo. Photos Š 101
-
 1
1 -
2
-
3
-
4
-
5
-
6
-
7
-
8
-
9
-
10
-
11
-
12
-
13
-
14
-
15
-
16
-
17
-
18
-
19
-
20
-
21
-
22
-
23
-
24
-
25
-
26
-
27
-
28
-
29
-
30
-
31
-
32
-
33
-
34
-
35
-
36
-
37
-
38
-
39
-
40
-
41
-
42
-
43
-
44
-
45
-
46
-
47
-
48
-
49
-
50
-
51
-
52
-
53
-
54
-
55
-
56
-
57
-
58
-
59
-
60
-
61
-
62
-
63
-
64
-
65
-
66
-
67
-
68
-
69
-
70
-
71
-
72
-
73
-
74
-
75
-
76
-
77
-
78
-
79
-
80
-
81
-
82
-
83
-
84
-
85
-
86
-
87
-
88
-
89
-
90
-
91
-
92
-
93
-
94
-
95
-
 96
96 -
 97
97 -
 98
98 -
 99
99 -
 100
100 -
 101
101 -
 102
102 -
 103
103 -
 104
104 -
 105
105 -
 106
106 -
107
-
108
-
109
-
110
-
111
-
112
-
113
-
114
-
115
-
116
-
117
-
118
-
119
-
120
-
121
-
122
-
123
-
124
-
125
-
126
-
127
-
128
-
129
-
130
-
131
-
132
-
133
-
134
-
135
-
136
-
137
-
138
-
139
-
140
-
141
-
142
-
143
-
144
-
145
-
146
-
147
-
148
-
149
-
150
-
151
-
152
-
153
-
154
-
155
-
156
-
157
-
158
-
159
-
160
-
161
-
162
-
163
-
164
-
165
-
166
-
167
-
168
-
169
-
170
-
171
-
172
-
173
-
174
-
175
-
176
-
177
-
178
-
179
-
180
-
181
-
182
-
183
-
184
 |
 |