Canon VIXIA HF R11 VIXIA HF R10/HF R11/HF R100 Instruction Manual - Page 120
Menu], Add Recordings to Disc], cenes] or [Remaining, cenes]
 |
View all Canon VIXIA HF R11 manuals
Add to My Manuals
Save this manual to your list of manuals |
Page 120 highlights
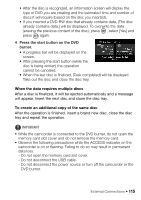
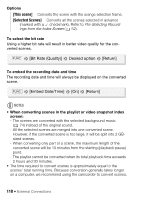
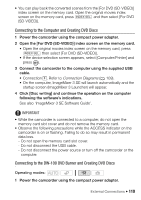
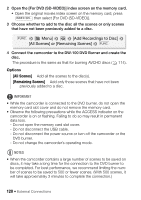
2 Open the [For DVD (SD-VIDEO)] index screen on the memory card. • Open the original movies index screen on the memory card, press INDEX SEL. then select [For DVD (SD-VIDEO)]. 3 Choose whether to add to the disc all the scenes or only scenes that have not been previously added to a disc. FUNC. [ Menu] [Add Recordings to Disc] [All Scenes] or [Remaining Scenes] FUNC. 4 Connect the camcorder to the DW-100 DVD Burner and create the disc. The procedure is the same as that for burning AVCHD discs ( 114). Options [All Scenes] Add all the scenes to the disc(s). [Remaining Scenes] Add only those scenes that have not been previously added to a disc. IMPORTANT • While the camcorder is connected to the DVD burner, do not open the memory card slot cover and do not remove the memory card. • Observe the following precautions while the ACCESS indicator on the camcorder is on or flashing. Failing to do so may result in permanent data loss. - Do not open the memory card slot cover. - Do not disconnect the USB cable. - Do not disconnect the power source or turn off the camcorder or the DVD burner. - Do not change the camcorder's operating mode. NOTES • When the camcorder contains a large number of scenes to be saved on discs, it may take a long time for the connection to the DVD burner to be completed. For best performance, we recommend limiting the number of scenes to be saved to 500 or fewer scenes. (With 500 scenes, it will take approximately 3 minutes to complete the connection.) 120 Š External Connections
-
 1
1 -
2
-
3
-
4
-
5
-
6
-
7
-
8
-
9
-
10
-
11
-
12
-
13
-
14
-
15
-
16
-
17
-
18
-
19
-
20
-
21
-
22
-
23
-
24
-
25
-
26
-
27
-
28
-
29
-
30
-
31
-
32
-
33
-
34
-
35
-
36
-
37
-
38
-
39
-
40
-
41
-
42
-
43
-
44
-
45
-
46
-
47
-
48
-
49
-
50
-
51
-
52
-
53
-
54
-
55
-
56
-
57
-
58
-
59
-
60
-
61
-
62
-
63
-
64
-
65
-
66
-
67
-
68
-
69
-
70
-
71
-
72
-
73
-
74
-
75
-
76
-
77
-
78
-
79
-
80
-
81
-
82
-
83
-
84
-
85
-
86
-
87
-
88
-
89
-
90
-
91
-
92
-
93
-
94
-
95
-
96
-
97
-
98
-
99
-
100
-
101
-
102
-
103
-
104
-
105
-
106
-
107
-
108
-
109
-
110
-
111
-
112
-
113
-
114
-
 115
115 -
 116
116 -
 117
117 -
 118
118 -
 119
119 -
 120
120 -
 121
121 -
 122
122 -
 123
123 -
 124
124 -
 125
125 -
126
-
127
-
128
-
129
-
130
-
131
-
132
-
133
-
134
-
135
-
136
-
137
-
138
-
139
-
140
-
141
-
142
-
143
-
144
-
145
-
146
-
147
-
148
-
149
-
150
-
151
-
152
-
153
-
154
-
155
-
156
-
157
-
158
-
159
-
160
-
161
-
162
-
163
-
164
-
165
-
166
-
167
-
168
-
169
-
170
-
171
-
172
-
173
-
174
-
175
-
176
-
177
-
178
-
179
-
180
-
181
-
182
-
183
-
184
 |
 |