Canon VIXIA HF R21 VIXIA HF R20 / HF R21 / HF R200 Instruction Manual - Page 129
Converting Only Part of a Scene or Story, Connecting to the Computer and Uploading your Videos
 |
View all Canon VIXIA HF R21 manuals
Add to My Manuals
Save this manual to your list of manuals |
Page 129 highlights
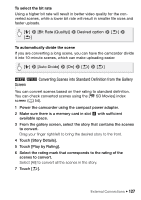
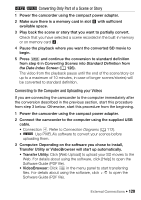
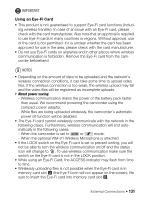
/ Converting Only Part of a Scene or Story 1 Power the camcorder using the compact power adapter. 2 Make sure there is a memory card in slot Y with sufficient available space. 3 Play back the scene or story that you want to partially convert. Check that you have selected a scene recorded in the built-in memory or on memory card X. 4 Pause the playback where you want the converted SD movie to begin. 5 Press Z and continue the conversion to standard definition from step 6 in Converting Scenes into Standard Definition from the Date Index Screen (0 126). The video from the playback pause until the end of the scene/story (or up to a maximum of 10 minutes, in case of longer scenes/stories) will be converted to standard definition. Connecting to the Computer and Uploading your Videos If you are connecting the camcorder to the computer immediately after the conversion described in the previous section, start this procedure from step 3 below. Otherwise, start this procedure from the beginning. 1 Power the camcorder using the compact power adapter. 2 Connect the camcorder to the computer using the supplied USB cable. • Connection D. Refer to Connection Diagrams (0 112). • Use PIXELA's software to convert your scenes before uploading them. 3 Computer: Depending on the software you chose to install, Transfer Utility or VideoBrowser will start up automatically. • Transfer Utility: Click [Web Upload] to upload your SD movies to the Web. For details about using the software, click [Help] to open the Software Guide (PDF file). • VideoBrowser: Click in the menu panel to start transferring files. For details about using the software, click to open the Software Guide (PDF file). External Connections Š 129
-
 1
1 -
2
-
3
-
4
-
5
-
6
-
7
-
8
-
9
-
10
-
11
-
12
-
13
-
14
-
15
-
16
-
17
-
18
-
19
-
20
-
21
-
22
-
23
-
24
-
25
-
26
-
27
-
28
-
29
-
30
-
31
-
32
-
33
-
34
-
35
-
36
-
37
-
38
-
39
-
40
-
41
-
42
-
43
-
44
-
45
-
46
-
47
-
48
-
49
-
50
-
51
-
52
-
53
-
54
-
55
-
56
-
57
-
58
-
59
-
60
-
61
-
62
-
63
-
64
-
65
-
66
-
67
-
68
-
69
-
70
-
71
-
72
-
73
-
74
-
75
-
76
-
77
-
78
-
79
-
80
-
81
-
82
-
83
-
84
-
85
-
86
-
87
-
88
-
89
-
90
-
91
-
92
-
93
-
94
-
95
-
96
-
97
-
98
-
99
-
100
-
101
-
102
-
103
-
104
-
105
-
106
-
107
-
108
-
109
-
110
-
111
-
112
-
113
-
114
-
115
-
116
-
117
-
118
-
119
-
120
-
121
-
122
-
123
-
 124
124 -
 125
125 -
 126
126 -
 127
127 -
 128
128 -
 129
129 -
 130
130 -
 131
131 -
 132
132 -
 133
133 -
 134
134 -
135
-
136
-
137
-
138
-
139
-
140
-
141
-
142
-
143
-
144
-
145
-
146
-
147
-
148
-
149
-
150
-
151
-
152
-
153
-
154
-
155
-
156
-
157
-
158
-
159
-
160
-
161
-
162
-
163
-
164
-
165
-
166
-
167
-
168
-
169
-
170
-
171
-
172
-
173
-
174
-
175
-
176
-
177
-
178
-
179
-
180
-
181
-
182
-
183
-
184
-
185
-
186
-
187
-
188
 |
 |