Canon VIXIA HF R21 VIXIA HF R20 / HF R21 / HF R200 Instruction Manual - Page 70
Manual Exposure Adjustment
 |
View all Canon VIXIA HF R21 manuals
Add to My Manuals
Save this manual to your list of manuals |
Page 70 highlights
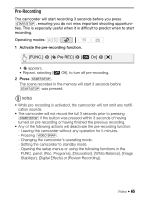
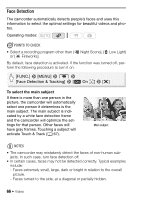
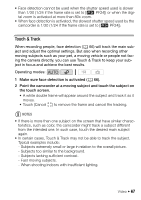
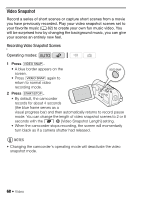
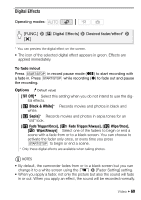
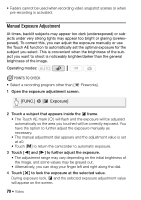
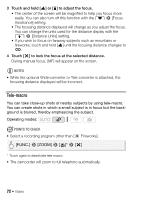
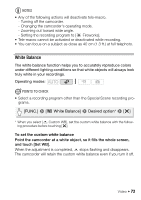
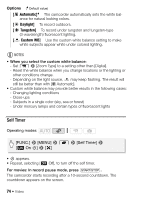
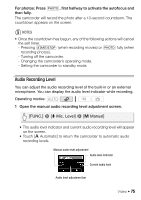
• Faders cannot be used when recording video snapshot scenes or when pre-recording is activated. Manual Exposure Adjustment At times, backlit subjects may appear too dark (underexposed) or subjects under very strong lights may appear too bright or glaring (overexposed). To correct this, you can adjust the exposure manually or use the Touch AE function to automatically set the optimal exposure for the subject you select. This is convenient when the brightness of the subject you want to shoot is noticeably brighter/darker than the general brightness of the image. Operating modes: POINTS TO CHECK • Select a recording program other than [M Fireworks]. 1 Open the exposure adjustment screen. [FUNC.] 8 [e Exposure] 2 Touch a subject that appears inside the e frame. • The Touch AE mark (P) will flash and the exposure will be adjusted automatically so the area you touched will be correctly exposed. You have the option to further adjust the exposure manually as necessary. • The manual adjustment dial appears and the adjustment value is set at ±0. • Touch [y] to return the camcorder to automatic exposure. 3 Touch [y] and [A] to further adjust the exposure. • The adjustment range may vary depending on the initial brightness of the image, and some values may be grayed out. • Alternatively, you can drag your finger left and right along the dial. 4 Touch [a] to lock the exposure at the selected value. During exposure lock, e and the selected exposure adjustment value will appear on the screen. 70 Š Video
-
 1
1 -
2
-
3
-
4
-
5
-
6
-
7
-
8
-
9
-
10
-
11
-
12
-
13
-
14
-
15
-
16
-
17
-
18
-
19
-
20
-
21
-
22
-
23
-
24
-
25
-
26
-
27
-
28
-
29
-
30
-
31
-
32
-
33
-
34
-
35
-
36
-
37
-
38
-
39
-
40
-
41
-
42
-
43
-
44
-
45
-
46
-
47
-
48
-
49
-
50
-
51
-
52
-
53
-
54
-
55
-
56
-
57
-
58
-
59
-
60
-
61
-
62
-
63
-
64
-
 65
65 -
 66
66 -
 67
67 -
 68
68 -
 69
69 -
 70
70 -
 71
71 -
 72
72 -
 73
73 -
 74
74 -
 75
75 -
76
-
77
-
78
-
79
-
80
-
81
-
82
-
83
-
84
-
85
-
86
-
87
-
88
-
89
-
90
-
91
-
92
-
93
-
94
-
95
-
96
-
97
-
98
-
99
-
100
-
101
-
102
-
103
-
104
-
105
-
106
-
107
-
108
-
109
-
110
-
111
-
112
-
113
-
114
-
115
-
116
-
117
-
118
-
119
-
120
-
121
-
122
-
123
-
124
-
125
-
126
-
127
-
128
-
129
-
130
-
131
-
132
-
133
-
134
-
135
-
136
-
137
-
138
-
139
-
140
-
141
-
142
-
143
-
144
-
145
-
146
-
147
-
148
-
149
-
150
-
151
-
152
-
153
-
154
-
155
-
156
-
157
-
158
-
159
-
160
-
161
-
162
-
163
-
164
-
165
-
166
-
167
-
168
-
169
-
170
-
171
-
172
-
173
-
174
-
175
-
176
-
177
-
178
-
179
-
180
-
181
-
182
-
183
-
184
-
185
-
186
-
187
-
188
 |
 |