Canon VIXIA HF R21 VIXIA HF R20 / HF R21 / HF R200 Instruction Manual - Page 87
Onscreen Displays and Data Code, Rating Scenes
 |
View all Canon VIXIA HF R21 manuals
Add to My Manuals
Save this manual to your list of manuals |
Page 87 highlights
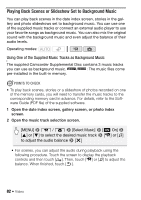
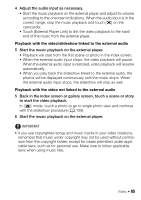
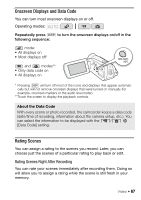
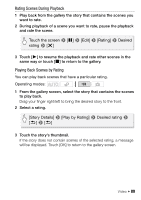
Onscreen Displays and Data Code You can turn most onscreen displays on or off. Operating modes: Repeatedly press h to turn the onscreen displays on/off in the following sequence: mode: • All displays on • Most displays off* and modes**: • Only data code on • All displays on * Pressing h will turn off most of the icons and displays that appear automatically but will not remove onscreen displays that were turned on manually (for example, onscreen markers or the audio level meter). **Touch the screen to display the playback controls. About the Data Code With every scene or photo recorded, the camcorder keeps a data code (date/time of recording, information about the camera setup, etc.). You can select the information to be displayed with the y/z 8 [Data Code] setting. Rating Scenes You can assign a rating to the scenes you record. Later, you can choose just the scenes of a particular rating to play back or edit. Rating Scenes Right After Recording You can rate your scenes immediately after recording them. Doing so will allow you to assign a rating while the scene is still fresh in your memory. Video Š 87
-
 1
1 -
2
-
3
-
4
-
5
-
6
-
7
-
8
-
9
-
10
-
11
-
12
-
13
-
14
-
15
-
16
-
17
-
18
-
19
-
20
-
21
-
22
-
23
-
24
-
25
-
26
-
27
-
28
-
29
-
30
-
31
-
32
-
33
-
34
-
35
-
36
-
37
-
38
-
39
-
40
-
41
-
42
-
43
-
44
-
45
-
46
-
47
-
48
-
49
-
50
-
51
-
52
-
53
-
54
-
55
-
56
-
57
-
58
-
59
-
60
-
61
-
62
-
63
-
64
-
65
-
66
-
67
-
68
-
69
-
70
-
71
-
72
-
73
-
74
-
75
-
76
-
77
-
78
-
79
-
80
-
81
-
 82
82 -
 83
83 -
 84
84 -
 85
85 -
 86
86 -
 87
87 -
 88
88 -
 89
89 -
 90
90 -
 91
91 -
 92
92 -
93
-
94
-
95
-
96
-
97
-
98
-
99
-
100
-
101
-
102
-
103
-
104
-
105
-
106
-
107
-
108
-
109
-
110
-
111
-
112
-
113
-
114
-
115
-
116
-
117
-
118
-
119
-
120
-
121
-
122
-
123
-
124
-
125
-
126
-
127
-
128
-
129
-
130
-
131
-
132
-
133
-
134
-
135
-
136
-
137
-
138
-
139
-
140
-
141
-
142
-
143
-
144
-
145
-
146
-
147
-
148
-
149
-
150
-
151
-
152
-
153
-
154
-
155
-
156
-
157
-
158
-
159
-
160
-
161
-
162
-
163
-
164
-
165
-
166
-
167
-
168
-
169
-
170
-
171
-
172
-
173
-
174
-
175
-
176
-
177
-
178
-
179
-
180
-
181
-
182
-
183
-
184
-
185
-
186
-
187
-
188
 |
 |