Canon VIXIA HF R32 VIXIA HF R30 / HF R32 / HF R300 Instruction Manual - Page 116
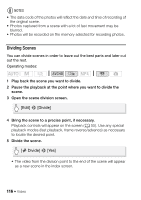
Dividing Scenes
 |
View all Canon VIXIA HF R32 manuals
Add to My Manuals
Save this manual to your list of manuals |
Page 116 highlights
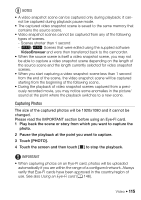
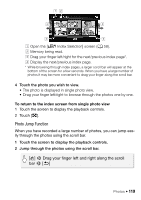
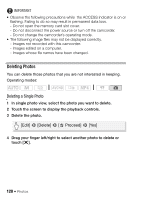
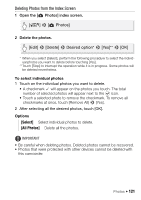
NOTES • The data code of the photos will reflect the date and time of recording of the original scene. • Photos captured from a scene with a lot of fast movement may be blurred. • Photos will be recorded on the memory selected for recording photos. Dividing Scenes You can divide scenes in order to leave out the best parts and later cut out the rest. Operating modes: 1 Play back the scene you want to divide. 2 Pause the playback at the point where you want to divide the scene. 3 Open the scene division screen. [Edit] > [Divide] 4 Bring the scene to a precise point, if necessary. Playback controls will appear on the screen (A 55). Use any special playback modes (fast playback, frame reverse/advance) as necessary to locate the desired point. 5 Divide the scene. [µ Divide] > [Yes] • The video from the division point to the end of the scene will appear as a new scene in the index screen. 116 Š Video
-
 1
1 -
2
-
3
-
4
-
5
-
6
-
7
-
8
-
9
-
10
-
11
-
12
-
13
-
14
-
15
-
16
-
17
-
18
-
19
-
20
-
21
-
22
-
23
-
24
-
25
-
26
-
27
-
28
-
29
-
30
-
31
-
32
-
33
-
34
-
35
-
36
-
37
-
38
-
39
-
40
-
41
-
42
-
43
-
44
-
45
-
46
-
47
-
48
-
49
-
50
-
51
-
52
-
53
-
54
-
55
-
56
-
57
-
58
-
59
-
60
-
61
-
62
-
63
-
64
-
65
-
66
-
67
-
68
-
69
-
70
-
71
-
72
-
73
-
74
-
75
-
76
-
77
-
78
-
79
-
80
-
81
-
82
-
83
-
84
-
85
-
86
-
87
-
88
-
89
-
90
-
91
-
92
-
93
-
94
-
95
-
96
-
97
-
98
-
99
-
100
-
101
-
102
-
103
-
104
-
105
-
106
-
107
-
108
-
109
-
110
-
 111
111 -
 112
112 -
 113
113 -
 114
114 -
 115
115 -
 116
116 -
 117
117 -
 118
118 -
 119
119 -
 120
120 -
 121
121 -
122
-
123
-
124
-
125
-
126
-
127
-
128
-
129
-
130
-
131
-
132
-
133
-
134
-
135
-
136
-
137
-
138
-
139
-
140
-
141
-
142
-
143
-
144
-
145
-
146
-
147
-
148
-
149
-
150
-
151
-
152
-
153
-
154
-
155
-
156
-
157
-
158
-
159
-
160
-
161
-
162
-
163
-
164
-
165
-
166
-
167
-
168
-
169
-
170
-
171
-
172
-
173
-
174
-
175
-
176
-
177
-
178
-
179
-
180
-
181
-
182
-
183
-
184
-
185
-
186
-
187
-
188
-
189
-
190
-
191
-
192
-
193
-
194
-
195
-
196
-
197
-
198
-
199
-
200
-
201
-
202
-
203
-
204
-
205
-
206
-
207
-
208
-
209
-
210
-
211
-
212
-
213
-
214
-
215
-
216
-
217
-
218
-
219
-
220
-
221
-
222
-
223
-
224
-
225
-
226
 |
 |