Canon VIXIA HF R400 Instruction Manual - Page 31
First Time Settings
 |
View all Canon VIXIA HF R400 manuals
Add to My Manuals
Save this manual to your list of manuals |
Page 31 highlights
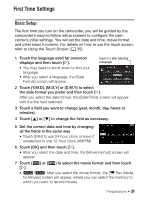
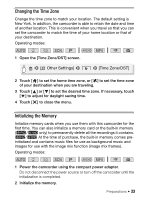
First Time Settings Basic Setup The first time you turn on the camcorder, you will be guided by the camcorder's easy-to-follow setup screens to configure the camcorder's initial settings. You will set the date and time, movie format, and other basic functions. For details on how to use the touch screen, refer to Using the Touch Screen (A 35). 1 Touch the language used for onscreen displays and then touch [æ]. • You may need to scroll down to find your language. • After you select a language, the [Date Format] screen will appear. Touch [æ] after selecting a language 2 Touch [Y.M.D], [M.D,Y] or [D.M.Y] to select the date format you prefer and then touch [æ]. After you select the date format, the [Date/Time] screen will appear with the first field selected. 3 Touch a field you want to change (year, month, day, hours or minutes). 4 Touch [Í] or [Î] to change the field as necessary. 5 Set the correct date and time by changing all the fields in the same way • Touch [24H] to use 24-hour clock or leave it unselected to use 12-hour clock (AM/PM). 6 Touch [OK] and then touch [æ]. • After you select the date and time, the [Movie Format] screen will appear. 7 Touch [·] or [¸] to select the movie format and then touch [æ]. • 6/4 After you select the movie format, the [v Rec Media for Movies] screen will appear, where you can select the memory to which you want to record movies. Preparations Š 31
-
 1
1 -
2
-
3
-
4
-
5
-
6
-
7
-
8
-
9
-
10
-
11
-
12
-
13
-
14
-
15
-
16
-
17
-
18
-
19
-
20
-
21
-
22
-
23
-
24
-
25
-
 26
26 -
 27
27 -
 28
28 -
 29
29 -
 30
30 -
 31
31 -
 32
32 -
 33
33 -
 34
34 -
 35
35 -
 36
36 -
37
-
38
-
39
-
40
-
41
-
42
-
43
-
44
-
45
-
46
-
47
-
48
-
49
-
50
-
51
-
52
-
53
-
54
-
55
-
56
-
57
-
58
-
59
-
60
-
61
-
62
-
63
-
64
-
65
-
66
-
67
-
68
-
69
-
70
-
71
-
72
-
73
-
74
-
75
-
76
-
77
-
78
-
79
-
80
-
81
-
82
-
83
-
84
-
85
-
86
-
87
-
88
-
89
-
90
-
91
-
92
-
93
-
94
-
95
-
96
-
97
-
98
-
99
-
100
-
101
-
102
-
103
-
104
-
105
-
106
-
107
-
108
-
109
-
110
-
111
-
112
-
113
-
114
-
115
-
116
-
117
-
118
-
119
-
120
-
121
-
122
-
123
-
124
-
125
-
126
-
127
-
128
-
129
-
130
-
131
-
132
-
133
-
134
-
135
-
136
-
137
-
138
-
139
-
140
-
141
-
142
-
143
-
144
-
145
-
146
-
147
-
148
-
149
-
150
-
151
-
152
-
153
-
154
-
155
-
156
-
157
-
158
-
159
-
160
-
161
-
162
-
163
-
164
-
165
-
166
-
167
-
168
-
169
-
170
-
171
-
172
-
173
-
174
-
175
-
176
-
177
-
178
-
179
-
180
-
181
-
182
-
183
-
184
-
185
-
186
-
187
-
188
-
189
-
190
-
191
-
192
-
193
-
194
-
195
-
196
 |
 |
