Canon VIXIA HF R400 Instruction Manual - Page 46
Taking Photos
 |
View all Canon VIXIA HF R400 manuals
Add to My Manuals
Save this manual to your list of manuals |
Page 46 highlights
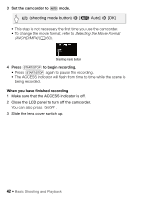
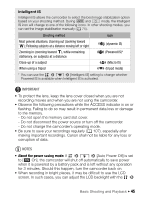
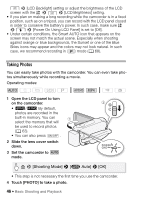
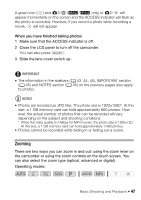
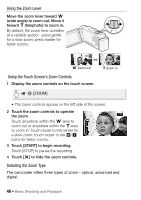
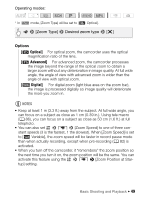
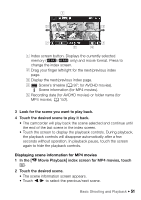
> [LCD Backlight] setting or adjust the brightness of the LCD screen with the > > [LCD Brightness] setting. • If you plan on making a long recording while the camcorder is in a fixed position, such as on a tripod, you can record with the LCD panel closed in order to conserve the battery's power. In such case, make sure > q > [Power On Using LCD Panel] is set to [Off]. • Under certain conditions, the Smart AUTO icon that appears on the screen may not match the actual scene. Especially when shooting against orange or blue backgrounds, the Sunset or one of the Blue Skies icons may appear and the colors may not look natural. In such case, we recommend recording in mode (A 68). Taking Photos You can easily take photos with the camcorder. You can even take photos simultaneously while recording a movie. Operating modes: SCN 1 Open the LCD panel to turn on the camcorder. ᕄ • 6/4 By default, photos are recorded in the built-in memory. You can ᕃ select the memory that will be used to record photos (A 63). • You can also press . 2 Slide the lens cover switch down. 3 Set the camcorder to mode. > [Shooting Mode] > [N Auto] > [OK] • This step is not necessary the first time you use the camcorder. 4 Touch [PHOTO] to take a photo. 46 Š Basic Shooting and Playback
-
 1
1 -
2
-
3
-
4
-
5
-
6
-
7
-
8
-
9
-
10
-
11
-
12
-
13
-
14
-
15
-
16
-
17
-
18
-
19
-
20
-
21
-
22
-
23
-
24
-
25
-
26
-
27
-
28
-
29
-
30
-
31
-
32
-
33
-
34
-
35
-
36
-
37
-
38
-
39
-
40
-
 41
41 -
 42
42 -
 43
43 -
 44
44 -
 45
45 -
 46
46 -
 47
47 -
 48
48 -
 49
49 -
 50
50 -
 51
51 -
52
-
53
-
54
-
55
-
56
-
57
-
58
-
59
-
60
-
61
-
62
-
63
-
64
-
65
-
66
-
67
-
68
-
69
-
70
-
71
-
72
-
73
-
74
-
75
-
76
-
77
-
78
-
79
-
80
-
81
-
82
-
83
-
84
-
85
-
86
-
87
-
88
-
89
-
90
-
91
-
92
-
93
-
94
-
95
-
96
-
97
-
98
-
99
-
100
-
101
-
102
-
103
-
104
-
105
-
106
-
107
-
108
-
109
-
110
-
111
-
112
-
113
-
114
-
115
-
116
-
117
-
118
-
119
-
120
-
121
-
122
-
123
-
124
-
125
-
126
-
127
-
128
-
129
-
130
-
131
-
132
-
133
-
134
-
135
-
136
-
137
-
138
-
139
-
140
-
141
-
142
-
143
-
144
-
145
-
146
-
147
-
148
-
149
-
150
-
151
-
152
-
153
-
154
-
155
-
156
-
157
-
158
-
159
-
160
-
161
-
162
-
163
-
164
-
165
-
166
-
167
-
168
-
169
-
170
-
171
-
172
-
173
-
174
-
175
-
176
-
177
-
178
-
179
-
180
-
181
-
182
-
183
-
184
-
185
-
186
-
187
-
188
-
189
-
190
-
191
-
192
-
193
-
194
-
195
-
196
 |
 |