Canon VIXIA HF R400 Instruction Manual - Page 79
Adjusting the Exposure
 |
View all Canon VIXIA HF R400 manuals
Add to My Manuals
Save this manual to your list of manuals |
Page 79 highlights
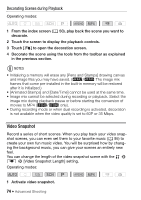
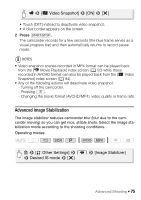
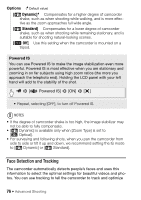
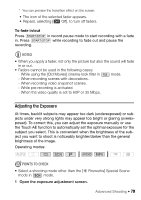
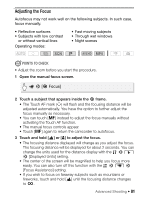
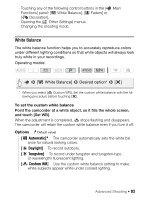
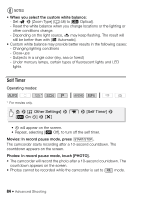
* You can preview the transition effect on the screen. • The icon of the selected fader appears. • Repeat, selecting [j Off], to turn off faders. To fade in/out Press Y in record pause mode to start recording with a fade in. Press Y while recording to fade out and pause the recording. NOTES • When you apply a fader, not only the picture but also the sound will fade in or out. • Faders cannot be used in the following cases: - While using the [Old Movies] cinema-look filter in mode. - When recording scenes with decorations. - When recording video snapshot scenes. - While pre-recording is activated. - When the video quality is set to 60P or 35 Mbps. Adjusting the Exposure At times, backlit subjects may appear too dark (underexposed) or subjects under very strong lights may appear too bright or glaring (overexposed). To correct this, you can adjust the exposure manually or use the Touch AE function to automatically set the optimal exposure for the subject you select. This is convenient when the brightness of the subject you want to shoot is noticeably brighter/darker than the general brightness of the image. Operating modes: SCN POINTS TO CHECK • Select a shooting mode other than the [ Fireworks] Special Scene mode in SCN mode. 1 Open the exposure adjustment screen. Advanced Shooting Š 79
-
 1
1 -
2
-
3
-
4
-
5
-
6
-
7
-
8
-
9
-
10
-
11
-
12
-
13
-
14
-
15
-
16
-
17
-
18
-
19
-
20
-
21
-
22
-
23
-
24
-
25
-
26
-
27
-
28
-
29
-
30
-
31
-
32
-
33
-
34
-
35
-
36
-
37
-
38
-
39
-
40
-
41
-
42
-
43
-
44
-
45
-
46
-
47
-
48
-
49
-
50
-
51
-
52
-
53
-
54
-
55
-
56
-
57
-
58
-
59
-
60
-
61
-
62
-
63
-
64
-
65
-
66
-
67
-
68
-
69
-
70
-
71
-
72
-
73
-
 74
74 -
 75
75 -
 76
76 -
 77
77 -
 78
78 -
 79
79 -
 80
80 -
 81
81 -
 82
82 -
 83
83 -
 84
84 -
85
-
86
-
87
-
88
-
89
-
90
-
91
-
92
-
93
-
94
-
95
-
96
-
97
-
98
-
99
-
100
-
101
-
102
-
103
-
104
-
105
-
106
-
107
-
108
-
109
-
110
-
111
-
112
-
113
-
114
-
115
-
116
-
117
-
118
-
119
-
120
-
121
-
122
-
123
-
124
-
125
-
126
-
127
-
128
-
129
-
130
-
131
-
132
-
133
-
134
-
135
-
136
-
137
-
138
-
139
-
140
-
141
-
142
-
143
-
144
-
145
-
146
-
147
-
148
-
149
-
150
-
151
-
152
-
153
-
154
-
155
-
156
-
157
-
158
-
159
-
160
-
161
-
162
-
163
-
164
-
165
-
166
-
167
-
168
-
169
-
170
-
171
-
172
-
173
-
174
-
175
-
176
-
177
-
178
-
179
-
180
-
181
-
182
-
183
-
184
-
185
-
186
-
187
-
188
-
189
-
190
-
191
-
192
-
193
-
194
-
195
-
196
 |
 |
