Canon XA10 XA10 Instruction Manual - Page 152
Output Onscreen Displays], LCD Brightness], LCD Screen Dimmer], LCD Mirror Image], Notification - firmware
 |
View all Canon XA10 manuals
Add to My Manuals
Save this manual to your list of manuals |
Page 152 highlights
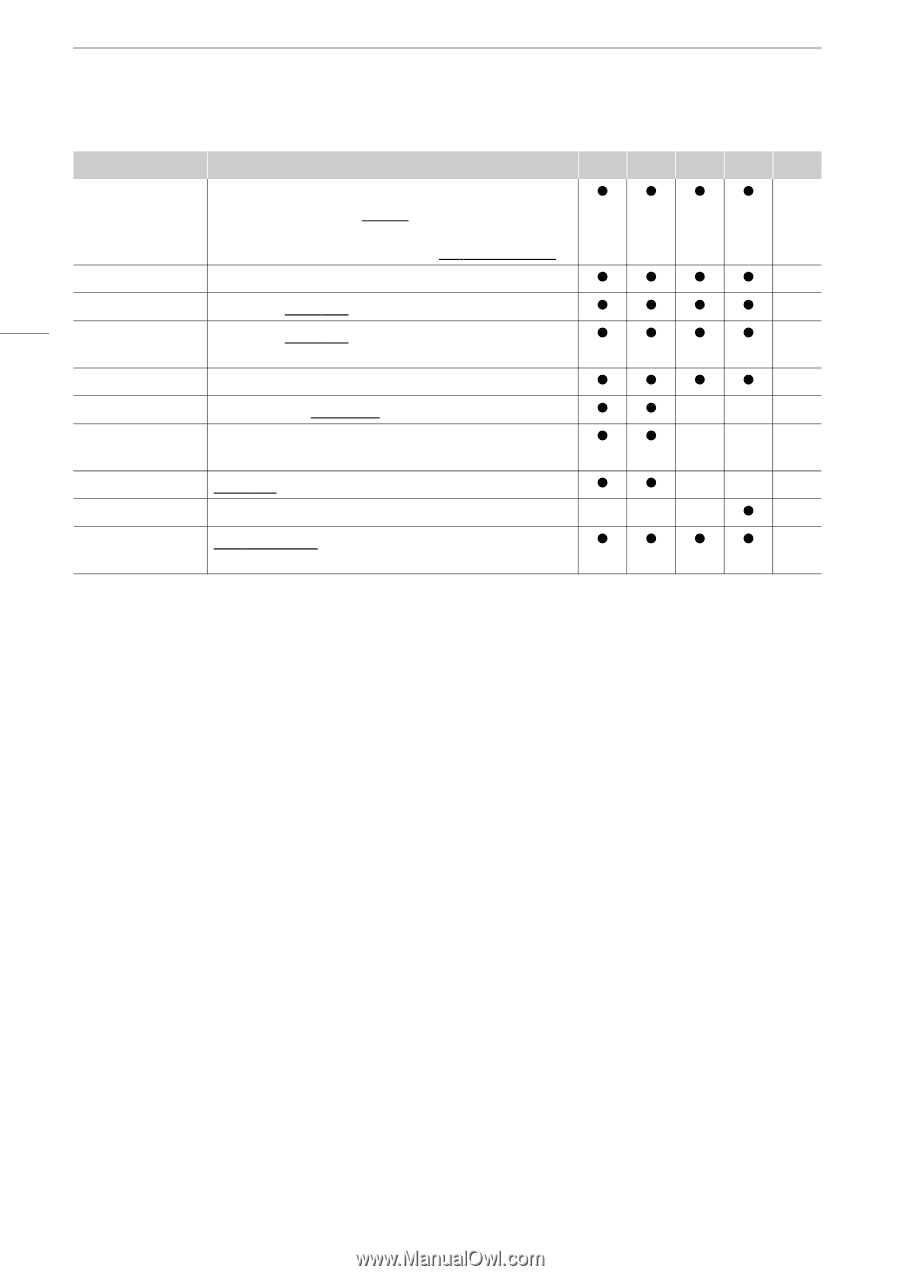
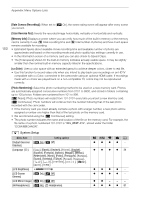
Appendix: Menu Options Lists 152 Menu item Setting options [Date/Time] [Date/Time]: - [Date Format]: [Y.M.D], [M.D,Y], [D.M.Y] (Y- year, M- month, D- day) [24H]: Toggle on (24-hour clock) or off (12-hour clock) [Battery Info] - [Control for HDMI]1 [A On], [B Off] [HDMI 1080p Output]1 [A On], [B Off] [HDMI Status] - [Distance Units] [m meters], [n feet] [Backup Menu Settings 7] [Save], [Load] [Demo Mode] [A On], [B Off] [Firmware] - [Eye-Fi [O Automatic], [B Off] Communication]2 y CINEMA 1 2 0 z z z z 34 zzzz - zzzz - zzzz - zzzz - zz - - - z z - - 92 zz - - - - - -z- z z z z 142 1 Option not available when the camcorder is connected to an HDTV using an optional HDMI cable. 2 Option available only after having inserted an Eye-Fi card into memory card slot Y. [Output Onscreen Displays]: When set to [A On], the camcorder's onscreen displays will appear also on the screen of a TV or monitor connected to the camcorder. [LCD Brightness]: Adjusts the brightness of the LCD screen. • Changing the brightness of the LCD screen does not affect the brightness of your recordings or the brightness of the playback image on a TV. [LCD Screen Dimmer]: When set to [A On], the LCD screen is dimmed. Doing so is ideal when using the camcorder in locations where the LCD's illumination could become a nuisance to others. Hold h pressed down for about 2 seconds to restore the LCD screen to its previous brightness setting. • Dimming the LCD screen does not affect the brightness of your recordings or the brightness of the playback image on a TV. • When the screen dimmer is set to [B Off], the LCD screen will return to the brightness level that was in use before the screen was dimmed. [LCD Mirror Image]: When set to [A On], you can rotate the LCD panel 180 degrees to let the subject check the image while you record. While the LCD panel is rotated toward the subject you will not be able to decorate the scene. [Notification Sounds]: A beep will accompany some operations like turning on the camcorder, the selftimer countdown, etc. • While pre-recording (0 86) is activated, the camcorder will not emit any notification sounds.
-
 1
1 -
2
-
3
-
4
-
5
-
6
-
7
-
8
-
9
-
10
-
11
-
12
-
13
-
14
-
15
-
16
-
17
-
18
-
19
-
20
-
21
-
22
-
23
-
24
-
25
-
26
-
27
-
28
-
29
-
30
-
31
-
32
-
33
-
34
-
35
-
36
-
37
-
38
-
39
-
40
-
41
-
42
-
43
-
44
-
45
-
46
-
47
-
48
-
49
-
50
-
51
-
52
-
53
-
54
-
55
-
56
-
57
-
58
-
59
-
60
-
61
-
62
-
63
-
64
-
65
-
66
-
67
-
68
-
69
-
70
-
71
-
72
-
73
-
74
-
75
-
76
-
77
-
78
-
79
-
80
-
81
-
82
-
83
-
84
-
85
-
86
-
87
-
88
-
89
-
90
-
91
-
92
-
93
-
94
-
95
-
96
-
97
-
98
-
99
-
100
-
101
-
102
-
103
-
104
-
105
-
106
-
107
-
108
-
109
-
110
-
111
-
112
-
113
-
114
-
115
-
116
-
117
-
118
-
119
-
120
-
121
-
122
-
123
-
124
-
125
-
126
-
127
-
128
-
129
-
130
-
131
-
132
-
133
-
134
-
135
-
136
-
137
-
138
-
139
-
140
-
141
-
142
-
143
-
144
-
145
-
146
-
 147
147 -
 148
148 -
 149
149 -
 150
150 -
 151
151 -
 152
152 -
 153
153 -
 154
154 -
 155
155 -
 156
156 -
 157
157 -
158
-
159
-
160
-
161
-
162
-
163
-
164
-
165
-
166
-
167
-
168
-
169
-
170
-
171
-
172
-
173
-
174
-
175
-
176
-
177
-
178
-
179
-
180
-
181
-
182
-
183
-
184
-
185
-
186
-
187
-
188
-
189
-
190
-
191
 |
 |