Canon XA10 XA10 Instruction Manual - Page 74
Using Line Input or an External Microphone Connected to an XLR Terminal - instruction manual
 |
View all Canon XA10 manuals
Add to My Manuals
Save this manual to your list of manuals |
Page 74 highlights
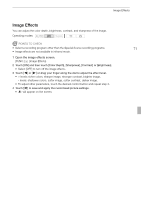
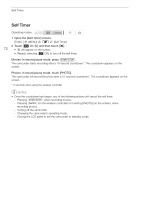
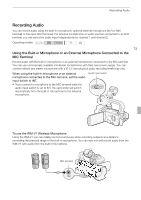
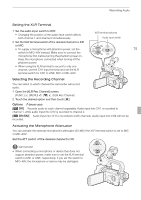
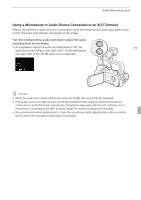
Recording Audio 1 Attach the receiver to the camcorder's grip belt. 2 Connect the receiver to the camcorder's MIC terminal. 3 If necessary, activate the audio mix function (0 80) and adjust the audio mix balance. 4 Attach the microphone (transmitter) to the subject. • For details about using the WM-V1, refer to the instruction manual supplied with the microphone. 74 To use commercially available microphones 1 Connect the external microphone to the MIC terminal. 2 Open the [MIC Terminal Input] screen. [FUNC.] [MENU] 7 [MIC Terminal Input] 3 Touch [Microphone] and then touch [a]. • If necessary, activate and adjust the audio mix balance (0 80). NOTES • When using an external microphone, make sure that the jacket covering above the plug is smaller than ∅ 9.5 mm. • When an external microphone is connected to the camcorder, 7 [Wind Screen] will automatically be set to [B Off Z]. Using Line Input or an External Microphone Connected to an XLR Terminal You can use the XLR terminals to connect an external audio source (analog line in) or microphone. When connecting an external microphone, follow the procedure below. Microphone lock screw Cable clamp XLR terminals 1 Loosen the microphone lock screw (ቢ), open the microphone holder unit and insert the microphone (ባ). 2 Tighten the lock screw and put the microphone cable through the microphone cable clamp under the microphone holder unit (ቤ). 3 Plug the microphone cable into the desired XLR terminal (ብ).
-
 1
1 -
2
-
3
-
4
-
5
-
6
-
7
-
8
-
9
-
10
-
11
-
12
-
13
-
14
-
15
-
16
-
17
-
18
-
19
-
20
-
21
-
22
-
23
-
24
-
25
-
26
-
27
-
28
-
29
-
30
-
31
-
32
-
33
-
34
-
35
-
36
-
37
-
38
-
39
-
40
-
41
-
42
-
43
-
44
-
45
-
46
-
47
-
48
-
49
-
50
-
51
-
52
-
53
-
54
-
55
-
56
-
57
-
58
-
59
-
60
-
61
-
62
-
63
-
64
-
65
-
66
-
67
-
68
-
 69
69 -
 70
70 -
 71
71 -
 72
72 -
 73
73 -
 74
74 -
 75
75 -
 76
76 -
 77
77 -
 78
78 -
 79
79 -
80
-
81
-
82
-
83
-
84
-
85
-
86
-
87
-
88
-
89
-
90
-
91
-
92
-
93
-
94
-
95
-
96
-
97
-
98
-
99
-
100
-
101
-
102
-
103
-
104
-
105
-
106
-
107
-
108
-
109
-
110
-
111
-
112
-
113
-
114
-
115
-
116
-
117
-
118
-
119
-
120
-
121
-
122
-
123
-
124
-
125
-
126
-
127
-
128
-
129
-
130
-
131
-
132
-
133
-
134
-
135
-
136
-
137
-
138
-
139
-
140
-
141
-
142
-
143
-
144
-
145
-
146
-
147
-
148
-
149
-
150
-
151
-
152
-
153
-
154
-
155
-
156
-
157
-
158
-
159
-
160
-
161
-
162
-
163
-
164
-
165
-
166
-
167
-
168
-
169
-
170
-
171
-
172
-
173
-
174
-
175
-
176
-
177
-
178
-
179
-
180
-
181
-
182
-
183
-
184
-
185
-
186
-
187
-
188
-
189
-
190
-
191
 |
 |