Canon XA20 Instruction Manual
Canon XA20 Manual
 |
View all Canon XA20 manuals
Add to My Manuals
Save this manual to your list of manuals |
Canon XA20 manual content summary:
- Canon XA20 | Instruction Manual - Page 1
PUB. DIM-1071-000 HD Camcorder Instruction Manual Caméscope HD Manuel d'instruction Videocámara HD Manual de Instrucciones - Canon XA20 | Instruction Manual - Page 2
ANNOYING INTERFERENCE, USE THE RECOMMENDED ACCESSORIES ONLY. COPYRIGHT WARNING: Unauthorized recording of copyrighted materials may infringe on the rights of copyright owners and be contrary to copyright laws. 2 FCC/IC NOTICE HD Camcorder, XA25 / XA20 systems This device complies with Part 15 of - Canon XA20 | Instruction Manual - Page 3
to alert the user to the presence of important operating and maintenance (servicing) instructions in the literature accompanying the product. 3 IMPORTANT SAFETY INSTRUCTIONS In these safety instructions the word "product" refers to the Canon HD Camcorder XA25 / XA20 and all its accessories. 1 Read - Canon XA20 | Instruction Manual - Page 4
, and the Wi-Fi Certified logo are trademarks of the Wi-Fi Alliance. • WPS as used on the camcorder's settings, onscreen displays and in this manual signifies Wi-Fi Protected Setup. • The Wi-Fi Protected Setup Identifier Mark is a mark of the Wi-Fi Alliance. • JavaScript is a trademark or registered - Canon XA20 | Instruction Manual - Page 5
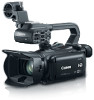
in low-light situations and achieve improved image stabilization. Wide zoom lens With a focal length at full wide angle of 26.8 mm* (35 mm equivalent), the camcorder has superb wide-angle shooting capability. The newly developed lens is also capable of 20x optical zoom. * 28.8 mm when using Dynamic - Canon XA20 | Instruction Manual - Page 6
You can use the built-in microphone, MIC audio input terminal or the two INPUT terminals when recording. When using the INPUT terminals, you can even use microphones that require phantom power. Audio scene select With the audio scene select function (A 81), you can optimize the audio settings of the - Canon XA20 | Instruction Manual - Page 7
Enjoying your Recordings on Other Devices Connect the camcorder to an external monitor (A 107). Copy your recordings to an external video recorder (A 119). 7 Save your recordings (A 114). Enjoying Your Recordings Using the Camcorder's Wi-Fi Functions Use your iOS or Android device to remotely - Canon XA20 | Instruction Manual - Page 8
this Manual 11 Conventions Used in this Manual 11 Supplied Accessories 13 Names of Parts 14 8 2 Preparations 21 Attaching the Ferrite Core 21 Charging the Battery Pack 21 Preparing the Camcorder 24 Attaching the Microphone Holder Unit 24 Attaching the Handle Unit 24 Using the Lens Hood and Lens Cap - Canon XA20 | Instruction Manual - Page 9
107 Connecting to an External Monitor 107 Connection Diagram 107 Selecting the Terminal Used For Output 108 Using the HD/SD-SDI Terminal 108 Using the HDMI OUT Terminal 108 Using the AV OUT Terminal 109 Audio Output 110 Synchronizing the Video with the Audio being Monitored 110 Selecting the Audio - Canon XA20 | Instruction Manual - Page 10
Settings 140 10 Additional Information 142 Appendix: Menu Options Lists 142 FUNC. Panel 142 Setup Menus 143 Appendix: Onscreen Icons and Displays 152 Troubleshooting 156 List of Messages 161 List of Messages for Wi-Fi Functions 165 Handling Precautions 168 Camcorder 168 Battery Pack 169 Memory Card - Canon XA20 | Instruction Manual - Page 11
you for purchasing the Canon XA25 / XA20. Please read this manual carefully before you use the camcorder and retain it for future reference. Should your camcorder fail to operate correctly, refer to Troubleshooting (A 156). 11 Conventions Used in this Manual • IMPORTANT: Precautions related to - Canon XA20 | Instruction Manual - Page 12
this Manual The three sets of icons indicate the operating mode and whether a function is available in that mode. : Indicates the movie format. For details, refer to Selecting the Movie Format (AVCHD/MP4) (A 39). : Indicates whether the : Indicates the shooting camcorder is in shooting (CAMERA - Canon XA20 | Instruction Manual - Page 13
13 Microphone holder unit (incl. screws) Handle unit (incl. screws) WL-D89 Wireless Controller HTC-100/S High Speed HDMI Cable (incl. CR2025 lithium button battery) STV-250N Stereo Video Cable IFC-300PCU/S USB Cable Lens hood with lens barrier Lens cap Data Import Utility CD-ROM* * Use - Canon XA20 | Instruction Manual - Page 14
Names of Parts Names of Parts Left side view 14 2 3 1 4 5 67 8 9 10 11 1 Lens barrier switch (A 40) 2 Memory card slot 2 (A 38) 3 Memory card slot 3 (A 38) 4 u (review recording) button (A 46)/ Assignable button 5 (A 97) 5 Lens hood (A 25) 6 Focus/Zoom ring (A 54, 59) 7 CUSTOM (customizable - Canon XA20 | Instruction Manual - Page 15
Right side view 1 Names of Parts 15 89 10 6 2 7 3 4 5 1 Built-in speaker (A 101) 2 MIC terminal (A 81) 3 HDMI OUT terminal (A 107, 108) 4 REMOTE terminal For connecting commercially available remote controllers. 5 HD/SD-SDI terminal (A 108) 6 × (headphones) terminal (A 89) 7 USB - Canon XA20 | Instruction Manual - Page 16
Names of Parts Front view 16 1 Back view 8 6 7 2 9 3 4 10 5 11 12 13 14 15 Dioptric adjustment lever (A 25) 10 Joystick (A 32)/SET button (A 32) 11 Strap mount (A 27) 12 Assignable button 3 (A 97) 13 Assignable button 4 (A 97) 14 Battery attachment unit (A 21) 15 START/STOP button (A 40 - Canon XA20 | Instruction Manual - Page 17
Top view Names of Parts 1 23 45 17 2 67 1 Built-in stereo microphone (A 79) 2 Handle attachment unit (A 24) 3 Mode switch (A 31) 4 Zoom rocker (A 59) 5 ACCESS indicator (A 40) 6 Power switch (A 30) 7 POWER / CHG (battery charging) indicator (A 21) - Canon XA20 | Instruction Manual - Page 18
Names of Parts Bottom view 18 1 2 3 1 Tripod socket (A 29) 2 BATTERY RELEASE switch (A 22) 3 Eye cup (A 25) - Canon XA20 | Instruction Manual - Page 19
unit 1 Names of Parts 23 4 5 67 89 10 19 11 12 13 14 15 16 1 Microphone holder unit (A 79) 2 Microphone lock screw (A 79) 3 Accessory shoe Cold shoe for attaching accessories. 4 Handle zoom rocker (A 60) 5 START/STOP lock (C) lever (A 45) 6 START/STOP button (A 40) 7 Sensitivity switches - Canon XA20 | Instruction Manual - Page 20
Names of Parts WL-D89 Wireless Controller 7 1 20 2 8 3 4 9 5 10 6 1 START/STOP button (A 40) 2 G (mode selection) button (A 100) 3 MENU button (A 34, 143) 4 DISP. (onscreen display) button (A 93) 5 SET button 6 Ñ (stop) button (A 100) 7 PHOTO button (A 40) 8 Zoom buttons (A 59) 9 - Canon XA20 | Instruction Manual - Page 21
then close the unit until it clicks shut. Charging the Battery Pack The camcorder can be powered with a battery pack or directly using the compact power adapter. For approximate charging times and recording/playback times with a fully charged battery pack, refer to Charging, Recording and Playback - Canon XA20 | Instruction Manual - Page 22
and hold it pressed down. 2 Slide the battery pack and then pull it out. BATTERY RELEASE switch IMPORTANT • Turn off the camcorder before connecting or disconnecting the compact power adapter. After you turn off the camcorder, important data is updated on the memory card. Be sure to wait until the - Canon XA20 | Instruction Manual - Page 23
packs continue to discharge naturally. Therefore, charge them on the day of use, or the day before, to ensure a full charge. • The first time you use a battery pack, fully charge it and then use the camcorder until the battery pack is completely exhausted. Doing so will ensure that the remaining - Canon XA20 | Instruction Manual - Page 24
the lens hood, grip belt and straps, be careful not to drop the camcorder by placing it on a table or other stable surface. 24 Attaching the Microphone Holder Unit Use the supplied screws to attach the microphone holder unit to the handle unit. Attaching the Handle Unit 1 Align the handle unit - Canon XA20 | Instruction Manual - Page 25
light that can be the cause of lens flare and ghost images. Additionally, closing the lens barrier can help prevent fingerprints and dirt accumulation on the lens. Use the supplied lens cap when carrying the camcorder or storing it after use. * Note that the lens cap and the lens hood with lens - Canon XA20 | Instruction Manual - Page 26
. • You can rotate the panel 180 degrees toward the lens. Rotating the OLED panel 180 degrees can be useful in the following cases: - To allow the subject to monitor the OLED screen while you use the viewfinder. - To allow the camcorder to be operated with the wireless controller from the front - Canon XA20 | Instruction Manual - Page 27
Preparing the Camcorder • About the OLED and viewfinder screens: The screens are produced using extremely highprecision manufacturing techniques, with more than 99.99% of the pixels operating to specification. Less than 0.01% of the pixels may occasionally misfire or - Canon XA20 | Instruction Manual - Page 28
in the direction of the arrow and pull out the battery holder. 2 Place the lithium button battery with the + side facing up. 3 Insert the battery holder. Tab To use the wireless controller Point the wireless controller at the camcorder's remote sensor when you press the buttons. • You can rotate - Canon XA20 | Instruction Manual - Page 29
at very close range, replace the battery. • The wireless controller may not work properly when the remote sensor is situated under strong light sources or direct sunlight. 29 Using a Tripod You can mount the camcorder on a tripod but do not use tripods with mounting screws longer than 6.5 mm - Canon XA20 | Instruction Manual - Page 30
On and Off You can choose to turn the camcorder on in CAMERA ( ) mode for making recordings or MEDIA ( ) mode for playing back recordings. Select the mode using the power switch. 30 To turn on the camcorder Set the power switch to CAMERA for mode (A 40) or MEDIA for mode (A 100). mode - Canon XA20 | Instruction Manual - Page 31
match your shooting style. 31 (Auto) mode Set the mode switch to N. With this mode, the camcorder takes care of all the settings while you concentrate on recording (A 41). This operating mode is suitable if you just prefer not to bother with detailed camcorder settings. (Manual) mode Set the mode - Canon XA20 | Instruction Manual - Page 32
- Attaching commercially available screen protectors or adhesive film onto the touch screen's surface. Using the FUNC. Button and Joystick You can navigate some of the camcorder's menus and screens using the FUNC. button and joystick instead of using the touch panel. Joystick/SET button When making - Canon XA20 | Instruction Manual - Page 33
Basic Operation of the Camcorder Using the Menus Many of the camcorder's functions can be adjusted from the FUNC. panel and the setup menus. For details about the available menu options and settings, refer to the appendix Menu Options Lists (A 142). FUNC. Panel In mode: 33 Operating modes: - Canon XA20 | Instruction Manual - Page 34
Basic Operation of the Camcorder Setup Menus In this manual, navigating the setup menus is explained using the touch panel controls but they can also be navigated using the joystick and other buttons. The procedure below explains how to use both methods. If necessary, refer back to this section for - Canon XA20 | Instruction Manual - Page 35
close the setup screen. NOTES • You can adjust the date and time later on with the q > [Date/Time] setting. • When you do not use the camcorder for about 3 months, the built-in rechargeable lithium battery may discharge completely and the date and time setting may be lost. In such case, recharge the - Canon XA20 | Instruction Manual - Page 36
], will appear in English regardless of the language selected. 36 Changing the Time Zone Change the time zone to match your location. The default setting is New York. In addition, the camcorder is able to retain the date and time of an additional location. This is convenient when you travel so that - Canon XA20 | Instruction Manual - Page 37
Using a Memory Card Using a Memory Card Memory Cards Compatible for Use with the Camcorder (as of April 2013) You can use the following types of commercially available Secure Digital (SD) cards with this camcorder. The movie recording function has been tested using SD/SDHC/SDXC memory cards made - Canon XA20 | Instruction Manual - Page 38
direction can cause a malfunction of the camcorder. Be sure to insert the memory card as described in step 3. Initializing a Memory Card Initialize memory cards when you use them with this camcorder for the first time. You can also initialize a memory card to permanently delete all the recordings it - Canon XA20 | Instruction Manual - Page 39
any problem. 4 Touch [OK] and then touch [X]. IMPORTANT • Initializing a memory card will permanently erase all recordings. Lost original recordings cannot be recovered. Make sure you save important recordings in advance using an external device (A 114). Selecting the Movie Format (AVCHD/MP4) You - Canon XA20 | Instruction Manual - Page 40
Record 1 Attach a charged battery pack to the camcorder (A 21). Lens barrier switch 2 Insert a memory card into a memory card slot. • To use relay recording or dual recording (A 49), insert memory cards into both memory card slots. 3 Open the lens barrier. • Set the lens barrier switch to OPEN - Canon XA20 | Instruction Manual - Page 41
to N. 2 Set the power switch to CAMERA. 41 To record video Press Y to begin recording. • During recording, Ü will appear on the screen. Additionally, if the handle unit is attached to the camcorder, the tally lamp will illuminate. • The ACCESS indicator will flash from time to time while the - Canon XA20 | Instruction Manual - Page 42
camcorder will automatically detect certain characteristics of the subject, background, lighting conditions, etc. It will then adjust various settings (focus, exposure, color, image stabilization, image quality, among others), selecting the best settings for the scene you want to shoot telephoto - Canon XA20 | Instruction Manual - Page 43
button. Return the lever to its previous position to enable use of the START/STOP button again. • When you set the q > [Rec Command] setting to [i On] and you use the HD/SD-SDI terminal ( only) or HDMI terminal to connect the camcorder to a device capable of receiving recording commands through - Canon XA20 | Instruction Manual - Page 44
of photos that can be saved on a 1 GB memory card are summarized in the 44 following table. However, the actual number of photos that can be recorded will vary depending on the subject and shooting conditions. Movie Format AVCHD MP4 Recording mode Any 35 Mbps, 24 Mbps, 17 Mbps 4 Mbps 3 Mbps - Canon XA20 | Instruction Manual - Page 45
button. Return the lever to its previous position to enable use of the START/STOP button again. • When you set the q > [Rec Command] setting to [i On] and you use the HD/SD-SDI terminal ( only) or HDMI terminal to connect the camcorder to a device capable of receiving recording commands through - Canon XA20 | Instruction Manual - Page 46
(A 102). • When you need to record for a long time with the camcorder set on a tripod, you can close the OLED panel and use only the viewfinder in order to save power when using a battery pack (A 25). Reviewing the Latest Scene Recorded You can review the last 4 seconds of the last scene recorded - Canon XA20 | Instruction Manual - Page 47
When the recording mode is set to 28 Mbps (AVCHD) or 35 Mbps (MP4), dual recording is not available. • In mode, 28 Mbps (AVCHD) and 35 Mbps (MP4) recording modes are not available. • The camcorder uses a variable bit rate (VBR) to encode video so the actual recording times will vary depending on - Canon XA20 | Instruction Manual - Page 48
Recording Mode (Video Quality) Recording modes by movie format Movie format AVCHD 48 MP4 Recording mode times For AVCHD movies: Default value Recording mode → Memory card ↓ 8 GB Memory card 16 GB Memory card 32 GB Memory card 64 GB Memory card 128 GB Memory card point, the camcorder will stop. - Canon XA20 | Instruction Manual - Page 49
use relay recording, it does not matter which memory card the recording starts on. The recording will continue on the other memory card. However, the camcorder will switch to another memory card only one time. • With the supplied software, Data Import Utility, you can join relay scenes (either AVCHD - Canon XA20 | Instruction Manual - Page 50
the desired frame rate and then touch [X]. Options for AVCHD movies ( Default value) [ 59.94i] 59.94 fields per second, interlaced. Standard frame rate of NTSC analog TV signals. [ PF29.97] 29.97 frames per second, progressive*. Use this frame rate to easily edit your recordings, for example - Canon XA20 | Instruction Manual - Page 51
return to its previous setting. • For low shooting frame rates, it may take approximately 1 second to stop recording. • To record movies using slow & fast motion, we recommend using memory cards rated SD Speed Class 10. • The amount of video that can be recorded at one time is approximately 12 hours - Canon XA20 | Instruction Manual - Page 52
use a variety of professional cinema-look filters to create unique movies with a distinctive appearance. You can also use cinema-look filters when you convert movies to MP4 (A 118). Operating modes: 52 1 Set number Touch [Color Depth], [Softening low), [M] (medium) or [H] (high). 3 Touch [K] and - Canon XA20 | Instruction Manual - Page 53
[7. Old Movies] [8. Memory] [9. Dramatic B&W] !Filter number (will appear on the control button) and name "Preview the effect on the screen #Select the effect level $Brief description (onscreen guidance) NOTES • During mode, the following functions are not available. - Taking photos - Dual - Canon XA20 | Instruction Manual - Page 54
Focus Adjustment Focus Adjustment You can adjust the focus manually and use the peaking function to assist you or you can let the camcorder focus for you by using autofocus. With autofocus, you can set the autofocus speed. The camcorder also features face detection & tracking. POINTS TO CHECK 54 • - Canon XA20 | Instruction Manual - Page 55
focus or zoom. • You can use the q > [Focus Preset Speed] setting to adjust the speed at which the camcorder returns to the preset focus position lens barrel) to G and 60 cm (2 ft.; throughout the zoom range, measured from the front of the lens barrel) to G. Perform the following procedure to set - Canon XA20 | Instruction Manual - Page 56
focus is adjusted at the highest speed. This mode is useful even when recording in very bright or low-light surroundings. This mode uses both the TTL system and external sensor for focusing. [? Medium AF] Sets the autofocus to Medium AF. The camcorder focuses more smoothly on the subject than when - Canon XA20 | Instruction Manual - Page 57
camcorder track and optimize settings for a different subject. You can also use tracking to optimize settings for moving subjects such as pets. You must use the touch screen to select the subject. Operating modes: POINTS TO CHECK • Select a recording program other than [ü Night Scene], [Œ Low Light - Canon XA20 | Instruction Manual - Page 58
cases when a subject's face is detected and use manual focus for all other scenes. The camcorder will also adjust the brightness when focusing automatically on the subject's face. Set an Subjects lacking sufficient contrast. - Fast moving subjects. - When shooting indoors with insufficient lighting. - Canon XA20 | Instruction Manual - Page 59
the p > [Digital Zoom] setting. 59 This camcorder also features a digital tele-converter, which allows you to enlarge the image on the screen digitally. * Digital zoom is not available in mode or when p > [Conversion Lens] is set to [WA-H58]. Using the Focus/Zoom Ring 1 Set the focus/zoom - Canon XA20 | Instruction Manual - Page 60
camcorder or handle unit toward T (wide angle) to zoom out. Move it toward S (telephoto) to zoom in. • You can also use the zoom buttons on the wireless controller. • By default, the camcorder [Zoom Speed Level] is set to [Z Fast], the sound made by the camcorder's internal machinery will increase - Canon XA20 | Instruction Manual - Page 61
p > [High-Speed Zoom] 2 Touch [i On] and then touch [X]. NOTES • When you are using an external microphone while recording, the sound made by the camcorder's internal machinery while zooming may be recorded in the scene. To set the speed of the handle unit's zoom rocker For the zoom rocker on the - Canon XA20 | Instruction Manual - Page 62
[K]. • When [Zoom Speed Level] is set to [Z Fast], the sound made by the camcorder's internal machinery will increase and may be telephoto. ** When the zoom speed is too fast (approximately 1.9 seconds end-to-end), the camcorder will have more trouble focusing automatically while zooming. Using - Canon XA20 | Instruction Manual - Page 63
digital tele-converter. NOTES • You can attach the optional tele-converter and use it in conjunction with this function to increase the effect. • The digital tele-converter cannot be set while recording or when p > [Conversion Lens] is set to [WA-H58]. • The image is digitally processed so the image - Canon XA20 | Instruction Manual - Page 64
Standard] Compensates for a lower degree of camcorder shake, such as when shooting while remaining stationary, and is suitable for shooting natural-looking scenes. [Ì Off] Use this setting when the camcorder is mounted on a tripod. Powered IS After setting an assignable button to [È Powered IS], you - Canon XA20 | Instruction Manual - Page 65
) Limit Automatic Gain Control (AGC) Limit When recording in dark surroundings, the camcorder will automatically increase the gain to try to get a brighter picture. However, using higher gain values may result in more noticeable video noise. You can select the AGC limit to curb the amount of noise - Canon XA20 | Instruction Manual - Page 66
[" Aperture-Pri. AE] Set the aperture value. The camcorder automatically sets the appropriate shutter speed. Available shutter speed settings [1/8] [1/250] [1/15] [1/500] [1/30] [1/1000] [1/60] [1/2000] [1/100] Available shutter speed settings when the frame rate is set to 23.98P [1/6] [1/100 - Canon XA20 | Instruction Manual - Page 67
number displayed will flash if the aperture value or shutter speed is not appropriate for the recording conditions. In such case, select a different value. • During exposure lock, the aperture value/shutter speed cannot be changed. Set the aperture value or shutter speed before manually adjusting - Canon XA20 | Instruction Manual - Page 68
very strong lights may appear too bright or glaring (overexposed). In such cases, adjusting the exposure will correct this. This camcorder features a dedicated recording program, [n Manual Exposure], for adjusting the exposure manually. However, you can also compensate the exposure when using other - Canon XA20 | Instruction Manual - Page 69
[n Manual Exposure], the camcorder will adjust the exposure automatically. However, you can compensate and lock the exposure or use the Touch AE function to automatically set the optimal exposure for the subject you select. This is convenient when the brightness of the subject you want to shoot is - Canon XA20 | Instruction Manual - Page 70
Auto Backlight Correction] setting, which is useful in situations in which case, press the assignable button to turn the backlight correction on and off. NOTES • Setting the exposure compensation is not available during infrared mode. • The camcorder will return to automatic exposure if the camcorder - Canon XA20 | Instruction Manual - Page 71
drag your finger along the dial. To set a custom white balance ([Æ Set 1] or [Ç Set 2]) Point the camcorder at a white object, so it fills the whole screen, and touch [Set WB]. When the adjustment is completed, Å stops flashing and disappears. The camcorder will retain the custom white balance even - Canon XA20 | Instruction Manual - Page 72
or other conditions change. - Depending on the light source, Å may keep flashing. The result will still be better than with [Ã Automatic]. 72 • Using a custom white balance may provide better results in the following cases: - Changing lighting conditions - Close-ups - Subjects in a single color - Canon XA20 | Instruction Manual - Page 73
the desired recording program and then touch [X]. Options ( Default value) [úPortrait] The camcorder uses a large aperture, to achieve a sharp focus on the subject while blurring the background. . [ÿSunset] To record sunsets in vibrant colors. [Œ Low Light] To record in low-light situations. - Canon XA20 | Instruction Manual - Page 74
. • [Œ Low Light]: - Moving subjects may leave a trailing afterimage. - Picture quality may not be as good as in other modes. - White points may appear on the screen. - Autofocus may not work as well as in other modes. In such case, adjust the focus manually. • [Š Fireworks]: To avoid camcorder blur - Canon XA20 | Instruction Manual - Page 75
screen. [FUNC.] > [Image Effects] 2 Touch [ON] and then touch [Color Depth], [Sharpness], [Contrast] or [Brightness]. • Select [OFF] to turn off the and apply the customized picture settings. • b will appear on the screen. NOTES • Image effects are not available during infrared mode. • [ - Canon XA20 | Instruction Manual - Page 76
the Time Code Setting the Time Code The camcorder can generate a time code signal and embed it in your recordings. In addition, the time code will appear in the recordings output from the HD/SD-SDI terminal ( only) and HDMI terminal. You can select whether the time code is output from the HDMI - Canon XA20 | Instruction Manual - Page 77
are using pre-recording mode, [Free Run] is automatically set and cannot be changed. • When you mix drop frame and non-drop frame time codes, there might be a discontinuity in the time code at the point where the recordings starts. • As long as the built-in rechargeable lithium battery is charged - Canon XA20 | Instruction Manual - Page 78
output from the HD/SD-SDI terminal ( only) or HDMI terminal. Operating modes: 78 1 Open the user bit [Setting] screen. [FUNC.] > [MENU] > > [User Bit Type] > [ Setting] • To set the time for the user bit, select [ Time] instead; to set the date for the user bit, select [ Date]. In such case - Canon XA20 | Instruction Manual - Page 79
external microphone (INPUT 1/INPUT 2 terminals*, MIC terminal) or line input (INPUT 1/INPUT 2 terminals*). Using the INPUT 1/INPUT 2 terminals, you can select the audio input independently for channel 1 (CH1) and channel 2 (CH2). When you are recording AVCHD movies and the recording mode is set - Canon XA20 | Instruction Manual - Page 80
to the MIC terminal. Use commercially available condenser microphones with their own power supply and a ∅ 3.5 mm mini-stereo plug. Set the INPUT terminal ON/OFF switch to OFF. • If you connect a microphone to the MIC terminal while the INPUT terminal ON/OFF switch is set to OFF, the camcorder will - Canon XA20 | Instruction Manual - Page 81
practical range of the built-in microphone. For details about using the WM-V1, refer to the instruction manual supplied with the microphone. 81 Audio Scenes and Other Audio Settings You can have the camcorder optimize the audio settings of the built-in microphone by selecting the audio scene that - Canon XA20 | Instruction Manual - Page 82
[" Noise [n] (manual): 70 [k Automatic] [H Auto (High)] [è Low Cut [í Monaural] Suppression] Filter] [„ Custom Setting] (A 82) (A 83) Selected by user (A 83) (A 84) (A 84) NOTES • [„ Custom Setting] is not available in Setting], if the camcorder is then set to mode. After setting [- Audio - Canon XA20 | Instruction Manual - Page 83
The built-in microphone wind screen will be deactivated at all times. NOTES • Some low-frequency sounds will be suppressed along with the sound of wind. When recording in surroundings unaffected by wind or if you want to record low-frequency sounds, we recommend setting [Built-in Mic Wind Screen] to - Canon XA20 | Instruction Manual - Page 84
will be deactivated at all times. Audio Equalizer (Built-in Microphone) You can use the audio equalizer to adjust sound levels by specifically targeting the high- or lowfrequency range and selecting one of 3 available levels. Operating modes: POINTS TO CHECK • Set [- Audio Scene] to [„ Custom - Canon XA20 | Instruction Manual - Page 85
of the camcorder/ microphone. 85 [h Normal] Standard stereo recording; a middle point between the [î Wide] and [í Monaural] settings in the Input (MIC Terminal) You can switch the input of the MIC terminal depending on whether you are using an external microphone or an external audio source, - Canon XA20 | Instruction Manual - Page 86
1 Open the [MIC Low Cut] screen. 86 [FUNC.] > [MENU] > p > [MIC Low Cut] 2 Touch [i On] and then touch [X]. Using Line Input or an External Microphone Connected to an INPUT Terminal Follow the steps below to use an external microphone connected to an INPUT terminal. 1 Set the INPUT terminal ON - Canon XA20 | Instruction Manual - Page 87
you select [ Built-in Mic/MIC], the camcorder will record monaural sound. In such case, [- Audio Scene] will be set to [' Standard]. 87 Audio Recording Level (INPUT Terminals) You can set the audio recording level for audio input to automatic or manual independently for each channel. Furthermore - Canon XA20 | Instruction Manual - Page 88
's sensitivity submenu. [FUNC.] > [MENU] > p > [INPUT 1 Mic Trimming] or [INPUT 2 Mic Trimming] 2 Touch the desired level and then touch [X]. • The available sensitivity levels are +12 dB, +6 dB, 0 dB, -6 dB and -12 dB. 88 Activating the Microphone's Attenuator (INPUT terminals) You can activate the - Canon XA20 | Instruction Manual - Page 89
the audio signal with the video signal or monitor the audio in real time. Use the q > [Monitor Delay] setting to select the method. Note that there will be a slight delay when you monitor in real time. Regardless of the setting, however, the audio and video signals recorded will be synchronized - Canon XA20 | Instruction Manual - Page 90
camcorder output and record color bars and a 1 kHz audio reference signal and output them from the HDMI OUT terminal, AV OUT terminal, HD/SD and then touch [X]. • Available levels are -12 dB, -18 dB and -20 dB. • Select [j Off] to turn off the signal. • The signal is output at the selected level - Canon XA20 | Instruction Manual - Page 91
as if a camera shutter had released. NOTES • The default length of a video snapshot scene is 4 seconds but you can change it to 2 or 8 seconds with the > [Video Snapshot Length] setting. • Any of the following will deactivate video snapshot mode: - Turning off the camcorder. - Changing the - Canon XA20 | Instruction Manual - Page 92
camcorder will start recording 3 seconds before you press Y, ensuring you do not miss important shooting opportunities. This is especially useful Y. • The scene recorded on the memory card will start 3 seconds before Y was pressed. NOTES • The camcorder will not record the full 3 seconds prior - Canon XA20 | Instruction Manual - Page 93
off mode2: • Only data code on • All displays on 1 The onscreen markers will be displayed only when p > [Onscreen Markers] is set to an option other than Data Code With every scene or photo recorded, the camcorder keeps a data code (date/time of recording, information about the camera setup, etc - Canon XA20 | Instruction Manual - Page 94
are not available. • Depending on the light source, autofocus may not work well while zooming. • When switching the camcorder to infrared mode, do not point the lens at strong sources of light or heat. The camcorder's sensitivity to such sources is much higher than when shooting video normally. If - Canon XA20 | Instruction Manual - Page 95
generates a strong magnetic field, such as magnets or electric motors. NOTES • The camcorder is not compatible with the receiver's digital compass and positioning interval functions. Also, [Set Now] is not available for q > [GPS Auto Time Setting]. • The GPS receiver's time will be set once when the - Canon XA20 | Instruction Manual - Page 96
to display the current AGC limit value and then use the CUSTOM dial to adjust it. [y Exposure] When using a recording program other than [Š Fireworks] or [n Manual Exposure], you can compensate the automatic exposure set by the camcorder. Press C to display the exposure compensation value and then - Canon XA20 | Instruction Manual - Page 97
]** Turns the infrared light on/off (A 94). [œ Audio Output CH]** Switches the audio output channel between CH1/CH2, CH1/CH1, CH2/CH2 and All/All (A 110). [ AF/MF]* Switches between autofocus and manual focus (A 54). Default setting for assignable button 1. [ Rec Review] Reviews the last scene - Canon XA20 | Instruction Manual - Page 98
selecting [- Audio Scene] (A 81) in the FUNC. panel. [ Mic Level]* Functions the same as selecting [ä Mic Level] (A 82) in the FUNC. panel. 98 [ Zoom] be disabled if you set the camcorder to mode. ** Requires attaching the handle unit in advance. Using an Assignable Button After you - Canon XA20 | Instruction Manual - Page 99
and setup menus, you can save those settings on a memory card. You can load those settings at a later date or on another XA25 or XA20 camcorder so that you can use that camcorder in the same way. Operating modes: 99 Saving Menu Settings to a Memory Card Menu settings must be saved to memory card - Canon XA20 | Instruction Manual - Page 100
playing back scenes using an external monitor, refer to Connecting to an External Monitor (A 107). Operating modes: 1 Set the power switch to MEDIA. • The AVCHD movie index screen will appear. 2 If necessary, change the index screen. [6 ¸] > Tab of the desired memory card (6 or 7) > Control button - Canon XA20 | Instruction Manual - Page 101
Video About folder names MP4 movies and photos are saved as files in folders. The folder names appear in a format such as "101_0501." The first three digits indicate the folder number ). & Stop the playback. ' Data code (A 93) * Touch several times to increase the playback speed to approximately 5x - Canon XA20 | Instruction Manual - Page 102
back with this camcorder movies recorded on a memory card using another device. NOTES • You can turn off the recording date and time display or change the information displayed with the s > [Data Code] setting. • Depending on the recording conditions, you may notice brief stops in video or sound - Canon XA20 | Instruction Manual - Page 103
in keeping. Deleting scenes allows you also to free up space on the memory card. Operating modes: Deleting a Single Scene 1 Play back the scene you wish . • A checkmark ! will appear on the scenes you touch. The total number of selected scenes will appear next to the " icon. • Touch a selected - Canon XA20 | Instruction Manual - Page 104
is on or flashing (while scenes are being deleted). - Do not open the double memory card slot cover. - Do not disconnect the power source or turn off the camcorder. - Do not change the camcorder's operating mode. NOTES • To delete all movies and make all recordable space available again you may - Canon XA20 | Instruction Manual - Page 105
Scenes Dividing Scenes You can divide AVCHD scenes in order to leave out the best parts and later cut out the rest. on the screen (A 102). Use any special playback modes as necessary to locate the desired point. 5 Divide the scene. [µ Divide] > [Yes] • The video from the division point to the - Canon XA20 | Instruction Manual - Page 106
Trimming Scenes Trimming Scenes You can trim MP4 scenes by removing everything up to a certain point or be trimmed is indicated by the marker. • Playback controls will appear on the screen (A 102). Use any special playback modes as necessary to locate the desired point. 5 Trim the scene. [Trim - Canon XA20 | Instruction Manual - Page 107
that you power the camcorder from a household power outlet using the compact power adapter. AV OUT terminal STV-250N Stereo Video Cable (supplied) VIDEO IN/ AUDIO IN HDMI OUT terminal HD/SD-SDI terminal* BNC cable (commercially available) HTC-100/S High Speed HDMI Cable (supplied) SDI IN - Canon XA20 | Instruction Manual - Page 108
the HD/SD-SDI and HDMI OUT terminals. [ HDMI] There is output only from the HDMI OUT terminal. [Ò AV OUT] There is output only from the AV OUT terminal. Using the HD/SD-SDI Terminal The digital signal output from the HD/SD-SDI terminal includes the video signal, audio signal and time code signal - Canon XA20 | Instruction Manual - Page 109
an External Monitor NOTES • When q > [Output Terminal] is set to [ HD/SD-SDI & HDMI], the signal output from the HDMI OUT terminal will be determined by the q > [HD/SD-SDI Output] setting. • The HDMI OUT terminal on the camcorder is for output only. Do not connect it to an HDMI output terminal - Canon XA20 | Instruction Manual - Page 110
can output audio from the HD/SD-SDI terminal ( only), HDMI OUT terminal, AV OUT terminal or × (headphone) terminal. When audio is output from the AV OUT terminal or × (headphone) terminal, you can configure the following settings. 110 Synchronizing the Video with the Audio being Monitored When - Canon XA20 | Instruction Manual - Page 111
Set the power switch to MEDIA. • The AVCHD movie index screen will appear. 2 Open the photo index screen. [6 ·] > Tab of the desired memory card few seconds. When you have a large number of photos it may be more convenient to Receiver was attached to the camcorder during recording, GPS information - Canon XA20 | Instruction Manual - Page 112
recorded a large number of photos, you can jump easily through the photos using the scroll bar. flashing. Failing to do so may result in permanent data loss. - Do not open the double memory card slot cover. - Do not disconnect the power source or turn off the camcorder. - Do not change the camcorder - Canon XA20 | Instruction Manual - Page 113
the individual photos you want to delete. • A checkmark ! will appear on the photos you touch. The total number of selected photos will appear next to the " icon. • Touch a selected photo to remove the checkmark. • Photos that were protected with other devices cannot be deleted with this camcorder. - Canon XA20 | Instruction Manual - Page 114
memory cards (A 49) and save them as a single scene. • Join multiple video stream files of a single scene (either AVCHD or MP4 format) split because of the 4 GB maximum file size restriction and save them as a single scene. For more details, check the Data Import Utility Software Guide, a PDF - Canon XA20 | Instruction Manual - Page 115
the memory card with other software. Failing to do so may result in not being able to save the files to your computer. Transferring Movies to the Computer After you install the supplied software Data Import Utility, you can save movies to your computer. 1 Camcorder: Power the camcorder using the - Canon XA20 | Instruction Manual - Page 116
Memory Cards Copying Recordings Between Memory Cards You can copy recordings from one memory card will appear on the scenes you touch. The total number of selected scenes will appear next to the " date. For AVCHD movies, the date will appear in the control button. For MP4 movies, the folder - Canon XA20 | Instruction Manual - Page 117
. - Do not change the camcorder's operating mode. NOTES • In the following cases, you will not be able to copy recordings to the memory card: - If the double memory card slot is open. - If the LOCK switch on the memory card is set to prevent writing. - If a file number (A 147) cannot be created - Canon XA20 | Instruction Manual - Page 118
convert AVCHD movies into MP4 movies or even convert MP4 movies into smaller MP4 movies. This is convenient, for example, when you want to upload the MP4 movies to the Web. When you convert movies on one memory card, they will be saved to the other memory card. While converting movies, the camcorder - Canon XA20 | Instruction Manual - Page 119
video recorder has an SD memory card slot*, you can use the memory card to copy your movies without connecting the camcorder. * Make sure the external device is compatible with the type of memory card used. Connecting 1 Power the camcorder using the compact power adapter. 2 Open the desired AVCHD - Canon XA20 | Instruction Manual - Page 120
Copying Recordings to an External Video Recorder 120 5 Camcorder: Resume playback. • By default, the data code will be embedded in the output video signal. You can change this using the s > [Data Code] setting. 6 External recorder: Start recording when the scene you wish to copy appears; stop - Canon XA20 | Instruction Manual - Page 121
"Android device" refers to Wi-Fi-enabled Android smartphones and tablets. 121 Wi-Fi connection When you use the Wi-Fi Remote app, you can use your iOS or Android device to remotely control the camcorder and make recordings (A 124). iOS or Android device Wi-Fi connection Wirelessly connect the - Canon XA20 | Instruction Manual - Page 122
download the Movie Uploader app3, wirelessly connect the camcorder to an iOS device (A 132) to save, play back and upload your recordings. You can even use this connection type if you plan to share videos on YouTube and Facebook on the go. 3 The Movie Uploader app, provided by PIXELA, is available - Canon XA20 | Instruction Manual - Page 123
Introduction to Wi-Fi NOTES • While using Wi-Fi functions other than remotely controlling the camcorder using the Wi-Fi Remote application, do not open the double memory card slot cover. Before using Wi-Fi functions Based on the function, the camcorder will wirelessly connect to a Wi-Fi-enabled - Canon XA20 | Instruction Manual - Page 124
the camcorder remotely via Wi-Fi Remote, a Web browser application that can be accessed using the Web browser* of devices compatible with Wi-Fi networks**. The Wi-Fi Remote application lets you monitor the image through live view, start and stop recording, and remotely control the shooting mode - Canon XA20 | Instruction Manual - Page 125
's password, the connection will be established automatically. 5 iOS/Android device: Enter the camcorder's password set previously. 6 iOS/Android device: Enter the URL displayed on the camcorder's screen into the Web browser to start the Wi-Fi Remote application. • The Wi-Fi Remote screen will - Canon XA20 | Instruction Manual - Page 126
21 14 20 19 18 17 16 15 When the recording program is set to [" Aperture-Pri. AE]: 10 12 1 Screen selection tab: Switch between advanced controls and basic controls. 2 Recording program (A 66, 73) 3 Time code (A 76) 4 Wi-Fi Remote connection status 5 Operation (A 155) 6 D (key lock): Press to - Canon XA20 | Instruction Manual - Page 127
ON/OFF] to show the camcorder's live view image on the Wi-Fi Remote screen. 2 Press [START/STOP] to begin recording. • The recording operation indicator changes from [STBY] to [ÜREC], the center of the START/STOP button lights up in red and the time code display starts running on the Wi-Fi Remote - Canon XA20 | Instruction Manual - Page 128
not yet been stored, [Å] will flash slowly. • During the procedure, [Å] will flash quickly. When it stops flashing, the procedure is completed and the setting will be applied to the camcorder. Adjusting the aperture 1 Press the aperture button. • The available aperture values will appear. 2 Select - Canon XA20 | Instruction Manual - Page 129
setup and conditions, there may be a delay when using live view and configuring settings. • When color bars are being displayed, live view updates will stop. • When Wi-Fi remote is activated, q > [Time Zone/DST], [Date/Time] and [GPS Auto Time Setting] are not available. If [GPS Auto Time Setting - Canon XA20 | Instruction Manual - Page 130
Your iOS or Android Device With the Remote Browse function, you can use the Web browser on your iOS device, Android device, computer or similar device to show a list of recordings in the camcorder, play them back and even download them.* This conveniently allows you to view your recordings while you - Canon XA20 | Instruction Manual - Page 131
Remote Browse: Viewing Recordings Using a Web Browser on Your iOS or Android Device 10 iOS/Android device: Touch to return to the index screen. 11 Camcorder: Touch [End] > [OK] when finished. NOTES • The following types of MP4 scenes will be recognized as multiple files on other devices. - Scenes - Canon XA20 | Instruction Manual - Page 132
for free from the App Store. ** Not available for MP4 movies recorded at 35 Mbps. iOS device Operating modes: POINTS TO CHECK • Before you perform this procedure for the first time, install the Movie Uploader app on your iOS device. The app can be downloaded for free from the following site. http - Canon XA20 | Instruction Manual - Page 133
video files. • The procedure above may differ depending on the version of iOS you are using. • For details about the Movie Uploader app, visit PIXELA's Web site. http://www.pixela.co.jp/oem/canon/e/movieuploader/ (English only) • The following types of MP4 scenes will be recognized as multiple - Canon XA20 | Instruction Manual - Page 134
for the desired memory card and play back the movies and photos. 8 Camcorder: Touch [End] > [OK] when finished. NOTES • Depending on the access point's settings and capability, playback may take time to start or may not appear smooth. For details, refer to Troubleshooting (A 156). • The following - Canon XA20 | Instruction Manual - Page 135
a correctly configured FTP server. During the manual setup procedure, you will need to enter the FTP server's IP address, port, user name, password and file transfer destination (where the files will be transferred to). To enter text for the various settings, use the virtual keyboard (A 136). 135 - Canon XA20 | Instruction Manual - Page 136
enter text for various settings, touch the text field and a virtual keyboard will appear on the screen. You must use the touch screen to operate the virtual keyboard. The illustrations below explain the various keys you can use. 136 ! Switch between letters and numbers/special characters. " Change - Canon XA20 | Instruction Manual - Page 137
the [WPS: Button] method or [WPS: PIN Code] method (see the description in the previous section). If you cannot successfully connect the camcorder using WPS, try using the [Search for Access Points] method. Refer also to the router's instruction manual. 1 [WPS: Button] method Press and hold the WPS - Canon XA20 | Instruction Manual - Page 138
enter the password (encryption key) to connect the camcorder. To enter text for the various settings, use the virtual keyboard (A 136). 1 Note the . Manual setup is for advanced users of Wi-Fi networks. To enter text for the various settings, use the virtual keyboard (A 136). 1 In the [SSID] field, - Canon XA20 | Instruction Manual - Page 139
function you were previously using. For details, refer to the procedure in Playback on a Computer (A 134), Transferring Files to a Computer or FTP Server (A 135) or Viewing and Changing Wi-Fi Settings (A 140), as necessary. 139 NOTES • The Wi-Fi functions available and the setup method will vary - Canon XA20 | Instruction Manual - Page 140
2 Touch [Access Point Connection]. • The four access points' SSID settings in the camcorder's memory will appear. • To add an access point, touch [Not configured] and then perform the procedure in Wi-Fi Connection Using an Access Point (A 137). After doing so, the screen from this step will appear - Canon XA20 | Instruction Manual - Page 141
) using the Wi-Fi standard. In most cases, this will be your wireless router. FTP Server An FTP server is an application running on a computer that allows users to transfer files to and from that computer. IP Address Exclusive number assigned to each device connected to the network. SSID Service Set - Canon XA20 | Instruction Manual - Page 142
Button Setting options/Function AUTO n CINEMA A [MENU] Open the setup menus z z z 34 [Rec. Programs] [' Programmed AE], [, Shutter-Pri. AE], [" Aperture-Pri. AE], [n Manual Exposure] - z z 66, 68 [ú Portrait], [û Sports], [ü Night Scene], [ý Snow], [þ Beach], [ÿ Sunset], [Œ Low Light - Canon XA20 | Instruction Manual - Page 143
Setting options/Function 1 Option available only for recording movies. 2 The setting is maintained when the camcorder is switched from (Except for [„ Custom Setting 116 113 Setup Menus p Camera Setup Menu item Setting options A [ 60 When [X]: 1-16 (8) [Handle Rocker Zoom [j] (off), [X] - Canon XA20 | Instruction Manual - Page 144
Monaural], [h Normal], [î Wide], [ï Zoom] 84 [MIC Att.] [k Automatic], [i On], [j Off] 85 [MIC Low Cut] [i On], [j Off] 86 [MIC Terminal Input] [Þ External Audio], [ß Microphone] 85 [CH2 Input] [ INPUT 1], [ INPUT 2], [ Built-in Mic/MIC] 86 [INPUT 1 Mic Trimming] [ +12 dB], [ +6 dB - Canon XA20 | Instruction Manual - Page 145
of audio signals to prevent audio distortions. 145 s / Playback Setup Menu item [Data Code] [TV Type] [Wi-Fi] Setting options A y} For AVCHD movies: [j Off], [% Date], [& Time], [' Date and Time], [( Camera Data] For MP4 movies: [j Off], [% Date] zz - [+ 4:3 TV], [, Wide TV] zz - [Movie - Canon XA20 | Instruction Manual - Page 146
Code]: Displays the date and/or time when the scene or photo was recorded. [( Camera Data]: Displays the aperture (f-stop) and shutter speed used when recording the scene or photo. [TV Type]: When you connect the camcorder to a TV using the supplied STV-250N Stereo Video Cable, select the setting - Canon XA20 | Instruction Manual - Page 147
[OK] [User Bit Output [ Mode] Fixed], [ Pulldown] [User Bit Type] [ Setting], [ Time], [ Date] [Color Bars] [j Off], [ SMPTE], [ ARIB] [1 kHz Tone] [ü -12 dB], [þ -18 dB], [ÿ -20 dB], [j Off] [File Numbering] [m Reset], [n Continuous] [Available Space [6], [7] in Memory] [Used Space in - Canon XA20 | Instruction Manual - Page 148
/Av], [l Manual Exposure], [x AGC Limit], Button] [y Exposure], [j Off] z - - 96 [Assign Button 1] [È Powered IS], [° BLC Always On], [~ Face Only AF], z - - 97 to [¦ Video Snapshot], [Ä WB Priority], [z Pre REC], [Assign Button 5]* [< IR Light], [œ Audio Output CH], [ AF/MF], [ Rec Review - Canon XA20 | Instruction Manual - Page 149
[Focus Preset Speed] [Battery Info] [Output Terminal] [Rec Command] [HD/SD-SDI Output] [HDMI Output] [HDMI Time Code] [HDMI Status] [Output Onscreen Displays] [Distance Units] [Backup Menu Settings 7] [GPS Auto Time Setting]** [GPS Information Display]** [Demo Mode] [Firmware] [Reset All] [Î Press - Canon XA20 | Instruction Manual - Page 150
Lamp]: Activates the tally lamp when the camcorder is recording, the wireless controller is being operated, the battery level is low or a memory card is full. When set to [j Off], the tally lamp will not turn on in these cases. The tally lamp is located on the handle unit so make sure you attach it - Canon XA20 | Instruction Manual - Page 151
includes the camcorder's time code. [HDMI Status]: Displays a screen where you can verify the standard of the output signal from the HDMI OUT terminal. [Output Onscreen Displays]: When set to [i On], the camcorder's onscreen displays will appear also on the screen of a TV or monitor connected to - Canon XA20 | Instruction Manual - Page 152
: Time code (hours : minutes : seconds : frames) 9 Operation (A 155) 10 Remote sensor off (A 150) 11 Pre-recording (A 92); D Video snapshot length (A 91) 12 Image stabilizer (A 64) 13 Frame rate (A 50) 14 Remaining battery time (A 155) 15 Remaining recording time1 6 / 7 On the memory card / Relay - Canon XA20 | Instruction Manual - Page 153
68) 32 Manual focus (A 54) 33 Backlight correction (A 70) 34 White balance (A 71) 35 GPS (A 95) 36 Image effects (A 75) 37 Slow & fast motion recording (shooting frame rate/playback frame rate) (A 51) 38 Wind screen (A 83) 39 Audio scene select (A 81) 40 External audio input from the MIC terminal - Canon XA20 | Instruction Manual - Page 154
Playback control buttons (A 101) 49 Scene number 50 Data code (A 93, 146) 51 Volume controls (A 101) Viewing Photos 52 1 53 54 50 55 56 52 Control button [MENU]: Open the setup menus (A 34, 143) 53 Current photo / Total number of photos 54 File number (A 147) 55 Control button [f]: Return - Canon XA20 | Instruction Manual - Page 155
) and the remaining recording time (in minutes) for 5 seconds. If the battery pack is exhausted, the battery information may not be displayed. 15 Remaining recording time When there is no more free space on a memory card, [6 End] (memory card 2) or [7 End] (memory card 3) will be displayed in - Canon XA20 | Instruction Manual - Page 156
problem persists. 156 CHECK THIS FIRST Power supply • Is the battery charged? Is the compact power adapter correctly connected to the camcorder? (A 21) Recording • Did you turn the camcorder on and correctly set it to correctly inserted into the camcorder? (A 38) mode? (A 40) Is a memory card - Canon XA20 | Instruction Manual - Page 157
it may indicate a problem with the camcorder. Consult a Canon Service Center. 157 Playback Cannot delete a scene. - You may not be able to delete scenes recorded or edited using another device. Deleting scenes takes longer than usual. - When the memory card contains a large number of scenes, some - Canon XA20 | Instruction Manual - Page 158
attached so the remaining battery time cannot be displayed. The tally lamp does not light up. - Change the q > [Tally Lamp] setting to [On]. The tally lamp flashes quickly (4 flashes per second). - The battery pack is exhausted. Replace or charge the battery pack. - The memory card is full. Delete - Canon XA20 | Instruction Manual - Page 159
you use it with the camcorder for the first time. - The LOCK switch on the memory card is set to prevent accidental erasure. Change the position of the LOCK switch. - A compatible memory card must be used to be able to record movies on a memory card (A 37). - The folder and file numbers have - Canon XA20 | Instruction Manual - Page 160
Wi-Fi network setup. Perform the setup manually (A 138) or turn off the stealth function of the access point. - The wireless router is using a Wi-Fi channel not supported by the camcorder. Refer to About available Wi-Fi frequencies and channels (A 182) and change the channel setting in the wireless - Canon XA20 | Instruction Manual - Page 161
Continue using this battery pack? - You attached a battery pack that is not recommended by Canon for use with this camcorder. - If you are using a battery pack recommended by Canon for use with this camcorder, there may be a problem with the camcorder or battery pack. Consult a Canon Service Center - Canon XA20 | Instruction Manual - Page 162
Troubleshooting 162 Cannot convert the scene - The camcorder cannot convert scenes that were recorded using a video configuration that is not supported (PAL or SECAM). - You cannot convert scenes that were recorded or edited using another device and then transferred to a memory card connected to a - Canon XA20 | Instruction Manual - Page 163
scenes (the maximum number of scenes for AVCHD movies); no further scenes can be copied onto the memory card. Delete some scenes (A 103) to free some space. Mem. Card Unable to recognize the data - The memory card contains scenes recorded using a video configuration that is not supported (PAL or - Canon XA20 | Instruction Manual - Page 164
Troubleshooting 164 Need to recover files from the memory card. Change the position of the LOCK switch on the memory card. - This message will appear the next time you turn on the camcorder if power supply was accidentally interrupted while the camcorder was writing on the memory card and later - Canon XA20 | Instruction Manual - Page 165
(A 114) and initialize the memory card using the [Complete Initialization] option (A 38). 165 List of Messages for Wi-Fi Functions Refer also to the instruction manual of your access point and other devices you will use. Another user is already controlling the camcorder. Try again later. - This - Canon XA20 | Instruction Manual - Page 166
Troubleshooting 166 Unable to complete WPS. - Turn off the camcorder and access point. After a short while, turn them on again and try again. If the problem persists, perform setup using the [Search for Access Points] option (A 137). Unable to complete WPS. Try the operation again. - Some access - Canon XA20 | Instruction Manual - Page 167
may interfere with the wireless signal. Try using the camcorder in a location farther away from such appliances. - Turn off the camcorder and access point. After a short while, turn them on again and perform the Wi-Fi network setup again. If the problem persists contact a Canon Service Center. 167 - Canon XA20 | Instruction Manual - Page 168
in case of damage and create more free space on the memory card. Canon shall not be liable for any data loss. • Do not carry the camcorder by the OLED panel. Be careful when closing the OLED panel. When using a wrist strap, do not allow the camcorder to swing and hit an object. • Handle the - Canon XA20 | Instruction Manual - Page 169
break as necessary. Long-term storage If you do not intend to use the camcorder for a long time, store it in a place free of dust, in low humidity, and at temperatures not higher than 30 °C (86 °F). 169 Battery Pack DANGER! Treat the battery pack with care. • Keep it away from fire (or it might - Canon XA20 | Instruction Manual - Page 170
CG-800 Battery Charger. • We recommend using genuine Canon battery packs bearing the Intelligent System mark. • If you attach to the camcorder battery packs that are not genuine Canon battery packs, will appear and the remaining battery time will not be displayed. Memory Card • We recommend - Canon XA20 | Instruction Manual - Page 171
contact. • For California, USA only: The lithium battery included contains Perchlorate Material - special handling may apply. See www.dtsc.ca.gov/hazardouswaste/perchlorate for details. 171 Disposal When you delete movies or initialize a memory card, only the file allocation table is altered and - Canon XA20 | Instruction Manual - Page 172
extreme changes in temperature. • Remove the memory card and battery pack. Then, place the camcorder in an airtight plastic bag and let it adjust gradually to temperature changes before removing it from the bag. When condensation is detected The precise time required for water droplets to evaporate - Canon XA20 | Instruction Manual - Page 173
Abroad Power Sources You can use the compact power adapter to operate the camcorder and to charge battery packs in any country with power supply between 100 and 240 V AC, 50/60 Hz. Consult a Canon Service Center for information on plug adapters for overseas use. Playback on a TV Screen 173 - Canon XA20 | Instruction Manual - Page 174
Optional Accessories Optional Accessories (Availability differs from area to area) The following optional accessories are compatible with this camcorder. Select accessories are described in more detail in the following pages. 174 BP-820, BP-828 Battery Pack CG-800 Battery Charger CA-570 Compact - Canon XA20 | Instruction Manual - Page 175
Call or visit your local retailer/dealer for genuine Canon video accessories. You can also obtain genuine accessories for your Canon camcorder by calling: 1-800-828-4040, Canon U.S.A. Information Center. Use of genuine Canon accessories is recommended. This product is designed to achieve excellent - Canon XA20 | Instruction Manual - Page 176
Optional Accessories 176 Recording AVCHD movies Battery pack BP-820 BP-828 Recording mode 28 Mbps LPCM (59.94P min. 210 min. 220 min. 225 min. 230 min. 220 min. 220 min. 230 min. Recording MP4 movies Battery pack BP-820 BP-828 Recording mode 35 Mbps (59.94P) 24 Mbps 17 Mbps 4 Mbps 3 Mbps - Canon XA20 | Instruction Manual - Page 177
Accessories Recording AVCHD movies Battery camcorder lens by a factor of 1.5. • The Tele-converter cannot be used together with the supplied lens hood with lens barrier. • The image stabilizer is not as effective when the Tele-converter is attached. • The minimum focusing distance at full telephoto - Canon XA20 | Instruction Manual - Page 178
attached to the camcorder's grip belt. SC-2000 Soft Carrying Case A handy camcorder bag with padded compartments and plenty of space for accessories. This mark identifies genuine Canon video accessories. When you use Canon video equipment, we recommend Canon-brand accessories or products bearing - Canon XA20 | Instruction Manual - Page 179
, the camcorder's image data at the time of shooting is used and optimized, yielding extremely high quality prints. • Video Signal Configuration AVCHD, MP4 • Recording Media SD, SDHC (SD High Capacity) or SDXC (SD eXtended Capacity) memory card (not included); two memory card slots • Maximum - Canon XA20 | Instruction Manual - Page 180
0.1 lx ([Low Light] recording program, Shutter speed at 1/2) 1.2 lx ([Programmed AE] recording program, Auto slow shutter [On], Shutter speed at 1/30) • Recommended Illumination: More than 100 lx • Image Stabilization: Optical-Shift Image Stabilizer • Size of Video Recordings AVCHD movies: 28 - Canon XA20 | Instruction Manual - Page 181
• HD/SD-SDI Terminal BNC jack, output only, 0.8 Vp-p / 75 Ω, unbalanced HD-SDI: SMPTE 292M Video: 1080i, 720P SD-SDI: SMPTE 259M Video: 480i Embedded audio, time code (VITC/LTC) • HDMI OUT Terminal HDMI mini connector; output only • USB Terminal: mini-B receptacle, Hi-Speed USB; output only - Canon XA20 | Instruction Manual - Page 182
attached: 131 x 180 x 231 mm (5.2 x 7.1 x 9.1 in.) • Weight (camcorder with lens hood and handle unit attached): 1160 g (2.6 lb) 1155 g (2.5 lb) 182 CA-570 Compact Power Adapter • Power supply: 100 - 240 V AC, 50/60 Hz • Rated output / consumption: 8.4 V DC, 1.5 A / 29 VA (100 V) - 39 VA (240 - Canon XA20 | Instruction Manual - Page 183
L Language 35 Lens barrier switch 40 Lens hood 25 Low cut filter 86 Low light (recording program 73 M M (Manual) mode 45 Maintenance 172 Manual exposure 68 Manual focus 54 Markers 145 Memory card 37, 170 Menu settings, saving and loading 99 MIC terminal 80, 81 Microphone attenuator 83 - Canon XA20 | Instruction Manual - Page 184
, 68, 73 Recording time 48 Relay recording 49 Remote Browse 130 Remote sensor 28 Resetting all camcorder settings 151 Reviewing recordings 46 S Saving recordings Using a computer 114 Using external video recorders 119 Selecting the memory card for recording 39 Setup menus 34, 143 Shutter - Canon XA20 | Instruction Manual - Page 185
follow operating instructions; B) If the Equipment is defective as a result of leaking batteries, sand, dirt or water damage; C) If defects or damages are caused by the use of unauthorized parts or by service other than by Canon USA's factory service centers or authorized service facilities; D) If - Canon XA20 | Instruction Manual - Page 186
the instruction manual; ii) the use of accessories, attachments, products, supplies, parts or devices with the Equipment that do not conform to Canon specifications or that cause abnormally frequent service problems; iii) repairs or services performed by any party other than a Canon Service Facility - Canon XA20 | Instruction Manual - Page 187
, Fax: +852 2428 3963 Visit your local Canon Web site to download the latest version of this Instruction Manual. For support concerning the supplied software, contact your local Canon Service Center. Consultez le site Web Canon de votre pays pour télécharger la version la plus récente de ce manuel
-
 1
1 -
 2
2 -
 3
3 -
 4
4 -
 5
5 -
 6
6 -
 7
7 -
8
-
9
-
10
-
11
-
12
-
13
-
14
-
15
-
16
-
17
-
18
-
19
-
20
-
21
-
22
-
23
-
24
-
25
-
26
-
27
-
28
-
29
-
30
-
31
-
32
-
33
-
34
-
35
-
36
-
37
-
38
-
39
-
40
-
41
-
42
-
43
-
44
-
45
-
46
-
47
-
48
-
49
-
50
-
51
-
52
-
53
-
54
-
55
-
56
-
57
-
58
-
59
-
60
-
61
-
62
-
63
-
64
-
65
-
66
-
67
-
68
-
69
-
70
-
71
-
72
-
73
-
74
-
75
-
76
-
77
-
78
-
79
-
80
-
81
-
82
-
83
-
84
-
85
-
86
-
87
-
88
-
89
-
90
-
91
-
92
-
93
-
94
-
95
-
96
-
97
-
98
-
99
-
100
-
101
-
102
-
103
-
104
-
105
-
106
-
107
-
108
-
109
-
110
-
111
-
112
-
113
-
114
-
115
-
116
-
117
-
118
-
119
-
120
-
121
-
122
-
123
-
124
-
125
-
126
-
127
-
128
-
129
-
130
-
131
-
132
-
133
-
134
-
135
-
136
-
137
-
138
-
139
-
140
-
141
-
142
-
143
-
144
-
145
-
146
-
147
-
148
-
149
-
150
-
151
-
152
-
153
-
154
-
155
-
156
-
157
-
158
-
159
-
160
-
161
-
162
-
163
-
164
-
165
-
166
-
167
-
168
-
169
-
170
-
171
-
172
-
173
-
174
-
175
-
176
-
177
-
178
-
179
-
180
-
181
-
182
-
183
-
184
-
185
-
186
-
187
 |
 |
PUB. DIM-1071-000
HD Camcorder
Instruction Manual
Caméscope HD
Manuel d'instruction
Videocámara HD
Manual de Instrucciones