Canon i250 i350 Quick Start Guide
Canon i250 Manual
 |
View all Canon i250 manuals
Add to My Manuals
Save this manual to your list of manuals |
Canon i250 manual content summary:
- Canon i250 | i350 Quick Start Guide - Page 1
BUBBLE JET PRINTER Quick Start Guide Table of Contents Preface 1 Shipping Materials 1 Introduction 1 Setting Up 2 Preparing the Printer 2 Installing the Print Head 3 Connecting the Printer to the Computer 6 Loading Paper 7 Installing the Printer Driver 8 Aligning the Print Head - Canon i250 | i350 Quick Start Guide - Page 2
Print This printer supports Exif 2.2 (also called "Exif Print"). Exif Print is a standard for enhancing the communication between digital cameras and printers. By connecting to an Exif Print As an ENERGY STAR® Partner, Canon Inc. has determined that this product Printer Model: K10228 (i350/i250) - Canon i250 | i350 Quick Start Guide - Page 3
for purchasing a Canon Bubble Jet Printer. Check that all the following items are in the box. If anything is missing or is damaged, contact your Canon Authorized Dealer or Sales Representative. ‰ Printer ‰ Setup Software & User's Guide CD-ROM ‰ Quick Start Guide ‰ Print Head ‰ 2 Ink Tanks * A USB - Canon i250 | i350 Quick Start Guide - Page 4
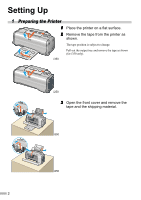
Setting Up 1 Preparing the Printer 1 Place the printer on a flat surface. 2 Remove the tape from the printer as shown. The tape position is subject to change. Pull out the output tray and remove the tape as shown (for i350 only). i350 i250 3 Open the front cover and remove the tape and the shipping - Canon i250 | i350 Quick Start Guide - Page 5
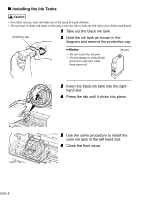
2 Installing the Print Head „ Installing the Print Head lock lever 1 Raise the lock lever. Do not touch internal parts other than the lock lever. print head 2 Remove the protective cap from the print head. • Do not touch the print head nozzles or electrical contacts. • Do not attempt to - Canon i250 | i350 Quick Start Guide - Page 6
cap. • Do not touch the ink port. • Do not attempt to reattach the protective cap once it has been removed. ink port 3 Insert the black ink tank into the right- hand slot. 4 Press the tab until it clicks into place. 5 Use the same procedure to install the color ink tank in the left hand slot - Canon i250 | i350 Quick Start Guide - Page 7
If an ink tank is installed improperly, the warning message appears when you try to print. Follow the above instructions in Steps 3 to 6 to reinstall ink tanks. 5 - Canon i250 | i350 Quick Start Guide - Page 8
3 Connecting the Printer to the Computer Use a USB cable. Recommended: Canon or other computer manufacturer cable, after turning off the printer. Follow the steps below to install the printer driver correctly. 1 Ensure the printer and the computer are switched off. 2 Plug the printer in. 3 Connect - Canon i250 | i350 Quick Start Guide - Page 9
in the circular holes of the paper rest (for i350 only). Print side 2 To avoid paper jams, fan the stack to guide and slide it against the left side of the stack of paper. You now need to install the printer driver: Windows: Go to page 8 Mac OS 8.6-9.x: Go to page 10 Mac OS X: Go to page - Canon i250 | i350 Quick Start Guide - Page 10
screens below refer to Windows XP installation. Screen may differ depending on the operating system you are using. • When installing the printer driver in Windows XP or Windows 2000, log on to the system as a member of the Administrators group. • The Setup Software & User's Guide CD-ROM contains the - Canon i250 | i350 Quick Start Guide - Page 11
the printer is recognized, the printer driver will be automatically installed. If the connection is not recognized, refer to the section "Notes on Handling the USB Interface (for Windows Users)" on page 22. ON 6 Click OK. Before you use the printer, you must carry out print head alignment on page 13 - Canon i250 | i350 Quick Start Guide - Page 12
double-click the Easy-PhotoPrint folder and then Installer. For Mac OS 8.6-9.x Users 1 Turn on the Mac. 2 Place the Setup Software & User's Guide CD-ROM in the CD-ROM drive. 3 Double-click the Mac OS 8.6-9.x folder. 4 Double-click the Printer Driver folder, then select a language. 5 Double-click - Canon i250 | i350 Quick Start Guide - Page 13
. Wait for the installation to finish. If the above message printer, you must carry out print head alignment on page 15. For Mac OS X Users 1 Turn on the Mac. 2 Place the Setup Software & User's Guide CD-ROM in the CD-ROM drive. 3 Double-click the Mac OS X folder, then double-click the Printer Driver - Canon i250 | i350 Quick Start Guide - Page 14
. 11 Software installation is complete. Restart your computer and turn the printer on. Before you use the printer, you must carry out print head alignment. For instructions on how to align the print head, refer to the Printer Driver Guide for Mac OS X. To view the Printer Driver Guide for Mac OS - Canon i250 | i350 Quick Start Guide - Page 15
the first time. Aligning the print head positions allows you to print without shifts in the color registration. „ Aligning the Print Head - Windows 1 Click Start and select Control Panel, Printers and Other Hardware, and then Printers and Faxes. For non-XP Windows, click Start, then select Settings - Canon i250 | i350 Quick Start Guide - Page 16
appears, click OK. It takes about 60 seconds to start printing. 7 After the pattern is printed, click Yes. If the pattern is not printed successfully, open the front cover and ensure that the ink tanks are correctly installed. 8 Look at the print-out. From the patterns in Column A, select the most - Canon i250 | i350 Quick Start Guide - Page 17
„ Aligning the Print Head - Macintosh For Mac OS X users, refer to the Printer Driver Guide for Mac OS X for instructions on how to align the print head. 1 Select Page Setup in the File Menu. 2 Click Utilities. 3 Select Test Print from the menu and click Print Head Alignment. 4 Check that paper is - Canon i250 | i350 Quick Start Guide - Page 18
6 In the same way, one by one, select the most even patterns printed with the least irregularities from each of Columns B to F, enter their numbers and white stripes 7 Click Close. More noticeable white stripes 8 Click OK. This completes the printer setup. The printer is now ready to use. 16 - Canon i250 | i350 Quick Start Guide - Page 19
your printer is selected, then click: • Windows XP →[Preferences] • Windows Me/Windows 98 →[Properties] • Windows 2000 →[Main] tab 3 Specify the required settings and click OK. If you use anything other than plain paper, please refer to "Basic Print Settings" on page 18. 4 To start printing, click - Canon i250 | i350 Quick Start Guide - Page 20
, select Manual. Select this to check the layout before printing. Click this for a more detailed explanation of the functions in the tab. (This may not appear when using Windows XP or Windows 2000. If this happens, click Start then select All Programs (or Programs) Canon i350 or Canon i250 - Guide - Canon i250 | i350 Quick Start Guide - Page 21
dialog box in your application. On the File menu, click Page Setup. Check the application's users manual for the actual procedures. 2 Specify the page setup. For details, refer to "Page Setup" on page 20. 3 Open the Print dialog box in your application to print the document. On the File menu, click - Canon i250 | i350 Quick Start Guide - Page 22
. Select the type of document you want to print. To specify more detailed settings for the print quality or color, select Manual and click Details. Click this to start printing. • See Balloon Help for more information about other printer driver functions. Select Show Balloons in the Help menu - Canon i250 | i350 Quick Start Guide - Page 23
Occurs or If a Specific Color Does Not Print Perform print head cleaning to improve the print quality. Ensure that the printer is turned on and follow the instructions below. • Windows Open the printer driver settings screen and click the Maintenance tab. Click Cleaning. See page 13 for details on - Canon i250 | i350 Quick Start Guide - Page 24
Notes on Handling the USB Interface (for Windows Users) If installation of the printer driver does not proceed as instructed in this Quick Start Guide, there may be a problem with the USB driver installation. Try reinstalling the printer driver. „ Reinstalling If you cannot proceed beyond the - Canon i250 | i350 Quick Start Guide - Page 25
-disk space for printer driver installation Mac OS 8.6-9.x: 30 MB Mac OS X v.10.2.1 or later: 100 MB • The following functions are not supported when using Mac OS X v.10.2.1 or later: - Duplex Printing - Photo Optimizer Pro Additional Systems Requirements for User's Guide • Pentium® 75 MHz - Canon i250 | i350 Quick Start Guide - Page 26
24 - Canon i250 | i350 Quick Start Guide - Page 27
- Canon i250 | i350 Quick Start Guide - Page 28
QA7-2714-V01 XX2003XX ©CANON INC.2003 PRINTED IN THAILAND
-
 1
1 -
 2
2 -
 3
3 -
 4
4 -
 5
5 -
 6
6 -
 7
7 -
8
-
9
-
10
-
11
-
12
-
13
-
14
-
15
-
16
-
17
-
18
-
19
-
20
-
21
-
22
-
23
-
24
-
25
-
26
-
27
-
28
 |
 |
BUBBLE JET PRINTER
Quick Start Guide
Table of Contents
Preface
1
Shipping Materials
1
Introduction
1
Setting Up
2
Preparing the Printer
2
Installing the Print Head
3
Connecting the Printer to the Computer
6
Loading Paper
7
Installing the Printer Driver
8
Aligning the Print Head
13
Basic Operations
17
Printing with Windows
17
Printing with Macintosh
19
Print Head Maintenance
21
Appendix
22
Notes on Handling the USB Interface (for Windows Users)
23
For Further Details...
23
QA7-2714-V01
BE