Canon iP5200R iP5200R Setup Guide
Canon iP5200R - PIXMA Color Inkjet Printer Manual
 |
UPC - 013803050431
View all Canon iP5200R manuals
Add to My Manuals
Save this manual to your list of manuals |
Canon iP5200R manual content summary:
- Canon iP5200R | iP5200R Setup Guide - Page 1
Setup Guide BE QA7-3632-V01 - Canon iP5200R | iP5200R Setup Guide - Page 2
could cause a fire or electric shock. The correct power supply voltages and frequencies are as follows: AC 110-120V, 50-60Hz AC 220-240V, 50-60Hz Conformity declaration for R&TTE We, Canon hereby declare that this equipment (printer) PIXMA iP5200R is in compliance with the essential requirements and - Canon iP5200R | iP5200R Setup Guide - Page 3
and the Computer (Windows 18 Installing the Software 18 First-time Setup for Use over Wireless LAN 20 First-time Setup for Use over Wired LAN 24 Setting Up for Use with USB Connection 27 Setting Up an Additional Computer to Use a Printer Already Connected to a Network 28 Aligning the Print - Canon iP5200R | iP5200R Setup Guide - Page 4
Preface Introduction Thank you for purchasing a Canon Inkjet Printer. This Setup Guide uses the following symbols to indicate important information. Always observe the instructions indicated by these symbols. Instructions that, if ignored, could result in death or serious personal injury caused by - Canon iP5200R | iP5200R Setup Guide - Page 5
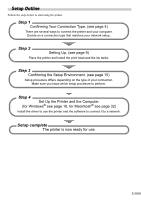
connection. Make sure you know which setup procedure to perform. Step 4 Set Up the Printer and the Computer. (for Windows® see page 18, for Macintosh® see page 32) Install the driver to use the printer and the software to connect it to a network. Setup complete The printer is now ready for use. 3 - Canon iP5200R | iP5200R Setup Guide - Page 6
printer connection method becomes wired LAN. • We recommend that you do not use the printer over a wired and wireless LAN at the same time since advanced network knowledge is required. Refer to the manuals of your network devices for necessary information. In an office setup, consult your network - Canon iP5200R | iP5200R Setup Guide - Page 7
connect them to the access point. • When using this printer in a wireless LAN setup, use the infrastructure mode. It does not support the ad-hoc mode. • An access point is needed to set up the infrastructure mode. • If you connect to a network that is not protected with security measures, there is - Canon iP5200R | iP5200R Setup Guide - Page 8
with router LAN cable A hub and LAN cable are required to connect this printer to a wired LAN. These must be purchased separately. The type of device in use in your network may vary. Refer to the manual of your device or contact its manufacturer for details. Connecting with USB Connection Your - Canon iP5200R | iP5200R Setup Guide - Page 9
use in your network may vary. Refer to the manual provided with your device or contact its manufacturer for details. Broadband modem without router Wireless LAN access point (with router) • The printer and the router need to be in the same network. You need to perform setup both on the computer - Canon iP5200R | iP5200R Setup Guide - Page 10
wired LAN, and connect another computer by USB to a wired LAN-connected printer. USB cable Wired LAN Hub To connect over wired LAN, your printer needs to be connected to a hub or a similar network device. You need to perform setup both on the computer to be used with USB connection and on the - Canon iP5200R | iP5200R Setup Guide - Page 11
• Never use any power supply other than the standard power supply available in the country of purchase. Using the incorrect voltage and frequency could cause a fire or electric shock. • Always push the plug all the way into the power outlet. If you do not intend to use the printer for a long period - Canon iP5200R | iP5200R Setup Guide - Page 12
turn on the computer yet. The POWER lamp flashes green and the printer begins to operate. Wait until the POWER lamp remains lit green. 3 Open the United States Write down the serial number located inside the printer. You will need this later to register the product. Serial number location 5 Remove - Canon iP5200R | iP5200R Setup Guide - Page 13
cap - this has no effect on print quality. Be careful not to get ink on yourself when handling these items. • Do not touch the Print Head rest at a slight angle. Be careful not to touch any parts inside the printer. Print Head Holder 8 Lock the Print Head into place by carefully lowering the - Canon iP5200R | iP5200R Setup Guide - Page 14
Installing the Ink Tanks • For safety reasons, store ink tanks out of the reach of small children. • Do not drop or shake ink tanks as this may cause the ink to leak out and stain your clothes and hands. • Be sure to remove the clear film from the ink tank in the exact order as shown in - Canon iP5200R | iP5200R Setup Guide - Page 15
same procedure to install the other ink tanks into their appropriate slots. Check the labels to make sure that each tank is in the correct position. Ensure that all the ink tank lamps light red. Ensure that all the ink tanks are installed in the order directed by the label. The printer cannot be - Canon iP5200R | iP5200R Setup Guide - Page 16
Guide on right side of the Paper Support. You can load up to 150 sheets of plain paper (64 gsm/17 lb). Do not exceed this limit. Cover Guide 3 Slide the Paper Guide the User's Guide. • You can select the paper source also from the printer driver. For details, refer to the Printer Driver Guide. 14 - Canon iP5200R | iP5200R Setup Guide - Page 17
function, see "On Firewalls" on page 16. • Make sure that configuration of computers, hubs, and other network devices is complete, and check that computers can connect to the network. You now need to set up the printer and your computer: Windows: Mac® OS X: Go to page 18 Go to page 32 15 - Canon iP5200R | iP5200R Setup Guide - Page 18
the manuals provided with those products, or contact their manufacturers. On Firewalls A firewall is a system that prevents unauthorized access to a local network from the outside. When setting up the printer for a use over a network, disable the firewall of your security software during the setup - Canon iP5200R | iP5200R Setup Guide - Page 19
to the manual provided with the access point or contact its manufacturer. • If Stealth (closed network) or ANY-Rejection feature is enabled We recommend you to disable it before entering setup. • If MAC address filtering is enabled We recommend that you register the printer's MAC address to the - Canon iP5200R | iP5200R Setup Guide - Page 20
and the Computer (Windows) Installing the Software If the following screen appears automatically, click Cancel to quit the screen, turn off the printer, and remove the USB cable, then resume setup. Re-insert the Setup Software & User's Guide CDROM. 1 Place the Setup Software & User's Guide CD-ROM in - Canon iP5200R | iP5200R Setup Guide - Page 21
, then follow the instructions on the screen. Move the cursor over items to display explanations of each application below. 4 Read the License Agreement carefully and click Yes. Installation of the printer driver, On-screen manual, and application software will begin. The Setup Method dialog box - Canon iP5200R | iP5200R Setup Guide - Page 22
for Use over Wireless LAN When you are setting up the printer to be used over wireless LAN (infrastructure mode), follow these steps to set up the printer and your computer. 1 In the Setup Method screen, select Set up the printer and the computer and click Next. 2 When the screen shown on the left - Canon iP5200R | iP5200R Setup Guide - Page 23
recognized, click Help and follow instructions on how to solve the problem. 4 When the Setup Preparations dialog box is displayed, confirm that preparation is complete, then click Next. If the printer's network settings are already configured, the Setup Environment Confirmation dialog box appears - Canon iP5200R | iP5200R Setup Guide - Page 24
Key (WEP key or Passphrase) set to the access point and click Connect. For details, see "About Network Key (Windows)/ Network Password (Macintosh)" in "Troubleshooting" on page 53. ‰ If An access point could not be detected is displayed Click OK to display Access Points dialog box. For details - Canon iP5200R | iP5200R Setup Guide - Page 25
see "Changing the port name" in "Troubleshooting" on page 61. 9 Place the printer in the location where you will use it, then turn it on. 10 Click Next in the Connection Performance Measurement examine the detailed status of the communication link after setup by using the Canon IJ Network Tool. 23 - Canon iP5200R | iP5200R Setup Guide - Page 26
link. • To check whether the new location is better, click Remesurement. Measurement of the communication status is performed again. • When any message on Overall network performance appears in the measurement results, rearrange the printer and other network devices following the instructions on the - Canon iP5200R | iP5200R Setup Guide - Page 27
is not recognized, click Help and follow its instructions. 4 When the Setup Preparations dialog box is displayed, confirm that preparation is complete, then click Next. If the printer's network settings are already configured, the Setup Environment Confirmation dialog box appears asking you for - Canon iP5200R | iP5200R Setup Guide - Page 28
setup" in "Troubleshooting" on page 60. 6 When the screen shown on the left appears, connect the printer to the network devices such as hubs with a LAN cable and click Yes. Then click Next. Connection may vary depending on your network setup. 7 Setup automatically detects the printer. The iP5200R - Canon iP5200R | iP5200R Setup Guide - Page 29
, click OK. Setting Up for Use with USB Connection When you are setting up the printer to be used as a standalone printer with USB connection, follow these steps. 1 In the Setup Method screen, select Use the printer via USB and click Next. 2 When the screen shown on the left appears, connect the - Canon iP5200R | iP5200R Setup Guide - Page 30
. Perform this setup procedure after installing the software. • If MAC or IP address filtering is configured to restrict access to the printer, make sure beforehand that the details of the client computer you are setting up are also registered. To do this, use the Canon IJ Network Tool on a computer - Canon iP5200R | iP5200R Setup Guide - Page 31
. • For how to confirm Windows XP Service Pack versions, see "Confirming the version of Windows XP" in "Troubleshooting" on page 62. • Some programs that switch the network environment depending on your environment will enable a firewall by default. Check the settings of any such software. 29 - Canon iP5200R | iP5200R Setup Guide - Page 32
box, and click Next. 5 Click Finish in the Setup Completion dialog box. If you changed the port name when setting up the printer from another computer, that name is displayed in Printer Model. For details, see "Changing the port name" in "Troubleshooting" on page 61. The Print Head Alignment dialog - Canon iP5200R | iP5200R Setup Guide - Page 33
. • To view the On-screen Manual, double-click the iP5200R On-screen Manual shortcut icon on the desktop, or click Start and select All Programs (or Programs), Canon iP5200R Manual and iP5200R On-screen Manual. • Microsoft Internet Explorer® 5.0 or later must be installed to view the On-screen - Canon iP5200R | iP5200R Setup Guide - Page 34
Setting Up the Printer and the Computer (Macintosh) Installing the Software 1 Place the Setup Software & User's Guide CD-ROM in the CD-ROM drive. If the CD-ROM does not run automatically, doubleclick the CD-ROM icon on the desktop. 2 Double-click the Setup icon. 3 When the Authenticate screen - Canon iP5200R | iP5200R Setup Guide - Page 35
on-screen instructions to register your product. When the Print Head Alignment Recommended screen appears, click Next. 7 When the screen shown on the left appears, click Restart. When the computer restarts, Canon IJ Network Tool will start up. The next step depends on whether using the printer for - Canon iP5200R | iP5200R Setup Guide - Page 36
computer over a LAN • "Setting Up an Additional Computer to Use a Printer Already Connected to a Network" on page 43. To also enable to use over a wired or wireless LAN • "First-time Setup for Use over Wireless LAN" on page 34. • "First-time Setup for Use over Wired LAN" on page 38. To use a USB - Canon iP5200R | iP5200R Setup Guide - Page 37
Setup from the Canon IJ Network Tool pop-up menu and iP5200R in Printers, then click OK. If Canon IJ Network Tool does not start automatically, select Library - Printers - Canon - IJPrinter - Utilities - Canon IJ Network Tool. • If the The printer could not be detected message is displayed, check - Canon iP5200R | iP5200R Setup Guide - Page 38
details, see "About Network Key (Windows)/ Network Password (Macintosh)" in "Troubleshooting" on page 53. Troubleshooting" on page 52. 6 Setup automatically detects the printer. The iP5200R connected with a USB cable is detected automatically. ‰ When the printer is detected automatically The printer - Canon iP5200R | iP5200R Setup Guide - Page 39
the communication status is performed again. • When any message on Overall network performance appears in the measurement results, rearrange the printer and other network devices following the instructions on the screen. The Printer Setup Utility (Printer Center on Mac OS X v.10.2) will start up. 37 - Canon iP5200R | iP5200R Setup Guide - Page 40
11 Click Add. 12 Select CANON IJ Network from the pop-up menu, select iP5200R from the list of printers, and click Add. The alphanumeric string after the printer name is its MAC address. 13 Confirm that your printer is added to the list of printers. 14 Perform print head alignment before you start - Canon iP5200R | iP5200R Setup Guide - Page 41
Setup from the Canon IJ Network Tool pop-up menu and iP5200R in Printers, then click OK. If Canon IJ Network Tool does not start automatically, select Library - Printers - Canon - IJPrinter - Utilities - Canon IJ Network Tool. • If the The printer could not be detected message is displayed, check - Canon iP5200R | iP5200R Setup Guide - Page 42
, refer to "The Set Printer IP Address / Printer IP Address Setup dialog box is displayed during setup" in "Troubleshooting" on page 58. 7 When the screen shown on the left appears, remove the USB cable and click Finish. The Printer Setup Utility (Print Center on Mac OS X v.10.2) will start up - Canon iP5200R | iP5200R Setup Guide - Page 43
Select CANON IJ Network from the pop-up menu, select iP5200R from the list of printers, and click Add. The alphanumeric string after the printer name is its MAC address. 10 Confirm that your printer is added to the list of printers. 11 Perform print head alignment before you start using your printer - Canon iP5200R | iP5200R Setup Guide - Page 44
3 Select Setup from the Canon IJ Network Tool pop-up menu, and click Printer Setup Utility (Print Center on Mac OS X v.10.2). If Canon IJ Network Tool does not start automatically, select Applications from the Go menu, double-click the Utilities folder, double-click the Printer Setup Utility icon, - Canon iP5200R | iP5200R Setup Guide - Page 45
on the printer. 2 Select Setup from the Canon IJ Network Tool pop-up menu. If Canon IJ Network Tool does not start automatically, select Applications from the Go menu, double-click the Utilities folder, double-click the Printer Setup Utility icon, and then proceed to step 6. When using Mac OS X v.10 - Canon iP5200R | iP5200R Setup Guide - Page 46
Click Printer Setup Utility (Print Center on Mac OS X v.10.2). 5 When the screen shown on the left appears, click Cancel. 6 Click Add. 7 Select CANON IJ Network from the pop-up menu, select iP5200R from the list of printers, and click Add. • The alphanumeric string after the printer name is its MAC - Canon iP5200R | iP5200R Setup Guide - Page 47
in Printer List, click Add to add the printer. For details, refer to the Printer Setup Utility Help in the Mac Help. When using Mac OS X v.10.2, select your printer from the Name list and click Configure. 4 Select your printer from the Product list and click Maintenance. Canon IJ Printer Utility - Canon iP5200R | iP5200R Setup Guide - Page 48
automatically. The printer is now ready to use. • If the pattern is not printed successfully, refer to "Eleven Flashes" in "The ALARM Lamp Flashes Orange" of the User's Guide. • The pattern is printed in black and blue. To view the On-screen Manual, double-click the iP5200R On-screen Manual alias on - Canon iP5200R | iP5200R Setup Guide - Page 49
• Windows Me/Windows 98 → Properties • Windows 2000 → Main tab 3 Specify the required settings and click OK. • For details about the printer driver, refer to the Printer Driver Guide. • Click Instructions to view the Printer Driver Guide. If the On-screen Manual is not installed, Instructions is - Canon iP5200R | iP5200R Setup Guide - Page 50
Macintosh 1 From your application's File menu, select Page Setup. 2 Select your printer name from Format for. 3 Select the paper size to printer driver, refer to the Printer Driver Guide. • Click to view the Printer Driver Guide. If the On-screen Manual is not installed, the Printer Driver Guide - Canon iP5200R | iP5200R Setup Guide - Page 51
until it clicks into place and then its red lamp lights. Ensure that all the ink tanks are installed in the order directed by the label. The printer cannot be used unless all ink tanks are installed. 4 Put back the Inner Cover and close the Top Cover when finished. The ALARM lamp flashes orange - Canon iP5200R | iP5200R Setup Guide - Page 52
to "Troubleshooting" on the User's Guide and the Network Guide. Troubles in setup/connections ‰ Cannot connect to the access point (the access point is not detected), page 51 • The target access point is not detected, page 52 • Cannot connect to the target access point, page 52 • Using the printer - Canon iP5200R | iP5200R Setup Guide - Page 53
is possible. • The firewall feature of security software may prevent proper setup or communication over a network. When setting up the printer for use over a network, disable the firewall of your security software during the setup. If you are using Windows XP Service Pack 1 or earlier and you have - Canon iP5200R | iP5200R Setup Guide - Page 54
point For details, see "Checking if the computer and the printer (access point) can communicate with each other" in the Network Guide. 4 Unplug the access point from the power outlet and plug it in, then click Update. • Using your access point's utility software, check if your access point is - Canon iP5200R | iP5200R Setup Guide - Page 55
priority). How to set a network key/network password Problem About Network Key (Windows)/Network Password (Macintosh) Possible Cause and Measures An encryption key used in wireless networks. As using passwords, settings must match among the access point, the printer, and the computer. A WEP - Canon iP5200R | iP5200R Setup Guide - Page 56
key length, when the string "canon" is entered, an access WEP key in Network Key or Network Password on the manual provided with the access point, or consult its manufacturer. Select either TKIP (Basic Encryption) or AES (Secure Encryption) for the dynamic encryption method. This printer supports - Canon iP5200R | iP5200R Setup Guide - Page 57
by security software may prevent proper setup or communication over a network. When setting up the printer for use over a network, disable any firewall provided by security software during the setup. For details on firewalls, see "On Firewalls" on page 16. If you are using Windows XP Service Pack - Canon iP5200R | iP5200R Setup Guide - Page 58
a WEP key/Passphrase (WPA key) has not been set, a detailed settings dialog box is displayed. To change the settings, click the Configuration button in the Manual Setup dialog box. For details, refer to "About Network Key (Windows)/Network Password (Macintosh)" on page 53. 56 - Canon iP5200R | iP5200R Setup Guide - Page 59
Problem The Access Points dialog box is displayed during setup (Continued) Possible Cause and Measures Configuration The detailed settings dialog box is displayed. The network password (WEP) or the network the Manual Setup dialog box. For details, see "About Network Key (Windows)/Network Password - Canon iP5200R | iP5200R Setup Guide - Page 60
of the access point, then start the setup again. The Set Printer IP Address / Printer IP Address Setup dialog box is displayed during setup The following dialog box is displayed if no printer was detected on the network. Specify the IP address of the printer and click the Connect button to retry - Canon iP5200R | iP5200R Setup Guide - Page 61
during setup (Continued) Possible Cause and Measures (1) (2) (3) (1) TCP/IP Setting Select Get IP address automatically or Use next IP address. Select Get IP address automatically to search for the target printer automatically. If it fails, check the network settings and the network connection - Canon iP5200R | iP5200R Setup Guide - Page 62
Problem The Printer Network Setup dialog box is displayed during setup Possible Cause and Measures The Printer Network Setup dialog box is displayed in the following cases. - when you are re-setting a printer whose setup was canceled halfway - when you changed the network settings - when you are - Canon iP5200R | iP5200R Setup Guide - Page 63
the network Problem Checking the IP address or the MAC address of the printer Possible Cause and Measures To check the IP address or the MAC address of the printer, print out the printer setup information or use Canon IJ Network Tool. For information on how to print out the printer network setting - Canon iP5200R | iP5200R Setup Guide - Page 64
print out printer setting information. If it fails, use Canon IJ Network Tool or Network Configuration to confirm the network settings from the computer. If you are using Windows XP, you may need to confirm your system version to configure the network setting of your computer. To check the version - Canon iP5200R | iP5200R Setup Guide - Page 65
devices or Canon Bubble Jet Direct compatible cameras to the Direct Print Port of the printer. If you do so, electric shock, fire, or damage to the device could result. When producing photos with the digital device connected to the printer, it is advisable to use the AC adapter supplied with the - Canon iP5200R | iP5200R Setup Guide - Page 66
a mode of producing photos compliant with PictBridge before connecting the device. You may also have to turn on the device or select Play mode manually after connecting the device to the printer. Perform necessary operations according to the instruction manual supplied with your device. (1) Ensure - Canon iP5200R | iP5200R Setup Guide - Page 67
, refer to your device's instruction manual. About Image Data Format for Printing This printer accepts images* taken with a camera compatible with the Design rule for Camera File system and PNG files. * Exif2.21 compliant About "Paper size" and "Paper type" To print on Photo Paper Pro, select Fast - Canon iP5200R | iP5200R Setup Guide - Page 68
print photo stickers. When printing on sticker paper, select 10 x 15 cm / 4" x 6" in Paper size. *2 This size can be selected only for Canon PictBridge . About "Date/File No. print" By default, Off is selected for this printer. If you select an image which has had the shooting date embedded in it - Canon iP5200R | iP5200R Setup Guide - Page 69
and troubleshooting, refer to your device's manual. • For print error messages, refer to the User's Guide. Checking or Changing PictBridge Print Settings From the Printer You can change the printer's default PictBridge print settings, such as paper size and type. To do this, install the Canon Setup - Canon iP5200R | iP5200R Setup Guide - Page 70
Paper Plus Semi-gloss A4 size Glossy Photo Paper A4 size Glossy Photo Paper "Everyday Use" A4 size • For the digital camera operation method and troubleshooting, refer to your digital camera's manual. • For print error messages, refer to the User's Guide. • By operating the digital camera, you can - Canon iP5200R | iP5200R Setup Guide - Page 71
the RESUME/CANCEL button until the POWER lamp flashes six times, then release it. The information as follows is printed out. For details on the network setting information, refer to "Printing Out Network Setting Information" in the Network Guide. • Printer name • Firmware version • Wireless LAN - Canon iP5200R | iP5200R Setup Guide - Page 72
and select All programs (or Programs). (2) Select Canon IJ Network Tool, and then Canon IJ Network Tool. On Macintosh, follow the procedure below. (1) Start up Printer Setup Utility (when using Mac OS X v.10.2.x, Print Center). (2) Select the target printer and click the Utility button. (3) Select - Canon iP5200R | iP5200R Setup Guide - Page 73
los requisitos esenciales y cualesquiera otras disposiciones aplicables o exigibles de la Directiva 1999/5/CE. Canon PIXMA iP5200R 1999/5/ΕΚ. Par la présente Canon déclare que l'appareil PIXMA iP5200R est conforme aux exigences essentielles et aux autres dispositions pertinentes de la directive - Canon iP5200R | iP5200R Setup Guide - Page 74
Portuguese Slovenian Slovak Finnish Swedish Icelandic Norwegian Polish Canon declara que este PIXMA iP5200R está conforme com os requisitos essenciais e outras disposições da Directiva 1999/5/CE. Canon izjavlja, da je ta PIXMA iP5200R v skladu z bistvenimi zahtevami in ostalimi relevantnimi določ - Canon iP5200R | iP5200R Setup Guide - Page 75
/60Hz model Color Printer Model: K10253 ( installation. This equipment generates, uses and can radiate radio frequency energy and, if not installed and used in accordance with the instructions unless otherwise specified in the manual. If such changes or modifications should be made, you could be - Canon iP5200R | iP5200R Setup Guide - Page 76
The following ink tanks are compatible with this printer. For details on ink tank replacement, refer to "Replacing an Ink Tank" in this guide. QA7-3632-V01 XXXXXXXX ©CANON INC.2005 PRINTED IN THAILAND
-
 1
1 -
 2
2 -
 3
3 -
 4
4 -
 5
5 -
 6
6 -
 7
7 -
8
-
9
-
10
-
11
-
12
-
13
-
14
-
15
-
16
-
17
-
18
-
19
-
20
-
21
-
22
-
23
-
24
-
25
-
26
-
27
-
28
-
29
-
30
-
31
-
32
-
33
-
34
-
35
-
36
-
37
-
38
-
39
-
40
-
41
-
42
-
43
-
44
-
45
-
46
-
47
-
48
-
49
-
50
-
51
-
52
-
53
-
54
-
55
-
56
-
57
-
58
-
59
-
60
-
61
-
62
-
63
-
64
-
65
-
66
-
67
-
68
-
69
-
70
-
71
-
72
-
73
-
74
-
75
-
76
 |
 |

Setup Guide
QA7-3632-V01
BE