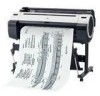
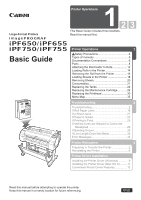
Canon iPF755 iPF650 655 750 755 Basic Guide Step1
Canon iPF755 - imagePROGRAF Color Inkjet Printer Manual
 |
UPC - 013803109740
View all Canon iPF755 manuals
Add to My Manuals
Save this manual to your list of manuals |
Canon iPF755 manual content summary:
- Canon iPF755 | iPF650 655 750 755 Basic Guide Step1 - Page 1
Relocation 3 Preparing to Transfer the Printer 2 Reinstalling the Printer 6 Printer Driver Installation Installing the Printer Driver (Windows 9 Installing the Printer Driver (Mac OS X) ......... 11 Convenient Printer Driver Features 13 Read this manual before attempting to operate the - Canon iPF755 | iPF650 655 750 755 Basic Guide Step1 - Page 2
Do not perform any operations or procedures other than as described in this manual. Doing so may result in unexpected accidents and can cause a fire or electrical shocks. Warning █ Printer location • Do not set up the printer in any location exposed to alcohol, thinner, or other volatile liquids. If - Canon iPF755 | iPF650 655 750 755 Basic Guide Step1 - Page 3
humidity or large amounts of dust, or exposed to direct sunlight, high temperature, or open flame. This could cause a fire or electrical shock. Use the printer location in an environment where temperature and humidity are within the ranges of 15°C to 30°C (59°F to 86°F) and 10 to 80% RH (with - Canon iPF755 | iPF650 655 750 755 Basic Guide Step1 - Page 4
, if a foreign object falls into or a liquid spills into the printer, press the Power button immediately to switch the printer off, unplug the printer power cable from the outlet, and then call for service. If you continue to use the printer, this could cause a fire or electrical shock. • Connect the - Canon iPF755 | iPF650 655 750 755 Basic Guide Step1 - Page 5
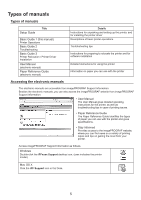
Types of manuals Types of manuals Title Setup Guide Basic Guide 1 (this manual) Printer Operations Basic Guide 2 Troubleshooting Basic Guide 3 Printer Relocation / Printer Driver Installation User Manual (electronic manual) Paper Reference Guide (electronic manual) Details Instructions for - Canon iPF755 | iPF650 655 750 755 Basic Guide Step1 - Page 6
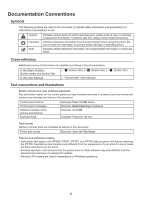
printer damage or operating errors. Indicates helpful reference information and supplemental information on particular topics. Cross-reference Additional sources of information are identified as follows in the documentation. In the Basic Guides: (Guide number and section title) In the User Manual - Canon iPF755 | iPF650 655 750 755 Basic Guide Step1 - Page 7
Canon Large Format Printer B digital device, instructions, manual. If such changes or modifications should be made, you could be required to stop operation of the equipment. Canon U.S.A. Inc. One Canon Plaza, Lake Success, NY 11042, U.S.A. Tel No. 516-328-5600 For CA, USA - Canon iPF755 | iPF650 655 750 755 Basic Guide Step1 - Page 8
. Open this cover to install the Printhead and remove any jammed paper from inside the printer, as needed. When loading the sheets , move the guide to match the paper size. A stand that holds the printer. Equipped with casters to facilitate moving it. (iPF750 and iPF755 only.) Load the roll on - Canon iPF755 | iPF650 655 750 755 Basic Guide Step1 - Page 9
detecting the Carriage position. Be careful not to touch this part when cleaning inside the Top Cover or clearing paper jams. When cleaning inside the printer under the Top Cover, use this brush to sweep away paper dust on the Platen. • Do not touch the Carriage Shaft (b) or Linear Scale - Canon iPF755 | iPF650 655 750 755 Basic Guide Step1 - Page 10
printer on and off. The power button is lit when the printer is on or in Sleep mode. Cancels print jobs in progress and ends the ink drying period. Enables you to check instructions numerical input, press this button to move to another digit. Displays the screen before the current screen. Displays - Canon iPF755 | iPF650 655 750 755 Basic Guide Step1 - Page 11
Menu operations Navigate and perform menu operations on the control panel as follows. After the printer starts up, the Tab Selection screen is shown on the Display Screen. Information is organized in four tabs, and you can press control panel buttons - Canon iPF755 | iPF650 655 750 755 Basic Guide Step1 - Page 12
the correct attachment for the paper core. The printer comes equipped with the 2-Inch Paper Core problems. • For details on supported sizes and types of rolls, see "Paper Sizes" or the Paper Reference Guide. (→"Paper Sizes," User Manual), (→"Types of Paper," User Manual) • To view instructions - Canon iPF755 | iPF650 655 750 755 Basic Guide Step1 - Page 13
Attaching the Roll Holder to Rolls 2 Insert the respective attachments for the roll paper core on the Roll Holder and Holder Stopper. • Using rolls with a 2-inch paper core Holder Stopper (Left Side) Roll Holder (Right Side) Align the tips (a) of the 2-Inch Paper Core Attachment with the holes - Canon iPF755 | iPF650 655 750 755 Basic Guide Step1 - Page 14
as follows. • Before loading rolls, make sure the printer is clean inside the Top Cover and around the Ejection Guide. If these areas are dirty, we recommend cleaning them in advance. (→ , If Paper is Soiled) 1 Press the Load button. OK 2 Press ▲ or ▼ to select Load - Canon iPF755 | iPF650 655 750 755 Basic Guide Step1 - Page 15
Holder Slot, keeping it level. Accidentally loading the Roll Holder crooked may damage the printer or Roll Holder when paper is advanced. Be careful not to pinch your fingers , see the Paper Reference Guide. (→ , Types of Manuals) 8 Holding it at the positions indicated, close the Roll Cover. 15 - Canon iPF755 | iPF650 655 750 755 Basic Guide Step1 - Page 16
Removing the Roll from the Printer Remove rolls from the printer as follows. 1 On the Tab Selection screen of the Control Panel, press ◄ or ► to select of roll paper left. (→"Keeping Track of the Amount of Roll Paper Left," User Manual) 5 Positioning your hands as shown, open the Roll Cover. 16 - Canon iPF755 | iPF650 655 750 755 Basic Guide Step1 - Page 17
Printer 7 Holding the Roll Holder flange (a), remove the holder from the Roll Holder Slot. a • See the following procedure for instructions on removing the Roll Holder from the roll. (→"Removing the Roll Holder from Rolls," User Manual) 8 Holding it at - Canon iPF755 | iPF650 655 750 755 Basic Guide Step1 - Page 18
Loading Sheets in the Printer Load sheets in the printer as follows. • One sheet of paper can be loaded in the Paper Feed Slot at a then press the OK button. Remove the paper and go to the next step. 2 Slide the Width Guide (a) to align it with the mark for the size of paper you will load. a 18 - Canon iPF755 | iPF650 655 750 755 Basic Guide Step1 - Page 19
a tone. Loading Sheets in the Printer a 4 Move the Width Guide (a) carefully to match the size of paper loaded. Set the Width Guide against the edge of the paper to and then press the OK button. The printer now starts feeding the paper. • For details on types of paper to select, see the - Canon iPF755 | iPF650 655 750 755 Basic Guide Step1 - Page 20
Removing Sheets This section describes how to remove sheets from the printer. 1 On the Tab Selection screen of the Control Panel, press . The paper is ejected from the front of the printer. 5 Holding the paper, push the Release Lever back and remove the sheet. 6 Pull the Release Lever forward. - Canon iPF755 | iPF650 655 750 755 Basic Guide Step1 - Page 21
Consumables Ink Tanks Ink tanks that can be used in the printer are labeled with a white letter "J" in a black circle on the side. When purchasing ink tanks, make sure a "J" is printed on the label, along with the - Canon iPF755 | iPF650 655 750 755 Basic Guide Step1 - Page 22
printer. Do not install used ink tanks in another model of printer. This will prevent correct ink level detection, which may damage the printer or cause other problems case, go to "Remove the ink tanks" without following the instructions in "Access the menu for ink tank replacement." Printing OK: - Canon iPF755 | iPF650 655 750 755 Basic Guide Step1 - Page 23
Access the menu for ink tank replacement Replacing Ink Tanks • This step is not necessary if a message requests you to replace ink tanks. Check the message on the Display Screen and press the OK button. Remove the Ink Tank at this point. 1 On the Tab Selection screen of the Control Panel, press - Canon iPF755 | iPF650 655 750 755 Basic Guide Step1 - Page 24
rotating the Ink Tank upside-down and right side up repeatedly. • Do not remove and agitate ink tanks that have already been installed in the printer. Ink may leak out. • If you do not agitate the Ink Tank, the ink may settle, which may affect printing quality. 2 Open the pouch and - Canon iPF755 | iPF650 655 750 755 Basic Guide Step1 - Page 25
3 Press the OK button and insert the Ink Tank into the holder facing as shown, with the ink holes down. Replacing Ink Tanks • Ink tanks cannot be loaded in the holder if the color or orientation is incorrect. If the Ink Tank does not fit in the holder, do not force it into the holder. Make sure - Canon iPF755 | iPF650 655 750 755 Basic Guide Step1 - Page 26
Maintenance Cartridge except to replace it. Make sure the printer is ready for maintenance cartridge replacement Maintenance Cartridge replacement is go to "Replace the maintenance cartridge" without following the instructions in "Access the menu for maintenance cartridge replacement." Maintenance - Canon iPF755 | iPF650 655 750 755 Basic Guide Step1 - Page 27
Replacing the Maintenance Cartridge Access the menu for maintenance cartridge replacement 1 On the Tab Selection screen of the Control Panel, press ◄ or ► to select the Settings/Adj. tab ( ). Printing OK:Setting/Adj. Menu Maint. cart. The level is low • If the Tab Selection screen is not - Canon iPF755 | iPF650 655 750 755 Basic Guide Step1 - Page 28
store it at an angle, ink may leak and cause stains. • The remaining Maintenance Cartridge capacity is recorded on each printer. Do not install a used Maintenance Cartridge in another printer. 4 Keep the used maintenance cartridge level as you put it in the plastic bag. Expel excess air from the - Canon iPF755 | iPF650 655 750 755 Basic Guide Step1 - Page 29
7 Close the Maintenance Cartridge Cover. Replacing the Maintenance Cartridge 8 Press the OK button. OK The printer now initializes the Maintenance Cartridge. 29 - Canon iPF755 | iPF650 655 750 755 Basic Guide Step1 - Page 30
B from the printer menu • If the Display Screen indicates Open top cover and replace the printhead. • If your Canon dealer has advised you because of the cutting method selected, cut it manually and remove it. (→"Cutting Roll Paper After Printing," User Manual) 2 Clean inside the Top Cover. (→ - Canon iPF755 | iPF650 655 750 755 Basic Guide Step1 - Page 31
. Ink is now filled. After about two minutes, a message is shown on the Display Screen instructing you to open the Top Cover. Replace the printhead 1 Open the Top Cover. Instructions are now shown on the Display Screen regarding Printhead replacement. • During Printhead replacement, do not move - Canon iPF755 | iPF650 655 750 755 Basic Guide Step1 - Page 32
, use a damp cloth that you have wrung out completely to wipe it clean. • Never touch the metal contacts of the Carriage. This may damage the printer. 3 Pull the Printhead Fixer Lever forward all the way to open it completely. 4 Pull up the Printhead Fixer Cover to open it completely. 5 Remove - Canon iPF755 | iPF650 655 750 755 Basic Guide Step1 - Page 33
metal contacts (c). This may damage the Printhead and affect printing quality. • Never touch the ink supply section (d). This may cause printing problems. a d c b • If you need to put a Printhead somewhere temporarily before installation, do not keep the nozzles and metal contacts facing down. If - Canon iPF755 | iPF650 655 750 755 Basic Guide Step1 - Page 34
in place. 10 Push the Printhead Fixer Lever toward the back of the printer until it clicks. 11 Close the Top Cover. Ink now fills the head Print > On in the Control Panel menu. In this case, follow the instructions displayed for Printhead adjustment. If Rep.P.head Print is Off, perform Head Posi. - Canon iPF755 | iPF650 655 750 755 Basic Guide Step1 - Page 35
the defaults. For details on settings values, refer to the User Manual. To access tab menus, press the Menu button to display the information on the types of paper the printer supports, refer to the Paper Reference Guide. The paper type setting in the printer driver and related software (as well as - Canon iPF755 | iPF650 655 750 755 Basic Guide Step1 - Page 36
OK Back OK Back OK Back OK Back OK Back OK Back Test Print Adjust Printer G Head Posi. Adj. Head Inc. Adj. Feed Priority Maintenance GL2 Replot *15 cart Head Info Quality Manager Paper Manager Auto(Standard) Auto(Advanced) Manual *5 Adj. Priority Adj. Quality *6 Adjust Length *7 Head - Canon iPF755 | iPF650 655 750 755 Basic Guide Step1 - Page 37
NetWare *20 AppleTalk *20 Ethernet Driver *20 IPv6 IPv6 Support IPv6 StlessAddrs DHCPv6 NetWare Frame Type *10 Print Service *10 On Off Auto Detect Comm 20 g Return Defaults *20 *9: Not shown if you have set IPv4 Mode to Manual. *10: Not shown if you have set NetWare to Off. *14: Available - Canon iPF755 | iPF650 655 750 755 Basic Guide Step1 - Page 38
for administrators only. Menu When Printing Press the Menu button when printing is paused to display this menu. Set./Adj. Menu OK Adj. Fine Feed Printer Info Back *13 Paper Info Ink Info Head Info System Info Error Log Other Counter *13: Available when you have specified Feed Priority > Adj - Canon iPF755 | iPF650 655 750 755 Basic Guide Step1 - Page 39
Core Attachment 12 3-Inch Paper Core Attachment 12 c Carriage 9, 31, 32 d Display Screen 10 e Ejection Guide 8 Electronic manuals (User Manual 5, 6 f Flange 13 h Holder Stopper 8, 12 i imagePROGRAF Support Information 5 Ink Lamp 23, 25 Ink Tank Cover 8, 23, 25 Ink Tank Lock Lever 23, 25 - Canon iPF755 | iPF650 655 750 755 Basic Guide Step1 - Page 40
. 30-2, Shimomaruko 3-chome, Ohta-ku, Tokyo 146-8501, Japan Canon U.S.A., Inc. One Canon Plaza, Lake Success, NY 11042 U.S.A Canon Europa N.V. Bovenkerkerweg 59-61 1185 XB Amstelveen The Netherlands Canon (China) Co., Ltd. 15F Jinbao Building No.89 Jinbao Street, Dongcheng District, Beijing 100005
-
 1
1 -
 2
2 -
 3
3 -
 4
4 -
 5
5 -
 6
6 -
 7
7 -
8
-
9
-
10
-
11
-
12
-
13
-
14
-
15
-
16
-
17
-
18
-
19
-
20
-
21
-
22
-
23
-
24
-
25
-
26
-
27
-
28
-
29
-
30
-
31
-
32
-
33
-
34
-
35
-
36
-
37
-
38
-
39
-
40
 |
 |

1
Printer Operations
Basic Guide
Read this manual before attempting to operate the printer.
Keep this manual in a handy location for future referencing.
Printer Operations
1
This Basic Guide includes three booklets.
Large-Format Printers
2
Troubleshooting
3
Printer Relocation
Printer Driver Installation
ENG
Read this manual
fi
rst.
Safety Precautions
........................................
2
Types of manuals
.............................................
5
Documentation Conventions
............................
6
Parts
.................................................................
8
Attaching the Roll Holder to Rolls
...................
12
Loading Rolls in the Printer
............................
14
Removing the Roll from the Printer
................
16
Loading Sheets in the Printer
.........................
18
Removing Sheets
...........................................
20
Consumables
..................................................
21
Replacing Ink Tanks
.......................................
22
Replacing the Maintenance Cartridge
............
26
Replacing the Printhead
.................................
30
Menu Map
.......................................................
35
Troubleshooting
................................................
2
If Roll Paper Jams
..........................................
18
If a Sheet Jams
...............................................
21
If Paper is Soiled
............................................
23
If Printing is Faint
............................................
25
If Vertical Lines are Warped or Colors are
Misaligned
..................................................
26
If Banding Occurs
...........................................
28
If Line Length Does Not Match
.......................
30
Error Messages
..............................................
32
Preparing to Transfer the Printer
......................
2
Reinstalling the Printer
.....................................
6
Installing the Printer Driver (Windows)
.............
9
Installing the Printer Driver (Mac OS X)
.........
11
Convenient Printer Driver Features
................
13