Canon imageCLASS 2300 Reference Guide for imageCLASS 2300 - Page 121
Press [F2], or [F3], to confirm the count information, press [BACK].
 |
View all Canon imageCLASS 2300 manuals
Add to My Manuals
Save this manual to your list of manuals |
Page 121 highlights
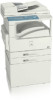
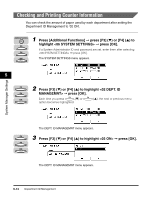
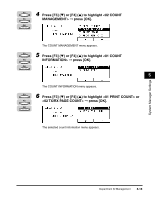
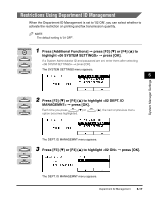
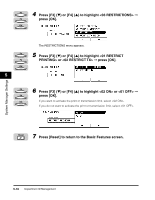
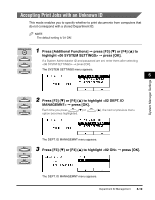
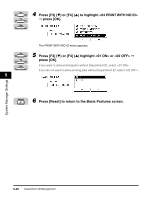
F2 7 Press [F2] (M) or [F3] (L) to confirm the count information © F3 press [BACK]. BACK The count information is shown, from left to right: The Department ID, the counted pages, and the maximum page number. If the maximum page number is displayed as , the maximum limit has not been specified. If it is displayed as a space, DEPT. ID MANAGEMENT has been set to '01 OFF'. (See "Restrictions Using Department ID Management," on p. 5-17.) System Manager Settings The COUNT INFORMATION menu returns. NOTE 5 If the department whose information you want to check is not displayed, press F2 (M) or F3 (L) until it is displayed. If a job without ID is sent while the Department ID Management display is shown, only the print count is displayed at the end of the count information. If you want to display the print or transmission limit, Restrict Printing or Restrict TX, respectively, must be set to '02 ON' in the RESTRICTIONS menu. (See "Restrictions Using Department ID Management," on p. 5-17.) Reset 8 Press [Reset] to return to the Basic Features screen. NOTE If you select in step 5, and then select , the counter information is deleted. 5-16 Department ID Management
-
 1
1 -
2
-
3
-
4
-
5
-
6
-
7
-
8
-
9
-
10
-
11
-
12
-
13
-
14
-
15
-
16
-
17
-
18
-
19
-
20
-
21
-
22
-
23
-
24
-
25
-
26
-
27
-
28
-
29
-
30
-
31
-
32
-
33
-
34
-
35
-
36
-
37
-
38
-
39
-
40
-
41
-
42
-
43
-
44
-
45
-
46
-
47
-
48
-
49
-
50
-
51
-
52
-
53
-
54
-
55
-
56
-
57
-
58
-
59
-
60
-
61
-
62
-
63
-
64
-
65
-
66
-
67
-
68
-
69
-
70
-
71
-
72
-
73
-
74
-
75
-
76
-
77
-
78
-
79
-
80
-
81
-
82
-
83
-
84
-
85
-
86
-
87
-
88
-
89
-
90
-
91
-
92
-
93
-
94
-
95
-
96
-
97
-
98
-
99
-
100
-
101
-
102
-
103
-
104
-
105
-
106
-
107
-
108
-
109
-
110
-
111
-
112
-
113
-
114
-
115
-
 116
116 -
 117
117 -
 118
118 -
 119
119 -
 120
120 -
 121
121 -
 122
122 -
 123
123 -
 124
124 -
 125
125 -
 126
126 -
127
-
128
-
129
-
130
-
131
-
132
-
133
-
134
-
135
-
136
-
137
-
138
-
139
-
140
-
141
-
142
-
143
-
144
-
145
-
146
-
147
-
148
-
149
-
150
-
151
-
152
-
153
-
154
-
155
-
156
-
157
-
158
-
159
-
160
-
161
-
162
-
163
-
164
-
165
-
166
-
167
-
168
-
169
-
170
-
171
-
172
-
173
-
174
-
175
-
176
-
177
-
178
-
179
-
180
-
181
-
182
-
183
-
184
-
185
-
186
-
187
-
188
-
189
-
190
-
191
-
192
-
193
-
194
-
195
-
196
-
197
 |
 |