Canon imageCLASS D1150 imageCLASS D1180/D1170/D1150/D1120 Basic Operation Guid - Page 247
Paper Jams, <paper Jam/lift Panel To Open> Or <output
 |
View all Canon imageCLASS D1150 manuals
Add to My Manuals
Save this manual to your list of manuals |
Page 247 highlights
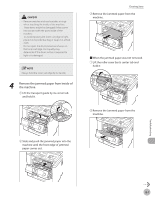
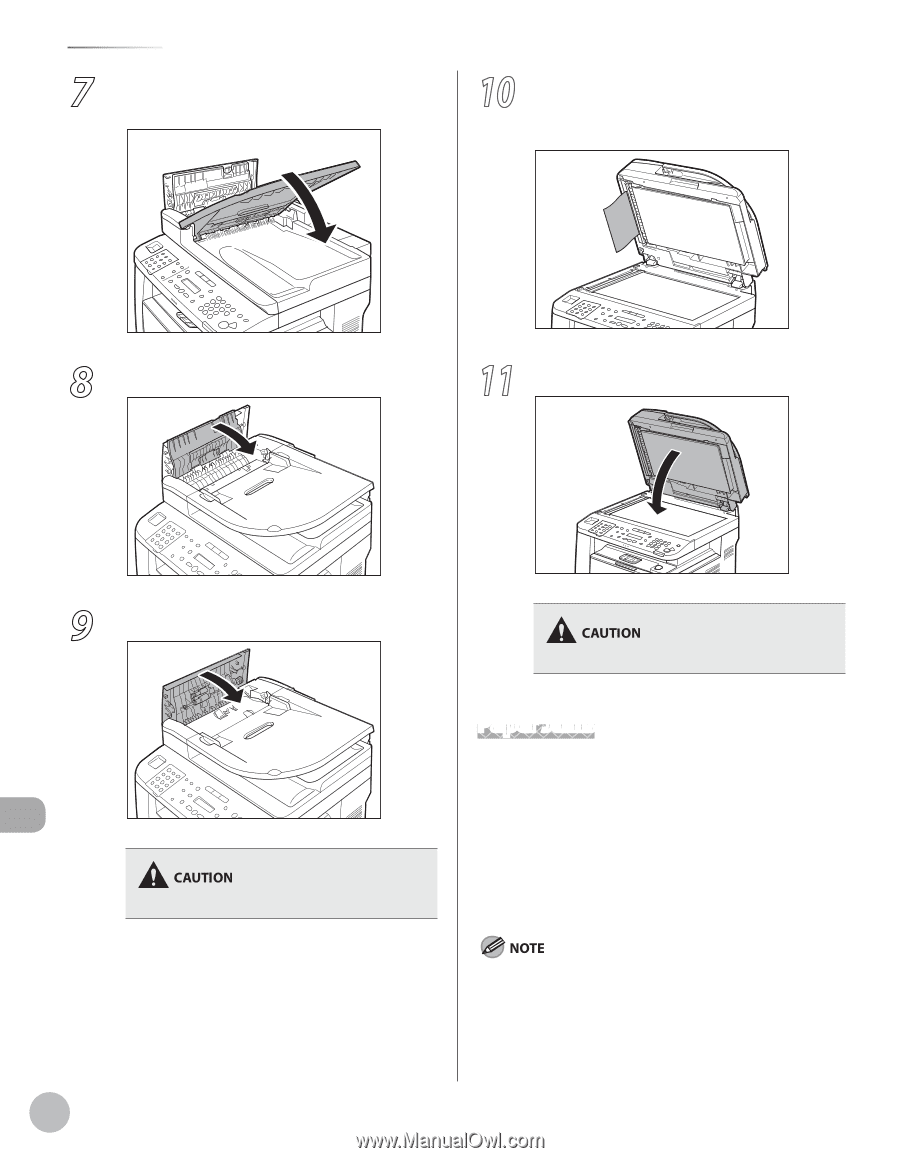
Clearing Jams 7 Return the document feeder tray to the original position. 10 Open the ADF and then hold both sides of any jammed documents and gently pull them out. Troubleshooting 8 Close the inner cover. 11 Close the ADF. 9 Close the ADF cover. Be careful not to get your fingers caught. 12-4 Be careful not to get your fingers caught. Paper Jams When , , or appears on the display, remove the jammed paper from the machine first, then from the paper cassette or multi-purpose tray if necessary. If the error messages still remains after having removed the jammed paper, open and close the front cover to reset the machine.
-
 1
1 -
2
-
3
-
4
-
5
-
6
-
7
-
8
-
9
-
10
-
11
-
12
-
13
-
14
-
15
-
16
-
17
-
18
-
19
-
20
-
21
-
22
-
23
-
24
-
25
-
26
-
27
-
28
-
29
-
30
-
31
-
32
-
33
-
34
-
35
-
36
-
37
-
38
-
39
-
40
-
41
-
42
-
43
-
44
-
45
-
46
-
47
-
48
-
49
-
50
-
51
-
52
-
53
-
54
-
55
-
56
-
57
-
58
-
59
-
60
-
61
-
62
-
63
-
64
-
65
-
66
-
67
-
68
-
69
-
70
-
71
-
72
-
73
-
74
-
75
-
76
-
77
-
78
-
79
-
80
-
81
-
82
-
83
-
84
-
85
-
86
-
87
-
88
-
89
-
90
-
91
-
92
-
93
-
94
-
95
-
96
-
97
-
98
-
99
-
100
-
101
-
102
-
103
-
104
-
105
-
106
-
107
-
108
-
109
-
110
-
111
-
112
-
113
-
114
-
115
-
116
-
117
-
118
-
119
-
120
-
121
-
122
-
123
-
124
-
125
-
126
-
127
-
128
-
129
-
130
-
131
-
132
-
133
-
134
-
135
-
136
-
137
-
138
-
139
-
140
-
141
-
142
-
143
-
144
-
145
-
146
-
147
-
148
-
149
-
150
-
151
-
152
-
153
-
154
-
155
-
156
-
157
-
158
-
159
-
160
-
161
-
162
-
163
-
164
-
165
-
166
-
167
-
168
-
169
-
170
-
171
-
172
-
173
-
174
-
175
-
176
-
177
-
178
-
179
-
180
-
181
-
182
-
183
-
184
-
185
-
186
-
187
-
188
-
189
-
190
-
191
-
192
-
193
-
194
-
195
-
196
-
197
-
198
-
199
-
200
-
201
-
202
-
203
-
204
-
205
-
206
-
207
-
208
-
209
-
210
-
211
-
212
-
213
-
214
-
215
-
216
-
217
-
218
-
219
-
220
-
221
-
222
-
223
-
224
-
225
-
226
-
227
-
228
-
229
-
230
-
231
-
232
-
233
-
234
-
235
-
236
-
237
-
238
-
239
-
240
-
241
-
 242
242 -
 243
243 -
 244
244 -
 245
245 -
 246
246 -
 247
247 -
 248
248 -
 249
249 -
 250
250 -
 251
251 -
 252
252 -
253
-
254
-
255
-
256
-
257
-
258
-
259
-
260
-
261
-
262
-
263
-
264
-
265
-
266
-
267
-
268
-
269
-
270
-
271
-
272
-
273
-
274
-
275
-
276
-
277
-
278
-
279
-
280
-
281
-
282
-
283
-
284
-
285
-
286
-
287
-
288
-
289
-
290
-
291
-
292
-
293
-
294
-
295
-
296
-
297
-
298
-
299
-
300
-
301
-
302
-
303
-
304
-
305
 |
 |
12-4
Troubleshooting
Clearing Jams
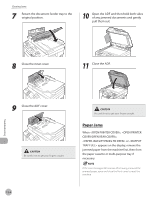
7
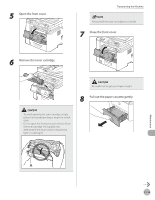
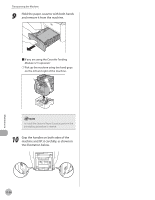
Return the document feeder tray to the
original position.
8
Close the inner cover.
9
Close the ADF cover.
Be careful not to get your fingers caught.
10
Open the ADF and then hold both sides
of any jammed documents and gently
pull them out.
11
Close the ADF.
Be careful not to get your fingers caught.
Paper Jams
When <OPEN PRINTER COVER>, <OPEN PRINTER
COVER/OPEN REAR COVER>,
<PAPER JAM/LIFT PANEL TO OPEN> or <OUTPUT
TRAY FULL> appears on the display, remove the
jammed paper from the machine first, then from
the paper cassette or multi-purpose tray if
necessary.
If the error messages still remains after having removed the
jammed paper, open and close the front cover to reset the
machine.