Canon imageCLASS D420 imageCLASS D480 Basic Operation Guide - Page 106
Setting the Current Date and Time, Setting the Type of Telephone Line, to select <FAX
 |
View all Canon imageCLASS D420 manuals
Add to My Manuals
Save this manual to your list of manuals |
Page 106 highlights
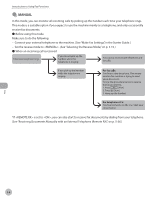
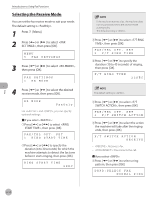
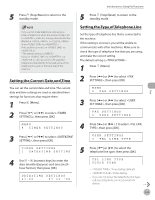
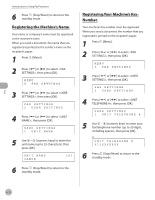
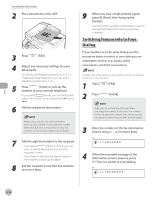
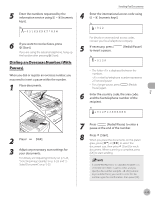
Fax 5 Press [Stop/Reset] to return to the standby mode. If you cannot make telephone calls using an external telephone when the receive mode is set to , make the settings described below. [MENU] → → → set to . If the problem persists, set to . * The default setting is . If you set to or , do not connect the supplied telephone cable directly to the wall jack and the telephone line jack on the back side of the machine. Setting the Current Date and Time You can set the current date and time. The current date and time settings are used as standard timer settings for functions that require them. 1 Press [Menu]. 2 Press [ ] or [ ] to select , then press [OK]. MENU 8 TIMER SETTINGS 3 Press [ ] or [ ] to select , then press [OK]. TIMER SETTINGS 1 DATE&TIME SETTING 4 Use - [numeric keys] to enter the date (month/day/year) and time (in 24hour format), then press [OK]. DATE&TIME SETTINGS 17:50 07 31 '08 Introduction to Using Fax Functions 5 Press [Stop/Reset] to return to the standby mode. Setting the Type of Telephone Line Set the type of telephone line that is connected to the machine. If this setting is incorrect, you will be unable to communicate with other machines. Make sure to check the type of telephone line that you are using, and make the correct setting. The default setting is . 1 Press [Menu]. 2 Press [ ] or [ ] to select , then press [OK]. MENU 5 FAX SETTINGS 3 Press [ ] or [ ] to select , then press [OK]. FAX SETTINGS 2 USER SETTINGS 4 Press [ ] or [ > ] to select , then press [OK]. USER SETTINGS 3 TEL LINE TYPE 5 Press [ ] or [ ] to select the telephone line type, then press [OK]. TEL LINE TYPE TOUCH TONE - : Tone dialing (default) - : Pulse dialing - If you do not know the telephone line type, call your telephone service provider for details. 5-11
-
 1
1 -
2
-
3
-
4
-
5
-
6
-
7
-
8
-
9
-
10
-
11
-
12
-
13
-
14
-
15
-
16
-
17
-
18
-
19
-
20
-
21
-
22
-
23
-
24
-
25
-
26
-
27
-
28
-
29
-
30
-
31
-
32
-
33
-
34
-
35
-
36
-
37
-
38
-
39
-
40
-
41
-
42
-
43
-
44
-
45
-
46
-
47
-
48
-
49
-
50
-
51
-
52
-
53
-
54
-
55
-
56
-
57
-
58
-
59
-
60
-
61
-
62
-
63
-
64
-
65
-
66
-
67
-
68
-
69
-
70
-
71
-
72
-
73
-
74
-
75
-
76
-
77
-
78
-
79
-
80
-
81
-
82
-
83
-
84
-
85
-
86
-
87
-
88
-
89
-
90
-
91
-
92
-
93
-
94
-
95
-
96
-
97
-
98
-
99
-
100
-
 101
101 -
 102
102 -
 103
103 -
 104
104 -
 105
105 -
 106
106 -
 107
107 -
 108
108 -
 109
109 -
 110
110 -
 111
111 -
112
-
113
-
114
-
115
-
116
-
117
-
118
-
119
-
120
-
121
-
122
-
123
-
124
-
125
-
126
-
127
-
128
-
129
-
130
-
131
-
132
-
133
-
134
-
135
-
136
-
137
-
138
-
139
-
140
-
141
-
142
-
143
-
144
-
145
-
146
-
147
-
148
-
149
-
150
-
151
-
152
-
153
-
154
-
155
-
156
-
157
-
158
-
159
-
160
-
161
-
162
-
163
-
164
-
165
-
166
-
167
-
168
-
169
-
170
-
171
-
172
-
173
-
174
-
175
-
176
-
177
-
178
-
179
-
180
-
181
-
182
-
183
-
184
-
185
-
186
-
187
-
188
-
189
-
190
-
191
-
192
-
193
-
194
-
195
-
196
-
197
-
198
-
199
-
200
-
201
-
202
-
203
-
204
-
205
-
206
-
207
-
208
-
209
-
210
-
211
-
212
-
213
-
214
-
215
-
216
-
217
-
218
-
219
-
220
-
221
-
222
-
223
-
224
-
225
-
226
-
227
-
228
-
229
-
230
-
231
-
232
-
233
-
234
-
235
-
236
 |
 |