Canon imageCLASS D420 imageCLASS D480 Basic Operation Guide - Page 111
Basic Methods for Sending PC Faxes, Recipient List]. - driver for windows 7
 |
View all Canon imageCLASS D420 manuals
Add to My Manuals
Save this manual to your list of manuals |
Page 111 highlights
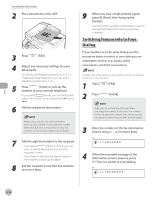
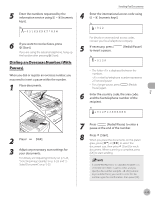
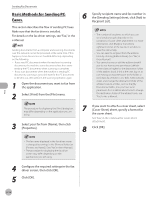
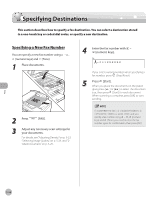
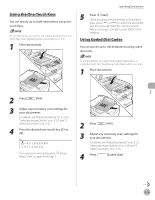
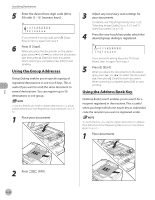
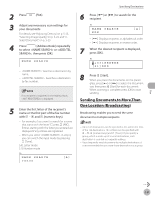
Fax Sending Fax Documents Basic Methods for Sending PC Faxes This section describes the flow of sending PC faxes. Make sure that the fax driver is installed. For details on the fax driver settings, see "Fax," in the e-Manual. Sending documents from a computer and scanning documents over the network cannot be processed at the same time. If this happens, these documents are handled differently depending on the following: - If you send PC documents when the machine is scanning documents, the machine scans documents first, then starts sending the PC documents when scanning is complete. - If you scan documents when the machine is sending PC documents, scanning is canceled. Wait for the PC documents to be sent out, then perform the scanning operation again. 1 Open the document you want to fax from the application. 2 Select [Print] from the [File] menu. The procedure for displaying the [Print] dialog box may differ depending on the application you are using. 3 Select your fax from [Name], then click [Properties]. 6 Specify recipient name and fax number in the [Sending Settings] sheet, click [Add to Recipient List]. - The number of recipients to which you can send simultaneously depends on the conditions of cover sheet attachment. For more information, click [Help] in the bottom righthand corner of the fax driver window to view the online help. - You can select a recipient from the address book by clicking [Address Book]. (See "Fax," in the e-Manual.) - You cannot access or edit the address book if you do not have access permission (default: Power Users or higher) to the destination folder of the address book. If this is the case, log on as user having access permission to the folder, or click [Specify a Folder] in the [Edit Address Book] sheet, and change the destination folder of the address book to a folder, such as the [My Documents] folder, that you have write permission for. For details about how to change the destination folder of the address book, see "Fax," in the e-Manual. 7 If you want to attach a cover sheet, select [Cover Sheet] sheet, specify a format for the cover sheet. See "Fax," in the e-Manual for cover sheet attachment. 8 Click [OK]. - The fax name displayed in the fax driver screen is changed by settings in the [Printers] folder (or [Printers and Faxes]). (See "Fax," in the e-Manual.) - The procedure for displaying the fax driver screen may differ depending on the applications you are using. 4 Configure the required settings in the fax driver screen, then click [OK]. 5 Click [OK]. 5-16
-
 1
1 -
2
-
3
-
4
-
5
-
6
-
7
-
8
-
9
-
10
-
11
-
12
-
13
-
14
-
15
-
16
-
17
-
18
-
19
-
20
-
21
-
22
-
23
-
24
-
25
-
26
-
27
-
28
-
29
-
30
-
31
-
32
-
33
-
34
-
35
-
36
-
37
-
38
-
39
-
40
-
41
-
42
-
43
-
44
-
45
-
46
-
47
-
48
-
49
-
50
-
51
-
52
-
53
-
54
-
55
-
56
-
57
-
58
-
59
-
60
-
61
-
62
-
63
-
64
-
65
-
66
-
67
-
68
-
69
-
70
-
71
-
72
-
73
-
74
-
75
-
76
-
77
-
78
-
79
-
80
-
81
-
82
-
83
-
84
-
85
-
86
-
87
-
88
-
89
-
90
-
91
-
92
-
93
-
94
-
95
-
96
-
97
-
98
-
99
-
100
-
101
-
102
-
103
-
104
-
105
-
 106
106 -
 107
107 -
 108
108 -
 109
109 -
 110
110 -
 111
111 -
 112
112 -
 113
113 -
 114
114 -
 115
115 -
 116
116 -
117
-
118
-
119
-
120
-
121
-
122
-
123
-
124
-
125
-
126
-
127
-
128
-
129
-
130
-
131
-
132
-
133
-
134
-
135
-
136
-
137
-
138
-
139
-
140
-
141
-
142
-
143
-
144
-
145
-
146
-
147
-
148
-
149
-
150
-
151
-
152
-
153
-
154
-
155
-
156
-
157
-
158
-
159
-
160
-
161
-
162
-
163
-
164
-
165
-
166
-
167
-
168
-
169
-
170
-
171
-
172
-
173
-
174
-
175
-
176
-
177
-
178
-
179
-
180
-
181
-
182
-
183
-
184
-
185
-
186
-
187
-
188
-
189
-
190
-
191
-
192
-
193
-
194
-
195
-
196
-
197
-
198
-
199
-
200
-
201
-
202
-
203
-
204
-
205
-
206
-
207
-
208
-
209
-
210
-
211
-
212
-
213
-
214
-
215
-
216
-
217
-
218
-
219
-
220
-
221
-
222
-
223
-
224
-
225
-
226
-
227
-
228
-
229
-
230
-
231
-
232
-
233
-
234
-
235
-
236
 |
 |