Canon imageCLASS D420 imageCLASS D480 Basic Operation Guide - Page 121
Redialing When the Line Is Busy, Redialing Manually, Redialing Automatically
 |
View all Canon imageCLASS D420 manuals
Add to My Manuals
Save this manual to your list of manuals |
Page 121 highlights
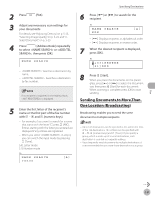
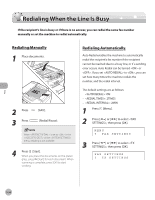
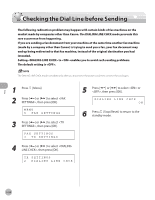
Redialing When the Line Is Busy Redialing When the Line Is Busy If the recipient's line is busy or if there is no answer, you can redial the same fax number manually or set the machine to redial automatically. Redialing Manually 1 Place documents. 2 Press 3 Press [FAX]. [Redial/Pause]. When is set to in the of the menu, redialing is not available. 4 Press [Start]. When you place the documents on the platen glass, press [Start] for each document. When scanning is complete, press [OK] to start sending. Redialing Automatically Auto Redial enables the machine to automatically redial the recipient's fax number if the recipient cannot be reached due to a busy line, or if a sending error occurs. Auto Redial can be turned or . If you set to , you can set how many times the machine redials the number, and the redial interval. The default settings are as follows: - : ON - : 2TIMES - : 2MIN. 1 Press [Menu]. 2 Press [ ] or [ ] to select , then press [OK]. MENU 5 FAX SETTINGS 3 Press [ ] or [ ] to select , then press [OK]. FAX SETTINGS 3 TX SETTINGS Fax 5-26
-
 1
1 -
2
-
3
-
4
-
5
-
6
-
7
-
8
-
9
-
10
-
11
-
12
-
13
-
14
-
15
-
16
-
17
-
18
-
19
-
20
-
21
-
22
-
23
-
24
-
25
-
26
-
27
-
28
-
29
-
30
-
31
-
32
-
33
-
34
-
35
-
36
-
37
-
38
-
39
-
40
-
41
-
42
-
43
-
44
-
45
-
46
-
47
-
48
-
49
-
50
-
51
-
52
-
53
-
54
-
55
-
56
-
57
-
58
-
59
-
60
-
61
-
62
-
63
-
64
-
65
-
66
-
67
-
68
-
69
-
70
-
71
-
72
-
73
-
74
-
75
-
76
-
77
-
78
-
79
-
80
-
81
-
82
-
83
-
84
-
85
-
86
-
87
-
88
-
89
-
90
-
91
-
92
-
93
-
94
-
95
-
96
-
97
-
98
-
99
-
100
-
101
-
102
-
103
-
104
-
105
-
106
-
107
-
108
-
109
-
110
-
111
-
112
-
113
-
114
-
115
-
 116
116 -
 117
117 -
 118
118 -
 119
119 -
 120
120 -
 121
121 -
 122
122 -
 123
123 -
 124
124 -
 125
125 -
 126
126 -
127
-
128
-
129
-
130
-
131
-
132
-
133
-
134
-
135
-
136
-
137
-
138
-
139
-
140
-
141
-
142
-
143
-
144
-
145
-
146
-
147
-
148
-
149
-
150
-
151
-
152
-
153
-
154
-
155
-
156
-
157
-
158
-
159
-
160
-
161
-
162
-
163
-
164
-
165
-
166
-
167
-
168
-
169
-
170
-
171
-
172
-
173
-
174
-
175
-
176
-
177
-
178
-
179
-
180
-
181
-
182
-
183
-
184
-
185
-
186
-
187
-
188
-
189
-
190
-
191
-
192
-
193
-
194
-
195
-
196
-
197
-
198
-
199
-
200
-
201
-
202
-
203
-
204
-
205
-
206
-
207
-
208
-
209
-
210
-
211
-
212
-
213
-
214
-
215
-
216
-
217
-
218
-
219
-
220
-
221
-
222
-
223
-
224
-
225
-
226
-
227
-
228
-
229
-
230
-
231
-
232
-
233
-
234
-
235
-
236
 |
 |
