Canon imageCLASS D420 imageCLASS D480 Basic Operation Guide - Page 66
Storing/Editing Recipients for Group Dialing, Registering Group Addresses - review
 |
View all Canon imageCLASS D420 manuals
Add to My Manuals
Save this manual to your list of manuals |
Page 66 highlights
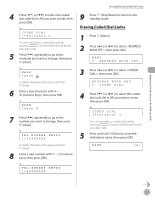
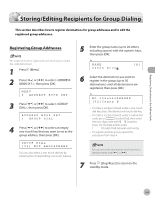
Registering Destinations in the Address Book Storing/Editing Recipients for Group Dialing Storing/Editing Recipients for Group Dialing This section describes how to register destinations for group addresses and to edit the registered group addresses. Registering Group Addresses The recipients must be registered in one-touch keys or coded dial codes beforehand. 1 Press [Menu]. 2 Press [ ] or [ ] to select , then press [OK]. MENU 6 ADDRESS BOOK SET. 3 Press [ ] or [ ] to select , then press [OK]. ADDRESS BOOK SET. 3 GROUP DIAL 4 Press [ ] or [ ] to select an empty one-touch key that you want to set as the group address, then press [OK]. GROUP DIAL [05] NOT REGISTERED You can also select a one-touch dial key by pressing the corresponding one-touch dial key. 5 Enter the group name (up to 20 letters, including spaces) with the numeric keys, then press [OK]. Ex. NAME Canon Group [A] 6 Select the destinations you want to register in the group (up to 50 destinations) until all destinations are registered, then press [OK]. Ex. NO.002=123XXXXXX [02]Canon E - To enter a recipient stored under a one-touch dial key, press the desired one-touch dial key. - To enter a recipient stored under a coded dial code, press [Coded Dial], then enter the two-digit code with - [numeric keys]. For multiple entries, press [Coded Dial] between each entry. - To register another group, repeat the procedure from step 4. You can review the destinations which have been already entered with [ ] or [ ]. 7 Press [Stop/Reset] to return to the standby mode. 3-9
-
 1
1 -
2
-
3
-
4
-
5
-
6
-
7
-
8
-
9
-
10
-
11
-
12
-
13
-
14
-
15
-
16
-
17
-
18
-
19
-
20
-
21
-
22
-
23
-
24
-
25
-
26
-
27
-
28
-
29
-
30
-
31
-
32
-
33
-
34
-
35
-
36
-
37
-
38
-
39
-
40
-
41
-
42
-
43
-
44
-
45
-
46
-
47
-
48
-
49
-
50
-
51
-
52
-
53
-
54
-
55
-
56
-
57
-
58
-
59
-
60
-
 61
61 -
 62
62 -
 63
63 -
 64
64 -
 65
65 -
 66
66 -
 67
67 -
 68
68 -
 69
69 -
 70
70 -
 71
71 -
72
-
73
-
74
-
75
-
76
-
77
-
78
-
79
-
80
-
81
-
82
-
83
-
84
-
85
-
86
-
87
-
88
-
89
-
90
-
91
-
92
-
93
-
94
-
95
-
96
-
97
-
98
-
99
-
100
-
101
-
102
-
103
-
104
-
105
-
106
-
107
-
108
-
109
-
110
-
111
-
112
-
113
-
114
-
115
-
116
-
117
-
118
-
119
-
120
-
121
-
122
-
123
-
124
-
125
-
126
-
127
-
128
-
129
-
130
-
131
-
132
-
133
-
134
-
135
-
136
-
137
-
138
-
139
-
140
-
141
-
142
-
143
-
144
-
145
-
146
-
147
-
148
-
149
-
150
-
151
-
152
-
153
-
154
-
155
-
156
-
157
-
158
-
159
-
160
-
161
-
162
-
163
-
164
-
165
-
166
-
167
-
168
-
169
-
170
-
171
-
172
-
173
-
174
-
175
-
176
-
177
-
178
-
179
-
180
-
181
-
182
-
183
-
184
-
185
-
186
-
187
-
188
-
189
-
190
-
191
-
192
-
193
-
194
-
195
-
196
-
197
-
198
-
199
-
200
-
201
-
202
-
203
-
204
-
205
-
206
-
207
-
208
-
209
-
210
-
211
-
212
-
213
-
214
-
215
-
216
-
217
-
218
-
219
-
220
-
221
-
222
-
223
-
224
-
225
-
226
-
227
-
228
-
229
-
230
-
231
-
232
-
233
-
234
-
235
-
236
 |
 |