Canon imageCLASS D760 imageCLASS D700 Series Set-up Instructions
Canon imageCLASS D760 Manual
 |
View all Canon imageCLASS D760 manuals
Add to My Manuals
Save this manual to your list of manuals |
Canon imageCLASS D760 manual content summary:
- Canon imageCLASS D760 | imageCLASS D700 Series Set-up Instructions - Page 1
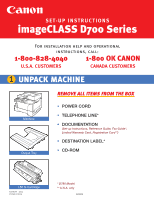
CUSTOMERS 1 UNPACK MACHINE Machine Output Tray REMOVE ALL ITEMS FROM THE BOX • POWER CORD • TELEPHONE LINE* • DOCUMENTATION (Set-up Instructions, Reference Guide, Fax Guide*, Limited Warranty Card, Registration Card**) • DESTINATION LABEL* • CD-ROM L50 S-Cartridge FA7-5177 (010) Printed in China - Canon imageCLASS D760 | imageCLASS D700 Series Set-up Instructions - Page 2
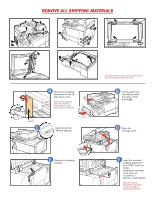
and slide the platen unit to the left (2). D Open the cartridge cover. E Remove the shipping material. F Insert the removed shipping attachment from STEP A into the holder. Keeping the cartridge cover open, go to section 2 INSTALL CARTRIDGE. Keep the shipping attachment in the holder in case you - Canon imageCLASS D760 | imageCLASS D700 Series Set-up Instructions - Page 3
Remove the cartridge from its bag. B Rock the cartridge 5 or 6 times to distribute the toner evenly. C Place the cartridge on a flat and stable surface, grip the sealing tape tab and snap in the direction shown. Make sure that the tab is detached from the cartridge. D Grasp the cartridge with one - Canon imageCLASS D760 | imageCLASS D700 Series Set-up Instructions - Page 4
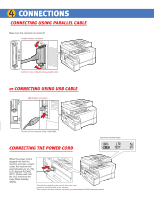
4 CONNECTIONS CONNECTING USING PARALLEL CABLE Make sure the computer is turned off. Parallel interface connection PARALLEL Connect to your computer using a parallel cable. or CONNECTING USING USB CABLE UUSSBBininteterfrafcaecceocnonencntieocnt.ion PAR CCoonnnnecetcttotoyoyuor - Canon imageCLASS D760 | imageCLASS D700 Series Set-up Instructions - Page 5
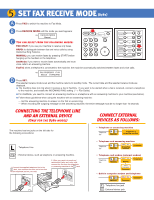
B Press RECEIVE MODE until the mode you want appears: ex. RECEIVE MODE Manual C You can select from the following modes: FAX ONLY: if you use your telephone to the machine, and enable the INCOMING RING setting. (---> Fax Guide). • For AnsMode, you need to connect an answering machine or a - Canon imageCLASS D760 | imageCLASS D700 Series Set-up Instructions - Page 6
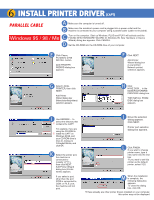
and PLAY will activate and the FOUND NEW HARDWARE WIZARD (In Windows 95, New Hardware or Device Wizard) dialog box appears. Click CANCEL. D Set the CD-ROM into the CD-ROM drive of your computer. E Click Canon PC1200/iC D700 INSTALL button. ADD PRINTER WIZARD dialog box appears. F Click NEXT. Add - Canon imageCLASS D760 | imageCLASS D700 Series Set-up Instructions - Page 7
using parallel cable. C Turn on the computer. Start up Windows XP. PLUG and PLAY will activate and the FOUND NEW HARDWARE WIZARD dialog box appears. Click CANCEL. For installations, using PLUG and PLAY function of your computer, -----> Printer Guide. D Set the CD-ROM into the CD-ROM drive of - Canon imageCLASS D760 | imageCLASS D700 Series Set-up Instructions - Page 8
described for "PARALLEL CABLE (Windows XP)" of "INSTALL PRINTER DRIVER". When you are asked to select the printer port, select either USBPRNXX or USBXXX (XX or XXX represents a set of numbers). For installation instructions using PLUG and PLAY or ADD PRINTER WIZARD for USB Port, ----> Printer Guide.
-
 1
1 -
 2
2 -
 3
3 -
 4
4 -
 5
5 -
 6
6 -
 7
7 -
8
 |
 |

For installation help and operational
instructions, call:
1-800-828-4040
1-800 OK CANON
U.S.A. CUSTOMERS
CANADA CUSTOMERS
Output Tray
L50 S-Cartridge
REMOVE ALL ITEMS FROM THE BOX
•
POWER CORD
•
TELEPHONE LINE*
•
DOCUMENTATION
(Set-up Instructions, Reference Guide, Fax Guide*,
Limited Warranty Card, Registration Card**)
•
DESTINATION LABEL*
•
CD-ROM
UNPACK MACHINE
1
SET-UP INSTRUCTIONS
imageCLASS D700 Series
Machine
* D780 Model
** U.S.A. only
FA7-5177
(010)
Printed in China
062002A