Canon imageCLASS MF4350d imageCLASS MF4380dn/MF4370dn/MF4350d Basic Operation - Page 140
Receiving Documents in Memory without Printing Out (Memory Lock Reception
 |
UPC - 013803092097
View all Canon imageCLASS MF4350d manuals
Add to My Manuals
Save this manual to your list of manuals |
Page 140 highlights
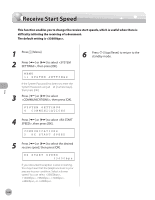
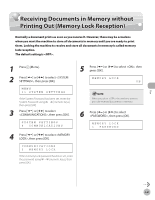
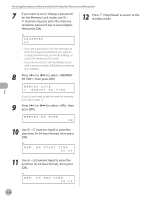
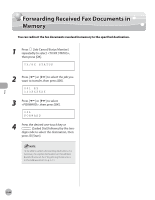
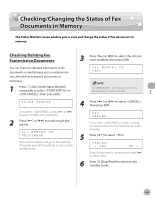
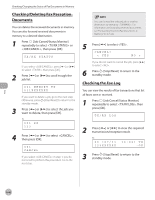
Receiving Documents in Memory without Printing Out (Memory Lock Reception) Receiving Documents in Memory without Printing Out (Memory Lock Reception) Normally a document prints as soon as you receive it. However, there may be occasions when you want the machine to store all documents in memory until you are ready to print them. Locking the machine to receive and store all documents in memory is called memory lock reception. The default setting is . 1 Press [Menu]. 2 Press [ ] or [ ] to select , then press [OK]. MENU 11 SYSTEM SETTINGS If the System Password has been set, enter the System Password using - [numeric keys], then press [OK]. 3 Press [ ] or [ ] to select , then press [OK]. SYSTEM SETTINGS 4 COMMUNICATIONS 4 Press [ ] or [ ] to select , then press [OK]. COMMUNICATIONS 3 MEMORY LOCK If the memory lock password has been set, enter the password using - [numeric keys], then press [OK]. 5 Press [ ] or [ ] to select , then press [OK]. MEMORY LOCK ON When you select , the machine starts to print the received documents in memory. 6 Press [ ] or [ ] to select , then press [OK]. MEMORY LOCK 1 PASSWORD Fax 5-41
-
 1
1 -
2
-
3
-
4
-
5
-
6
-
7
-
8
-
9
-
10
-
11
-
12
-
13
-
14
-
15
-
16
-
17
-
18
-
19
-
20
-
21
-
22
-
23
-
24
-
25
-
26
-
27
-
28
-
29
-
30
-
31
-
32
-
33
-
34
-
35
-
36
-
37
-
38
-
39
-
40
-
41
-
42
-
43
-
44
-
45
-
46
-
47
-
48
-
49
-
50
-
51
-
52
-
53
-
54
-
55
-
56
-
57
-
58
-
59
-
60
-
61
-
62
-
63
-
64
-
65
-
66
-
67
-
68
-
69
-
70
-
71
-
72
-
73
-
74
-
75
-
76
-
77
-
78
-
79
-
80
-
81
-
82
-
83
-
84
-
85
-
86
-
87
-
88
-
89
-
90
-
91
-
92
-
93
-
94
-
95
-
96
-
97
-
98
-
99
-
100
-
101
-
102
-
103
-
104
-
105
-
106
-
107
-
108
-
109
-
110
-
111
-
112
-
113
-
114
-
115
-
116
-
117
-
118
-
119
-
120
-
121
-
122
-
123
-
124
-
125
-
126
-
127
-
128
-
129
-
130
-
131
-
132
-
133
-
134
-
 135
135 -
 136
136 -
 137
137 -
 138
138 -
 139
139 -
 140
140 -
 141
141 -
 142
142 -
 143
143 -
 144
144 -
 145
145 -
146
-
147
-
148
-
149
-
150
-
151
-
152
-
153
-
154
-
155
-
156
-
157
-
158
-
159
-
160
-
161
-
162
-
163
-
164
-
165
-
166
-
167
-
168
-
169
-
170
-
171
-
172
-
173
-
174
-
175
-
176
-
177
-
178
-
179
-
180
-
181
-
182
-
183
-
184
-
185
-
186
-
187
-
188
-
189
-
190
-
191
-
192
-
193
-
194
-
195
-
196
-
197
-
198
-
199
-
200
-
201
-
202
-
203
-
204
-
205
-
206
-
207
-
208
-
209
-
210
-
211
-
212
-
213
-
214
-
215
-
216
-
217
-
218
-
219
-
220
-
221
-
222
-
223
-
224
-
225
-
226
-
227
-
228
-
229
-
230
-
231
-
232
-
233
-
234
-
235
-
236
-
237
-
238
-
239
-
240
-
241
-
242
-
243
-
244
-
245
-
246
-
247
-
248
-
249
-
250
-
251
-
252
 |
 |