Canon imageCLASS MF4350d imageCLASS MF4380dn/MF4370dn/MF4350d Basic Operation - Page 145
Checking/Deleting Fax Reception Documents, Checking the Fax Log, Job Cancel/Status Monitor]
 |
UPC - 013803092097
View all Canon imageCLASS MF4350d manuals
Add to My Manuals
Save this manual to your list of manuals |
Page 145 highlights
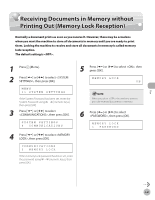
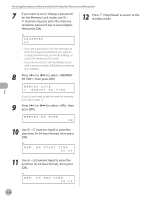
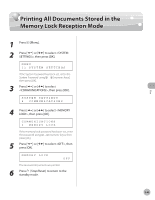
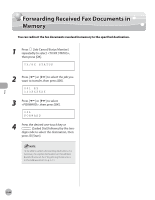
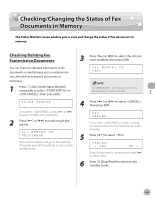
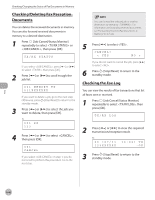
Checking/Changing the Status of Fax Documents in Memory Checking/Deleting Fax Reception Documents You can delete the received documents in memory. You can also forward received documents in memory to a desired destination. 1 Press [Job Cancel/Status Monitor] repeatedly to select or , then press [OK]. TX/RX STATUS If you select , press [ ] or [ ] to select , then press [OK]. 2 Press [ ] or [ ] to scroll trough the job list. 001 MEMORY TX 031XXXXXXX If you want to delete a job, go to the next step. Otherwise, press [Stop/Reset] to return to the standby mode. 3 Press [ ] or [ ] to select the job you want to delete, then press [OK]. Ex. 001 RX 123 4 Press [ ] or [ ] to select , then press [OK]. 001 CANCEL If you select in step 1, you do not need to perform this procedure. Go to the next step. You can forward the selected job to another destination by selecting . For information on forwarding received documents, see "Forwarding Received Fax Documents in Memory," on p. 5-44. 5 Press [ ] to select . CANCEL? < YES NO > If you do not want to cancel the job, press [ ] to select . 6 Press [Stop/Reset] to return to the standby mode. Checking the Fax Log You can view the results of fax transactions that list all faxes sent or received. 1 Press [Job Cancel/Status Monitor] repeatedly to select , then press [OK]. TX/RX LOG 2 Press [ ] or [ ] to view the required transmission/reception result. Ex. 60 (07/31 123XXXXXX 14:04) TX -OK 3 Press [Stop/Reset] to return to the standby mode. Fax 5-46
-
 1
1 -
2
-
3
-
4
-
5
-
6
-
7
-
8
-
9
-
10
-
11
-
12
-
13
-
14
-
15
-
16
-
17
-
18
-
19
-
20
-
21
-
22
-
23
-
24
-
25
-
26
-
27
-
28
-
29
-
30
-
31
-
32
-
33
-
34
-
35
-
36
-
37
-
38
-
39
-
40
-
41
-
42
-
43
-
44
-
45
-
46
-
47
-
48
-
49
-
50
-
51
-
52
-
53
-
54
-
55
-
56
-
57
-
58
-
59
-
60
-
61
-
62
-
63
-
64
-
65
-
66
-
67
-
68
-
69
-
70
-
71
-
72
-
73
-
74
-
75
-
76
-
77
-
78
-
79
-
80
-
81
-
82
-
83
-
84
-
85
-
86
-
87
-
88
-
89
-
90
-
91
-
92
-
93
-
94
-
95
-
96
-
97
-
98
-
99
-
100
-
101
-
102
-
103
-
104
-
105
-
106
-
107
-
108
-
109
-
110
-
111
-
112
-
113
-
114
-
115
-
116
-
117
-
118
-
119
-
120
-
121
-
122
-
123
-
124
-
125
-
126
-
127
-
128
-
129
-
130
-
131
-
132
-
133
-
134
-
135
-
136
-
137
-
138
-
139
-
 140
140 -
 141
141 -
 142
142 -
 143
143 -
 144
144 -
 145
145 -
 146
146 -
 147
147 -
 148
148 -
 149
149 -
 150
150 -
151
-
152
-
153
-
154
-
155
-
156
-
157
-
158
-
159
-
160
-
161
-
162
-
163
-
164
-
165
-
166
-
167
-
168
-
169
-
170
-
171
-
172
-
173
-
174
-
175
-
176
-
177
-
178
-
179
-
180
-
181
-
182
-
183
-
184
-
185
-
186
-
187
-
188
-
189
-
190
-
191
-
192
-
193
-
194
-
195
-
196
-
197
-
198
-
199
-
200
-
201
-
202
-
203
-
204
-
205
-
206
-
207
-
208
-
209
-
210
-
211
-
212
-
213
-
214
-
215
-
216
-
217
-
218
-
219
-
220
-
221
-
222
-
223
-
224
-
225
-
226
-
227
-
228
-
229
-
230
-
231
-
232
-
233
-
234
-
235
-
236
-
237
-
238
-
239
-
240
-
241
-
242
-
243
-
244
-
245
-
246
-
247
-
248
-
249
-
250
-
251
-
252
 |
 |