Canon imageCLASS MF4350d imageCLASS MF4380dn/MF4370dn/MF4350d Basic Operation - Page 171
Starting the Remote UI
 |
UPC - 013803092097
View all Canon imageCLASS MF4350d manuals
Add to My Manuals
Save this manual to your list of manuals |
Page 171 highlights
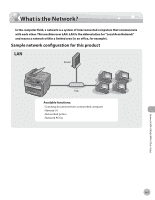
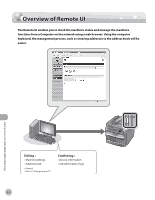
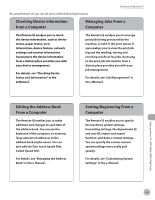
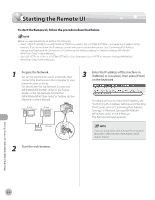
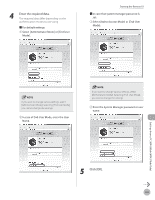
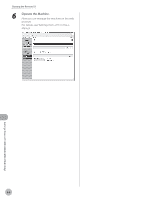
Starting the Remote UI Starting the Remote UI To start the Remote UI, follow the procedure described below. Before you start the Remote UI, perform the following: - Select in located in the , and verify the IP address of the machine. If you do not know the IP address, consult with your network administrator. (See "Confirming IPv4 Address Settings and Checking IPv4 Connection," or "Confirming IPv6 Address Settings," in "Network Settings (MF4380dn/ MF4370dn Only)," in the e-Manual.) - Set to in . (See "Setting the Use of HTTP," in "Network Settings (MF4380dn/ MF4370dn Only)," in the e-Manual.) 1 Prepare the Network. Set up the machine for use in a network, then connect the machine and the computer to your network router or a hub. For details, see "Set Up Network Connection (MF4380dn/MF4370dn Only)," in the Starter Guide, or "Set Up Network Connection (MF4380dn/MF4370dn Only)," in "Setting Up the Machine," in the e-Manual. 3 Enter the IP address of the machine in [Address] or [Location], then press [Enter] on the keyboard. For details on how to check the IP address, see "Confirming IPv4 Address Settings and Checking IPv4 Connection," or "Confirming IPv6 Address Settings," in "Network Settings (MF4380dn/ MF4370dn Only)," in the e-Manual. The Remote UI screen appears. 2 Start the web browser. If you are using Safari, click [Choose File] instead of [Browse] to select the file of the Address Book data to import. Settings from a PC (MF4380dn/MF4370dn Only) 9-4
-
 1
1 -
2
-
3
-
4
-
5
-
6
-
7
-
8
-
9
-
10
-
11
-
12
-
13
-
14
-
15
-
16
-
17
-
18
-
19
-
20
-
21
-
22
-
23
-
24
-
25
-
26
-
27
-
28
-
29
-
30
-
31
-
32
-
33
-
34
-
35
-
36
-
37
-
38
-
39
-
40
-
41
-
42
-
43
-
44
-
45
-
46
-
47
-
48
-
49
-
50
-
51
-
52
-
53
-
54
-
55
-
56
-
57
-
58
-
59
-
60
-
61
-
62
-
63
-
64
-
65
-
66
-
67
-
68
-
69
-
70
-
71
-
72
-
73
-
74
-
75
-
76
-
77
-
78
-
79
-
80
-
81
-
82
-
83
-
84
-
85
-
86
-
87
-
88
-
89
-
90
-
91
-
92
-
93
-
94
-
95
-
96
-
97
-
98
-
99
-
100
-
101
-
102
-
103
-
104
-
105
-
106
-
107
-
108
-
109
-
110
-
111
-
112
-
113
-
114
-
115
-
116
-
117
-
118
-
119
-
120
-
121
-
122
-
123
-
124
-
125
-
126
-
127
-
128
-
129
-
130
-
131
-
132
-
133
-
134
-
135
-
136
-
137
-
138
-
139
-
140
-
141
-
142
-
143
-
144
-
145
-
146
-
147
-
148
-
149
-
150
-
151
-
152
-
153
-
154
-
155
-
156
-
157
-
158
-
159
-
160
-
161
-
162
-
163
-
164
-
165
-
 166
166 -
 167
167 -
 168
168 -
 169
169 -
 170
170 -
 171
171 -
 172
172 -
 173
173 -
 174
174 -
 175
175 -
 176
176 -
177
-
178
-
179
-
180
-
181
-
182
-
183
-
184
-
185
-
186
-
187
-
188
-
189
-
190
-
191
-
192
-
193
-
194
-
195
-
196
-
197
-
198
-
199
-
200
-
201
-
202
-
203
-
204
-
205
-
206
-
207
-
208
-
209
-
210
-
211
-
212
-
213
-
214
-
215
-
216
-
217
-
218
-
219
-
220
-
221
-
222
-
223
-
224
-
225
-
226
-
227
-
228
-
229
-
230
-
231
-
232
-
233
-
234
-
235
-
236
-
237
-
238
-
239
-
240
-
241
-
242
-
243
-
244
-
245
-
246
-
247
-
248
-
249
-
250
-
251
-
252
 |
 |
