Canon imageCLASS MF5750 imageCLASS MF5750/MF5770 Facsimile Guide
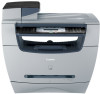
Canon imageCLASS MF5750 Manual
 |
View all Canon imageCLASS MF5750 manuals
Add to My Manuals
Save this manual to your list of manuals |
Canon imageCLASS MF5750 manual content summary:
- Canon imageCLASS MF5750 | imageCLASS MF5750/MF5770 Facsimile Guide - Page 1
imageCLASS MF5750/MF5770 Facsimile Guide - Canon imageCLASS MF5750 | imageCLASS MF5750/MF5770 Facsimile Guide - Page 2
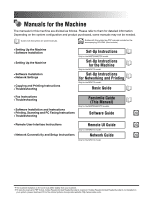
. Set-Up Instructions for Networking and Printing Only for the MF5770 model. Basic Guide • Fax Instructions • Troubleshooting Facsimile Guide (This Manual) Only for the MF5750/MF5770 models. • Software Installation and Instructions • Printing, Scanning and PC Faxing Instructions Software Guide - Canon imageCLASS MF5750 | imageCLASS MF5750/MF5770 Facsimile Guide - Page 3
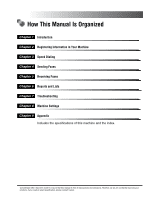
Chapter 5 Receiving Faxes Chapter 6 Reports and Lists Chapter 7 Troubleshooting Chapter 8 Machine Settings Chapter 9 Appendix Includes the specifications of this machine and the index. Considerable effort has been made to ensure that this manual is free of inaccuracies and omissions. However, as we - Canon imageCLASS MF5750 | imageCLASS MF5750/MF5770 Facsimile Guide - Page 4
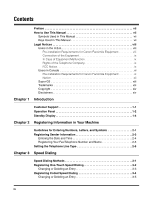
Contents Preface vii How to Use This Manual vii Symbols Used in This Manual vii Keys Used in This Manual vii Legal Notices viii Users in the U.S.A viii Pre-installation Requirements for Canon Facsimile Equipment viii Connection of the Equipment ix In Case of Equipment Malfunction ix Rights - Canon imageCLASS MF5750 | imageCLASS MF5750/MF5770 Facsimile Guide - Page 5
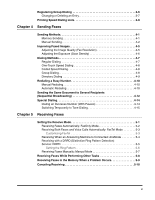
Is Connected: AnsMode 5-4 Receiving with a DRPD (Distinctive Ring Pattern Detection) Service: DRPD 5-5 Setting the Ring Pattern 5-6 Receiving Faxes Manually: Manual Mode 5-7 Receiving Faxes While Performing Other Tasks 5-8 Receiving Faxes in the Memory When a Problem Occurs 5-9 Canceling - Canon imageCLASS MF5750 | imageCLASS MF5750/MF5770 Facsimile Guide - Page 6
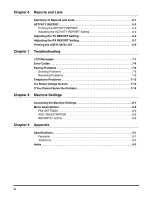
the ACTIVITY REPORT Setting 6-4 Adjusting the TX REPORT Setting 6-5 Adjusting the RX REPORT Setting 6-7 Printing the USER DATA LIST 6-9 Chapter 7 Troubleshooting LCD Messages 7-1 Error Codes 7-4 Faxing Problems 7-6 Sending Problems 7-6 Receiving Problems 7-8 Telephone Problems 7-12 If - Canon imageCLASS MF5750 | imageCLASS MF5750/MF5770 Facsimile Guide - Page 7
Preface Thank you for purchasing Canon imageCLASS MF5750/MF5770. Please read this manual thoroughly before operating the machine in order to familiarize yourself with its capabilities, and to make the most of its many functions. After reading this manual, store it in a safe place for future - Canon imageCLASS MF5750 | imageCLASS MF5750/MF5770 Facsimile Guide - Page 8
" can be used with the imageCLASS MF5750/MF5770. Key telephone systems are not recommended because they send non-standard signals to individual telephones for ringing and special codes, which may cause a fax error. C. Power Requirements This equipment should be connected to a standard 120-volt AC - Canon imageCLASS MF5750 | imageCLASS MF5750/MF5770 Facsimile Guide - Page 9
modular jack are provided with this equipment. This equipment is designed to be connected to the telephone network or premises wiring using a compatible modular jack which is Part 68 compliant. See Installation instructions for details. The Ringer Equivalence Number (REN) is used to determine the - Canon imageCLASS MF5750 | imageCLASS MF5750/MF5770 Facsimile Guide - Page 10
in Subpart B of Part 15 of the FCC Rules. Do not make any changes or modifications to the equipment unless otherwise specified in this manual. If such changes or modifications should be made, you could be required to stop operation of the equipment. Canon U.S.A. Inc. One Canon Plaza, Lake Success - Canon imageCLASS MF5750 | imageCLASS MF5750/MF5770 Facsimile Guide - Page 11
OVERSEAS NOTE Canon recommends an individual line following industry standards [e.g., the 2,500 (touch tone) or 500 (rotary/pulse dial) telephones]. A dedicated extension off a PBX unit without "Camp On" signals is also permissible with your imageCLASS MF5750/MF5770. Key telephone systems - Canon imageCLASS MF5750 | imageCLASS MF5750/MF5770 Facsimile Guide - Page 12
of the local telecommunications company. The equipment must also be installed using an acceptable method of connection. The customer should be aware that compliance with the above conditions may not prevent degradation of service in some situations. Repairs to certified equipment should be - Canon imageCLASS MF5750 | imageCLASS MF5750/MF5770 Facsimile Guide - Page 13
of the maximum number of devices allowed to be connected to a telephone interface. The termination on an interface Network (PSTN) currently supports 28.8 Kbps modem speeds or lower, depending on telephone line conditions. Trademarks Canon, the Canon logo, and imageCLASS are trademarks of Canon - Canon imageCLASS MF5750 | imageCLASS MF5750/MF5770 Facsimile Guide - Page 14
No part of this publication may be reproduced or transmitted in any form or by any means, electronic or mechanical, including photocopying and recording, or by any information storage or retrieval system without the prior written permission of Canon Inc. Disclaimers The information in this manual is - Canon imageCLASS MF5750 | imageCLASS MF5750/MF5770 Facsimile Guide - Page 15
, contact Canon Authorized Service Facilities or the Canon Customer Care Center at 1-800-828-4040 between the hours of 8:00 A.M. to 8:00 P.M. EST Monday through Friday and 10:00 A.M. to 8:00 P.M. on Saturday. For interactive troubleshooting, e-mail technical support, the latest driver downloads and - Canon imageCLASS MF5750 | imageCLASS MF5750/MF5770 Facsimile Guide - Page 16
green when the reservation of fax transmission is set, or a fax is received into the memory. e Alarm indicator Flashes red when the machine has a problem such as a paper jam. (The error message is displayed in the LCD.) f FAX key Switches the standby display to the Fax mode. g Menu key Customizes - Canon imageCLASS MF5750 | imageCLASS MF5750/MF5770 Facsimile Guide - Page 17
standby display in the LCD. l Hook key r Set key Enables you to dial without picking up the handset. Determines the contents you set or register. m Status Monitor key Checks f gh i j 01 02 03 04 05 06 07 08 09 10 11 12 Redial / Pause Coded Dial Directory COPY Alarm In Use / - Canon imageCLASS MF5750 | imageCLASS MF5750/MF5770 Facsimile Guide - Page 18
depending on which mode is selected. The standby display in the Fax mode is as follows: ■ Fax Mode Date & time Introduction Receive mode Image quality NOTE For the standby display in the Copy mode and the Scan mode, see Chapter 1, "Introduction," in the Basic Guide. 1-4 Standby Display - Canon imageCLASS MF5750 | imageCLASS MF5750/MF5770 Facsimile Guide - Page 19
chapter explains how to register the information necessary for sending and receiving faxes. NOTE You can print the USER DATA LIST to check the sender information you have registered. (See "Printing the USER DATA LIST," on p. 6-9.) Guidelines for Entering Numbers, Letters, and Symbols Follow this - Canon imageCLASS MF5750 | imageCLASS MF5750/MF5770 Facsimile Guide - Page 20
2 Use the numeric keys to enter the character. Press the key repeatedly until the character you want appears. Registering Information in Your Machine :A :a :1 [1] @.-_/ @.-_/ 1 [2] ABC abc 2 [3] DEF def 3 [4] GHI ghi 4 2 [5] JKL jkl 5 [6] MNO mno 6 [7] PQRS pqrs 7 - Canon imageCLASS MF5750 | imageCLASS MF5750/MF5770 Facsimile Guide - Page 21
SAPORS LANE•BOOLE•DORSET•BH25 8ER TELEPHONE BOOLE (945 13) 51617 - FAX 1234567 Our Ref. 350/PJC/EAC Your name Page number NOTE You can set the sender information to print inside or outside the image area. (See of "Menu Descriptions," on p. 8-3.) Registering Sender Information - Canon imageCLASS MF5750 | imageCLASS MF5750/MF5770 Facsimile Guide - Page 22
and Time NOTE You can print the USER DATA LIST to check the current setting. (See "Printing the USER DATA LIST," on p. 6-9.) 1 Press [Menu]. 2 2 Press [ (-)] or [ (+)] to select ➞ press [Set]. Registering Information in Your Machine 3 Press [ (-)] or [ (+)] to select - Canon imageCLASS MF5750 | imageCLASS MF5750/MF5770 Facsimile Guide - Page 23
(-)] or [ (+)] to select ➞ press [Set]. 9 Use the numeric keys to enter your name (max. 24 characters, including spaces) ➞ press [Set]. UNIT NAME CANON :A ➞ USER SETTINGS 3.TX TERMINAL ID 10 Press [Stop/Reset] to return to the standby display. Registering Sender Information 2-5 - Canon imageCLASS MF5750 | imageCLASS MF5750/MF5770 Facsimile Guide - Page 24
to check the current setting. (See "Printing the Set]. 6 Press [ (-)] or [ (+)] to select the telephone line type ➞ press [Set]. You can select from the following: - for tone dialing - for pulse dialing 7 Press [Stop/Reset] to return to the standby display. 2-6 Setting - Canon imageCLASS MF5750 | imageCLASS MF5750/MF5770 Facsimile Guide - Page 25
Dialing," on p. 3-6), then to send a document to all numbers in that group, simply press the one-touch speed dialing key, or press [Coded Dial] ➞ enter the two-digit code assigned to that group. NOTE After you set up your speed dialing keys, we recommend that you occasionally print a list of all fax - Canon imageCLASS MF5750 | imageCLASS MF5750/MF5770 Facsimile Guide - Page 26
1 Press [Menu]. 2 Press [ (-)] or [ (+)] to select ➞ press [Set]. 3 Press [ (-)] or [ (+)] to select ➞ press [Set]. 4 Press [ (-)] or [ (+)] to select a one-touch speed dialing key (01 to 12) ➞ press [Set] twice. You can also select a key by pressing the - Canon imageCLASS MF5750 | imageCLASS MF5750/MF5770 Facsimile Guide - Page 27
key (max. 16 characters, including spaces) ➞ press [Set]. NAME Canon FRANCE :A ➞ 1-TOUCH SPD DIAL [01] Canon FRANCE To continue registering one-touch speed dialing keys, repeat the procedure from step 4. 7 Press [Stop/Reset] to return to the standby display. NOTE Use the destination labels - Canon imageCLASS MF5750 | imageCLASS MF5750/MF5770 Facsimile Guide - Page 28
register up to 100 fax/telephone numbers. Speed Dialing 3 1 Press [Menu]. 2 Press [ (-)] or [ (+)] to select ➞ press [Set]. 3 Press [ (-)] or [ (+)] to select ➞ press [Set]. 4 Press [ (-)] or [ (+)] to select a coded speed dialing code (00 to 99) ➞ press - Canon imageCLASS MF5750 | imageCLASS MF5750/MF5770 Facsimile Guide - Page 29
16 characters, including spaces) ➞ press [Set]. NAME Canon ITALIA :A ➞ CODED SPD DIAL [∗00]Canon ITALIA To continue registering coded speed dialing codes, repeat the procedure from step 4. 7 Press [Stop/Reset] to return to the standby - Canon imageCLASS MF5750 | imageCLASS MF5750/MF5770 Facsimile Guide - Page 30
cannot enter numbers with the numeric keys. Speed Dialing 1 Press [Menu]. 2 Press [ (-)] or [ (+)] to select ➞ press [Set]. 3 Press [ (-)] or [ (+)] to select ➞ press [Set]. 4 Specify an empty one-touch speed dialing key or coded speed dialing code that you want to - Canon imageCLASS MF5750 | imageCLASS MF5750/MF5770 Facsimile Guide - Page 31
group a number stored under a one-touch speed dialing key, press the desired one-touch speed dialing key(s). To enter review the numbers you have entered, press [ (-)] or [ (+)]. 3 6 Use the numeric keys to enter a name for the group (max. 16 characters, including spaces) ➞ press [Set]. NAME Canon - Canon imageCLASS MF5750 | imageCLASS MF5750/MF5770 Facsimile Guide - Page 32
to select the list you want to print ➞ press [Set]. You can select from the following: - - - Samples of the lists are shown below. ■ 1-TOUCH LIST 02/01/2005 10:32 FAX 1234567 CANON 1-TOUCH LIST *** NO. [ 01] [ 02] [ 04] [ 03] 732 2233 - Canon imageCLASS MF5750 | imageCLASS MF5750/MF5770 Facsimile Guide - Page 33
,INC. HUNT INVESTMENTS LAKESIDE INC. ■ GROUP DIAL LIST 02/01/2005 10:07 FAX 1234567 CANON 001 GROUP DIAL LIST *** 3 [ 05] CANON GROUP [* 00] 225 7823 [* 01] 233 7766 [ 01] 876 2398 [ 02] 613 9076 CANON NY CANON CA CANON TX CANON OH Speed Dialing Printing Speed Dialing Lists 3-9 - Canon imageCLASS MF5750 | imageCLASS MF5750/MF5770 Facsimile Guide - Page 34
following: - "To Use the Machine as a Local Printer (USB Connection)," or "To Use the Machine as a Network Printer (Network Connection)," in the Set-Up Instructions for Networking and Printing (MF5770 Model Only) - Chapter 1, "Installation," in the Software Guide • For details on how to send faxes - Canon imageCLASS MF5750 | imageCLASS MF5750/MF5770 Facsimile Guide - Page 35
details on how to set the machine to redial automatically, see "Automatic Redialing," on p. 4-10. You can store up to 20 fax jobs or approximately 256 pages in the memory.* * Based on the condition that the other party sends the fax by the imageCLASS MF5750/ MF5770 with Canon Fax Standard Chart No - Canon imageCLASS MF5750 | imageCLASS MF5750/MF5770 Facsimile Guide - Page 36
connect a telephone to the machine, see "Connect the telephone cable and necessary external device," in the Set-Up Instructions (for MF5750 users) or Set-Up Instructions for the Machine (for MF5770 p. 4-7. NOTE You cannot use group dialing for manual sending. 6 Talk through the handset to the - Canon imageCLASS MF5750 | imageCLASS MF5750/MF5770 Facsimile Guide - Page 37
8 When you hear a high-pitched signal, press [Start] ➞ hang up the handset. NOTE • To cancel manual sending, press [Status Monitor]. (See Chapter 7, "Status Monitor," in the Basic Guide.) • If the offhook alarm starts beeping, make sure that the handset is resting properly on the handset cradle. The - Canon imageCLASS MF5750 | imageCLASS MF5750/MF5770 Facsimile Guide - Page 38
image quality according to the type of document you are sending. 4 1 Press [Image Quality]. 2 Press or [Image Quality] to select the resolution ➞ press [Set]. You can select from the following: - for most text-only documents (203 x 98 dpi) - for fine-print documents (203 x 196 dpi - Canon imageCLASS MF5750 | imageCLASS MF5750/MF5770 Facsimile Guide - Page 39
areas of an image. 1 Press [Exposure]. 2 Press [ (-)] or [ (+)] to adjust the density ➞ press [Set]. EXPOSURE -LT DK+ ➞ 02/01/2005 FaxOnly TUE 15:10 STANDARD You can select from the following: - Set in the middle for standard documents 4 - Press [ (+)] for light documents to be darker - Canon imageCLASS MF5750 | imageCLASS MF5750/MF5770 Facsimile Guide - Page 40
Fax/Telephone Number Is Registered in the Machine • One-Touch Speed Dialing 4 • Coded Speed Dialing check the numbers. (See "Printing Speed Dialing Lists," on p. 3-8.) • For details on registering a fax/telephone number for speed dialing, see Chapter 3, "Speed Dialing." • The machine must be set - Canon imageCLASS MF5750 | imageCLASS MF5750/MF5770 Facsimile Guide - Page 41
Stop/Reset]. 2 Press [Start] to dial the number. Group Dialing 1 Press the desired one-touch speed dialing key (01 to 12), or press [Coded Dial] ➞ enter the two appears if no fax/telephone number is assigned to the one-touch speed dialing key you pressed. NOTE • If you press a wrong - Canon imageCLASS MF5750 | imageCLASS MF5750/MF5770 Facsimile Guide - Page 42
other party's name but cannot recall the one-touch speed dialling key, the code for number (see Chapter 3 "Speed Dialing".). ● To check registered names ❑ Pressing [ (+)] displays the names With the name you want to dial displayed, press [Set]. The other party's name, or the name for group dialing - Canon imageCLASS MF5750 | imageCLASS MF5750/MF5770 Facsimile Guide - Page 43
Automatic Redialing Settings," on p. 4-10.) NOTE To cancel automatic redialing, wait until the machine starts redialing ➞ press [Stop/ Reset] ➞ follow the instructions in the LCD. You can also cancel automatic redialing using [Status Monitor]. (See Chapter 7, "Status Monitor," in the Basic Guide - Canon imageCLASS MF5750 | imageCLASS MF5750/MF5770 Facsimile Guide - Page 44
the machine to redial ➞ press [Set] twice. You can set the machine to redial between 1 to 10 times. REDIAL TIMES 2TIMES ➞ REDIAL Set]. You can set the time interval between 2 to 99 minutes. REDIAL INTERVAL 4MIN. ➞ TX SETTINGS 4.TIME OUT 6 Press [Stop/Reset] to return to the standby - Canon imageCLASS MF5750 | imageCLASS MF5750/MF5770 Facsimile Guide - Page 45
you to send documents to all recipients in the group at the press of one or a few keys. Sending Faxes 4 1 Place the document on the load documents, see Chapter 3, "Document Handling," in the Basic Guide. 2 Adjust any necessary settings for your document. • Press [Image Quality] to select the - Canon imageCLASS MF5750 | imageCLASS MF5750/MF5770 Facsimile Guide - Page 46
code, the machine waits for 10 seconds before it begins sending. If you do not want the machine to send automatically, you need to change in in of the Menu. (See of "Menu Descriptions," on p. 8-4.) • To review the numbers you have entered, press - Canon imageCLASS MF5750 | imageCLASS MF5750/MF5770 Facsimile Guide - Page 47
4 NOTE You cannot insert a pause after the last number you entered for manual sending. Sending Faxes 1 Place the document on the platen glass or load it , see Chapter 3, "Document Handling," in the Basic Guide. 2 Adjust any necessary settings for your document. • Press [Image Quality] to select - Canon imageCLASS MF5750 | imageCLASS MF5750/MF5770 Facsimile Guide - Page 48
it to the machine. (See "Connect the telephone cable and necessary external device," in the Set-Up Instructions (for MF5750 users) or Set-Up Instructions for the Machine (for MF5770 users).) 3 Enter a destination using the numeric keys on your telephone or using a one-touch speed dialing key, coded - Canon imageCLASS MF5750 | imageCLASS MF5750/MF5770 Facsimile Guide - Page 49
line uses tone dialing, go to the next step. 5 Use the numeric keys on the machine to enter the numbers requested by the information service. Numbers entered after pressing [ ] will be dialed using tone dialing. 6 If you want to receive faxes, press [Start]. 4 7 Press [Hook] or hang up the - Canon imageCLASS MF5750 | imageCLASS MF5750/MF5770 Facsimile Guide - Page 50
Both Faxes and Voice Calls Automatically: FaxTel Mode," on p. 5-3.) - to receive faxes automatically and route voice calls to an answering machine connected to the machine. (See "Receiving When an Answering Machine Is Connected: AnsMode," on p. 5-4.) Setting the Receive Mode 5-1 - Canon imageCLASS MF5750 | imageCLASS MF5750/MF5770 Facsimile Guide - Page 51
/Reset] to return to the standby display. NOTE You can save the toner consumption when printing out the received documents. (See Chapter 10, "Machine Settings," in the Basic Guide.) 5 Receiving Faxes Automatically: FaxOnly Mode If you want to select , check the following: ■ Select This Mode - Canon imageCLASS MF5750 | imageCLASS MF5750/MF5770 Facsimile Guide - Page 52
set . (See "Setting the Receive Mode," on p. 5-1.) • connect a telephone to the machine. (See "Connect the telephone cable and necessary external device," in the Set-Up Instructions (for MF5750 users) or Set-Up Instructions adjust the time the machine takes to check whether a call is a fax or - Canon imageCLASS MF5750 | imageCLASS MF5750/MF5770 Facsimile Guide - Page 53
> to disconnect the call 8 Press [Stop/Reset] to return to the standby display. Receiving When an Answering Machine Is Connected: AnsMode If you want to select , check the following: ■ Select This Mode If: • you only have one telephone line for both fax and telephone use. • you want to - Canon imageCLASS MF5750 | imageCLASS MF5750/MF5770 Facsimile Guide - Page 54
information on this service. ■ You Will Need to: • set . (See "Setting the Receive Mode," on p. 5-1.) • connect a telephone to the machine. (See "Connect the telephone cable and necessary external device," in the Set-Up Instructions (for MF5750 users) or Set-Up Instructions for the Machine - Canon imageCLASS MF5750 | imageCLASS MF5750/MF5770 Facsimile Guide - Page 55
pattern to each number when you order the DRPD service. Follow this procedure to set the fax ring pattern that matches the pattern assigned by the telephone company: 1 Make sure you have set the receive mode to . (See "Setting the Receive Mode," on p. 5-1.) 2 Press [Menu]. 3 Press [ (-)] or - Canon imageCLASS MF5750 | imageCLASS MF5750/MF5770 Facsimile Guide - Page 56
want to select , check the following: ■ Select This Mode If: • you only have one telephone line for both fax and telephone use. • you receive mainly voice calls and sometimes faxes. ■ You Will Need to: • set . (See "Setting the Receive Mode," on p. 5-1.) • connect a telephone to - Canon imageCLASS MF5750 | imageCLASS MF5750/MF5770 Facsimile Guide - Page 57
Receiving Faxes While Performing Other Tasks Since the machine is a multitasking device, it can receive faxes and voice calls while you are performing other tasks. • If you receive a fax while you are performing certain tasks, the machine stores the incoming fax in the memory. Then, as soon as you - Canon imageCLASS MF5750 | imageCLASS MF5750/MF5770 Facsimile Guide - Page 58
LCD displays as well as one or more messages. When the problem is cleared, the machine automatically prints the fax which the condition that the other party sends the fax by the imageCLASS MF5750/ MF5770 with Canon Fax Standard Chart No. 1, standard mode. The maximum number - Canon imageCLASS MF5750 | imageCLASS MF5750/MF5770 Facsimile Guide - Page 59
. CANCEL DURING TX/RX? < YES NO > 5 2 Press [ (-)] to cancel receiving. If you change your mind and want to continue receiving, press [ (+)] for . Receiving Faxes 5-10 Canceling Receiving - Canon imageCLASS MF5750 | imageCLASS MF5750/MF5770 Facsimile Guide - Page 60
1-TOUCH LIST Lists the fax/telephone numbers and names registered for one-touch speed dialing. p. 3-8 CODED DIAL LIST Lists the fax/ automatic printing of this report after every 20 transactions. You can also manually set the machine to print it. p. 6-3 TX (Transmission) REPORT Prints - Canon imageCLASS MF5750 | imageCLASS MF5750/MF5770 Facsimile Guide - Page 61
Report or List USER DATA LIST Description Lists the current settings of the machine and the registered sender information. Details p. 6-9 NOTE • The paper sizes that can be used for reports and lists function are letter, legal and A4. Only papers loaded in the cassette can be used for reports and - Canon imageCLASS MF5750 | imageCLASS MF5750/MF5770 Facsimile Guide - Page 62
set to print an ACTIVITY REPORT after every 20 transactions. Transactions in an ACTIVITY REPORT are listed chronologically. 02/01/2005 17:28 FAX 1234567 CANON 2060 02/01 17:20 1 234 2060 5001 AUTO RX ECM 4 OK 00'14 0001 MANUAL TX ECM 1 OK 02'00 0002 TRANSMIT ECM 1 OK 00'17 5002 AUTO RX - Canon imageCLASS MF5750 | imageCLASS MF5750/MF5770 Facsimile Guide - Page 63
[ (+)] to select the setting you want ➞ press [Set]. 6 You can select from the following: - to turn on automatic printing of the ACTIVITY REPORT - to turn off automatic printing of the ACTIVITY REPORT 6 Press [Stop/Reset] to return to the standby display. Reports and - Canon imageCLASS MF5750 | imageCLASS MF5750/MF5770 Facsimile Guide - Page 64
default, the machine is set to print a TX report only when an error occurs. TX REPORT 02/01/2005 17:52 FAX 1234567 CANON TX REPORT TRANSMISSION OK TX recipient's fax/telephone number (RECIPIENT ADDRESS) is not shown for the manually sent faxes. • The machine does not print a TX report when - Canon imageCLASS MF5750 | imageCLASS MF5750/MF5770 Facsimile Guide - Page 65
SETTINGS> ➞ press [Set]. 3 Press [ (-)] or [ (+)] to select ➞ press [Set]. 4 Press [ (-)] or [ (+)] to select ➞ press [Set]. 5 Press [ (-)] or [ (+)] to select the setting you want ➞ press [Set ❑ You can set whether to print the first page of the report setting is set to - Canon imageCLASS MF5750 | imageCLASS MF5750/MF5770 Facsimile Guide - Page 66
a document, or only when an error occurs. Alternatively, you can disable printing the report. By default, the machine is set not to print an RX REPORT. 02/01/2005 17:52 FAX 1234567 CANON RX REPORT RECEPTION OK TX/RX NO RECIPIENT ADDRESS DESTINATION ID ST. TIME TIME USE PGS. R E S U LT 5003 - Canon imageCLASS MF5750 | imageCLASS MF5750/MF5770 Facsimile Guide - Page 67
setting you want ➞ press [Set]. You can select from the following: - to disable printing the report - to print a report only when a reception error occurs - to print a report every time you receive a document 6 Press [Stop/Reset] to return to the standby - Canon imageCLASS MF5750 | imageCLASS MF5750/MF5770 Facsimile Guide - Page 68
you to check the current settings of the machine as well as the registered sender information. (See "Registering Sender Information," on p. 2-3.) 02/01/2005 13:36 FAX 1234567 1. PAPER SETTINGS CASSETTE PAPER SIZE PAPER TYPE MP TRAY PAPER SIZE PAPER TYPE 2. COMMON SETTINGS CANON USER'S DATA - Canon imageCLASS MF5750 | imageCLASS MF5750/MF5770 Facsimile Guide - Page 69
to fax functions. For other messages, see Chapter 9, "Troubleshooting," in the Basic Guide. CHANGE PAPERSIZE Cause When the machine prints the reports or lists, the paper size setting is set to a size other than , or . Remedy Set the paper size setting to , or and - Canon imageCLASS MF5750 | imageCLASS MF5750/MF5770 Facsimile Guide - Page 70
to even the stack. CHECK PAPER SIZE Cause The size of the paper in the cassette or multi-purpose feeder is different from that of the paper specified in in of the Menu. Remedy 1 Load the correct paper size or change in of the Menu. For - Canon imageCLASS MF5750 | imageCLASS MF5750/MF5770 Facsimile Guide - Page 71
memory because paper or toner ran out, a paper jam occurred, or incorrect paper size was loaded. Remedy Load correct paper size in the cassette, replace the cartridge, or clear the paper jam. For more information, see the following: • Chapter 2, "Paper Handling," in the Basic Guide 7 • Chapter - Canon imageCLASS MF5750 | imageCLASS MF5750/MF5770 Facsimile Guide - Page 72
check it against the table below to learn more about what caused the error and how to remedy it. #0001 Cause There may be a document jam. Remedy Clear the jam. #0003 Cause 1 A document longer than one Troubleshooting have them check their fax machine fax machine. Remedy Check with the other party - Canon imageCLASS MF5750 | imageCLASS MF5750/MF5770 Facsimile Guide - Page 73
set properly. Load paper in the cassette or set the cassette properly. #0012 Cause Remedy The other fax machine has run out of paper and its memory is full. Contact the other party and tell them to refill the paper , contact the other party and have them check if their fax machine is turned on. - Canon imageCLASS MF5750 | imageCLASS MF5750/MF5770 Facsimile Guide - Page 74
. After connecting the power cord, the machine cannot scan documents immediately. Q Is the machine set for the correct telephone line type (pulse/tone)? A Make sure the machine is set for the correct telephone line type. (See "Setting 7 the Telephone Line Type," on p. 2-6.) Troubleshooting - Canon imageCLASS MF5750 | imageCLASS MF5750/MF5770 Facsimile Guide - Page 75
in the Basic Guide. If the copy is clear, the problem may be in the receiving fax machine. If the copy is spotted or dirty, clean the platen glass or the read area of the platen glass. For more information, see Chapter 8, "Maintenance," in the Basic Guide. Troubleshooting Faxing Problems 7-7 - Canon imageCLASS MF5750 | imageCLASS MF5750/MF5770 Facsimile Guide - Page 76
in proper condition? Or do you have a good connection? A Lower the transmission speed. (See of "Menu Descriptions," on p. 8-2.) Receiving Problems 7 Cannot receive a fax automatically. Troubleshooting Q Is the machine set to receive automatically? A For the machine to - Canon imageCLASS MF5750 | imageCLASS MF5750/MF5770 Facsimile Guide - Page 77
Q Is the telephone line connected properly? A Make sure all line connections are secure. (See "Connect the telephone cable and necessary external device," in the Set-Up Instructions (for MF5750 users) or Set-Up Instructions for the Machine (for MF5770 users).) The machine does not switch - Canon imageCLASS MF5750 | imageCLASS MF5750/MF5770 Facsimile Guide - Page 78
the sealing tape from the cartridge. (See "Install the toner cartridges," in the Set-Up Instructions (for MF5750 users) or Set-Up Instructions for the Machine (for MF5770 users).) Q Is any toner left in the cartridge? A Replace the cartridge with a new one. For more information, see Chapter - Canon imageCLASS MF5750 | imageCLASS MF5750/MF5770 Facsimile Guide - Page 79
have a good connection? A Lower the reception speed. (See of "Menu Descriptions," on p. 8-2.) Q Is the sending fax machine functioning properly? A Call the sender and have them check that their fax machine is functioning properly. 7 Troubleshooting Faxing Problems 7-11 - Canon imageCLASS MF5750 | imageCLASS MF5750/MF5770 Facsimile Guide - Page 80
on the machine, the telephone jack on your wall and the jack on your telephone. (See "Connect the telephone cable and necessary external device," in the Set-Up Instructions (for MF5750 users) or Set-Up Instructions for the Machine (for MF5770 users).) Troubleshooting 7-12 Telephone Problems - Canon imageCLASS MF5750 | imageCLASS MF5750/MF5770 Facsimile Guide - Page 81
retains the user data settings and the speed dialing settings. Any sent or received connected to the machine, depending on the type of telephone you use. • You can receive telephone calls using a telephone connected to the machine, depending on the type of telephone you use. 7 Troubleshooting - Canon imageCLASS MF5750 | imageCLASS MF5750/MF5770 Facsimile Guide - Page 82
Guide, contact Canon Authorized Service Facilities or the Canon Customer Care Center at 1-800-828-4040 between the hours of 8:00 A.M. to 8:00 P.M. EST Monday through Friday and 10:00 A.M. to 8:00 P.M. on Saturday. For interactive troubleshooting, e-mail technical support, the latest driver downloads - Canon imageCLASS MF5750 | imageCLASS MF5750/MF5770 Facsimile Guide - Page 83
USER DATA LIST. 3 Press [ (-)] or [ (+)] to select the sub menu you want to change ➞ press [Set]. NOTE • For details on sub menus, see "Menu Descriptions," on p. 8-2. • If you press [Stop/Reset] before [Set] is pressed, the item you have selected will not be registered. • Press [Stop/Reset] to exit - Canon imageCLASS MF5750 | imageCLASS MF5750/MF5770 Facsimile Guide - Page 84
LIST to check the current settings. (See "Printing the USER DATA LIST," on p. 6-9.) • For details on , , , , and , see Chapter 10, "Machine Settings," in the Basic Guide. • For details on , see Chapter - Canon imageCLASS MF5750 | imageCLASS MF5750/MF5770 Facsimile Guide - Page 85
All receptions are conducted. ON Receives the fax only from the sending fax machine that sends the TSI signal. 3. REPORT SETTINGS Sets the settings related to report functions. 1. TX REPORT Enables/disables automatic printing of a transmission report. PRINT ERROR ONLY Prints a report only - Canon imageCLASS MF5750 | imageCLASS MF5750/MF5770 Facsimile Guide - Page 86
Press [Start] to scan document. Otherwise, AUTO CLEAR function activates and the LCD returns to standby display after 1 minute. (See Chater 10, "Machine Settings," in the Basic Guide.) 5. RX SETTINGS Sets the reception functions. 1. ECM RX The ECM (Error Correction Mode) reception is turned on - Canon imageCLASS MF5750 | imageCLASS MF5750/MF5770 Facsimile Guide - Page 87
extension telephone rings for a specified length of time in the manual receive mode. ON The machine switches to document receive mode after the connected extension telephone rings for a specified time. F/T RING TIME Sets the length of time to elapse before the machine switches to the document - Canon imageCLASS MF5750 | imageCLASS MF5750/MF5770 Facsimile Guide - Page 88
SPEED DIAL LIST 3. USER DATA LIST Descriptions Prints a report manually before it is printed automatically after every 20 transactions. Prints the one-touch speed dialing keys, coded speed dialing codes, or group dialing. 1-TOUCH LIST, CODED DIAL LIST, GROUP DIAL LIST Prints out a list of items set - Canon imageCLASS MF5750 | imageCLASS MF5750/MF5770 Facsimile Guide - Page 89
. Facsimile Applicable Line Compatibility Data Compressing System Modem Speed Transmission Speed Transmission/ Reception Memory Fax Scanning Speed Public Switched Telephone Network (PSTN) G3 MH, MR, MMR, JBIG 33.6/31.2/28.8/26.4/24/21.6/19.2/16.8/14.4/12/9.6/7.2/4.8/2.4 Kbps Automatic fallback - Canon imageCLASS MF5750 | imageCLASS MF5750/MF5770 Facsimile Guide - Page 90
Fax Resolution Dialing Networking Telephone Connection STANDARD: 8 pels/mm x 3.85 lines/mm FINE: 8 pels/mm x 7.7 lines/mm PHOTO: 8 pels/mm x 7.7 lines/mm SUPER FINE: 8 pels/mm x 15.4 lines/mm ULTRA FINE: 16 pels/mm x 15.4 lines/mm • Speed dialing One-touch speed dialing (12 destinations) Coded - Canon imageCLASS MF5750 | imageCLASS MF5750/MF5770 Facsimile Guide - Page 91
DOCUMENT message, 7-1 CHECK PAPER SIZE message, 7-2 Clear key, 1-3 Coded Dial key, 1-2 CODED DIAL LIST description, 6-1 printing, 3-8 sample, 3-9 CODED SPD DIAL setting, 8-6 Coded speed dialing changing, deleting, 3-5 description, 3-1 registering, 3-4 using, 4-8 Customer support, 1-1 D Date & Time - Canon imageCLASS MF5750 | imageCLASS MF5750/MF5770 Facsimile Guide - Page 92
description, 3-1 registering, 3-2 using, 4-8 One-Touch Speed Dialing keys, 1-2 Overseas number, dialing, 4-14 P L LCD, 1-3 LCD messages (See also individual messages), 7-1 Letters, entering, 2-1 PAUSE TIME setting, 8-4 Pauses, dialing with, 4-14 Problems receiving, 7-8 sending, 7-6 telephone, 7-12 - Canon imageCLASS MF5750 | imageCLASS MF5750/MF5770 Facsimile Guide - Page 93
5-10 manual, 4-2 in memory when a problem occurs, 5-9 memory, 4-1 manually, 5-7 methods, 4-1 problems, 7-8 problems, 7-6 when an answering machine is connected, 5-4 sequential broadcasting, 4-12 while performing other tasks, 5-8 Sequential broadcasting, 4-12 Redial / Pause key, 1-2 Set - Canon imageCLASS MF5750 | imageCLASS MF5750/MF5770 Facsimile Guide - Page 94
, 8-4 Time, entering, 2-4 TONER SUPPLY LOW, 8-5 TOUCH TONE setting, 8-2 Troubleshooting, 7-1 TTI POSITION setting, 8-3 TX (Transmission) REPORT description, 6-1, 8-3 setting, 6-5 TX REPORT setting, 8-3 TX SETTINGS settings, 8-3 TX START SPEED setting, 8-2 TX TERMINAL ID setting, 8-3 U UNIT NAME - Canon imageCLASS MF5750 | imageCLASS MF5750/MF5770 Facsimile Guide - Page 95
Tower, Beijing Kerry Centre, 1 Guang Hua Road, Chao Yang District, 100020, Beijing, China CANON SINGAPORE PTE. LTD. 1 HarbourFront Avenue #04-01 Keppel Bay Tower Singapore 098632 CANON HONGKONG CO., LTD 19/F., The Metropolis Tower, 10 Metropolis Drive, Hunghom, Kowloon, Hong Kong FA7-6520 (010
-
 1
1 -
 2
2 -
 3
3 -
 4
4 -
 5
5 -
 6
6 -
 7
7 -
8
-
9
-
10
-
11
-
12
-
13
-
14
-
15
-
16
-
17
-
18
-
19
-
20
-
21
-
22
-
23
-
24
-
25
-
26
-
27
-
28
-
29
-
30
-
31
-
32
-
33
-
34
-
35
-
36
-
37
-
38
-
39
-
40
-
41
-
42
-
43
-
44
-
45
-
46
-
47
-
48
-
49
-
50
-
51
-
52
-
53
-
54
-
55
-
56
-
57
-
58
-
59
-
60
-
61
-
62
-
63
-
64
-
65
-
66
-
67
-
68
-
69
-
70
-
71
-
72
-
73
-
74
-
75
-
76
-
77
-
78
-
79
-
80
-
81
-
82
-
83
-
84
-
85
-
86
-
87
-
88
-
89
-
90
-
91
-
92
-
93
-
94
-
95
 |
 |

imageCLASS
MF5750/MF5770
Facsimile Guide