Canon imageFORMULA CR-50 CR-50/80 Instruction Manual
Canon imageFORMULA CR-50 Manual
 |
View all Canon imageFORMULA CR-50 manuals
Add to My Manuals
Save this manual to your list of manuals |
Canon imageFORMULA CR-50 manual content summary:
- Canon imageFORMULA CR-50 | CR-50/80 Instruction Manual - Page 1
Instructions Please read this manual before operating this scanner. - Canon imageFORMULA CR-50 | CR-50/80 Instruction Manual - Page 2
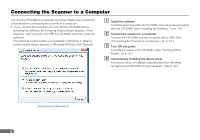
," on p. 21.) C Turn ON the power Turn ON the power of the CR-50/80. (See "Turning ON the Power," on p. 22.) D Automatically installing the device driver The device driver is installed automatically when Windows recognizes the CR-50/80 as new hardware. (See p. 23.) Wizard Screen (Windows 7) 2 - Canon imageFORMULA CR-50 | CR-50/80 Instruction Manual - Page 3
you to use the SOFTWARE. No updates, fixes or support will be made available for the SOFTWARE. 4. LIMITED WARRANTY AND DISCLAIMER OF INDEMNITY: Canon, Canon's affiliate, their distributor or dealer will not guarantee uninterrupted service, or absence or correction of errors. Therefore, the SOFTWARE - Canon imageFORMULA CR-50 | CR-50/80 Instruction Manual - Page 4
instructions, manual. If such changes or modifications should be made, you could be required to stop operation of the equipment. Canon U.S.A. Inc. One Canon service. For more information regarding return and recycling of WEEE products, please visit www.canon CR-50: Model M111101 CR-80: Model M111102 4 - Canon imageFORMULA CR-50 | CR-50/80 Instruction Manual - Page 5
also be trademarks or registered trademarks in other countries. • imageFORMULA is a trademark of CANON ELECTRONICS INC. • Microsoft, Windows, Windows XP, Windows MAXIMUM LIABILITY OF CANON ELECTRONICS INC. UNDER THIS WARRANTY IS LIMITED TO THE PURCHASE PRICE OF THE PRODUCT COVERED BY THE WARRANTY. - Canon imageFORMULA CR-50 | CR-50/80 Instruction Manual - Page 6
up the CR-50/80 in accordance with the Installation Guide. For details on the CR-50/80, refer to the Instructions (electronic manual). Operation & Maintenance Guide (Supplied with the scanner/ Electronic Manual) Describes the basic operations for using the CR-50/80, troubleshooting, and maintenance - Canon imageFORMULA CR-50 | CR-50/80 Instruction Manual - Page 7
Scanner to a Computer 2 INTRODUCTION 6 Manuals for the CR-50/80 6 Symbols Used in This Manual 6 Important Safety Instructions 9 Handling 9 Disposal 10 Installation Location 10 Power Supply 11 Moving the Scanner 11 Introduction to the CR-50/80 12 Features of the CR-50/80 12 Features 12 - Canon imageFORMULA CR-50 | CR-50/80 Instruction Manual - Page 8
Maintenance 45 Daily Cleaning 45 Cleaning the Main Unit 45 Cleaning the Inside of the Scanner 45 Cleaning the Scanning Glass and Rollers 45 Cleaning the Magnetic Heads 48 Cleaning the Ink Jet Nozzles 49 Maintenance 50 Replacing the Ink Cartridge 50 Adjusting the Separation Roller Gap 52 - Canon imageFORMULA CR-50 | CR-50/80 Instruction Manual - Page 9
Safety Instructions Handling Before you clean the scanner, turn the power OFF and disconnect the power cord from the power outlet. ■ To clean the scanner's power outlet. Contact your local authorized Canon dealer or service representative to have the scanner serviced. ■ Before you move the scanner - Canon imageFORMULA CR-50 | CR-50/80 Instruction Manual - Page 10
that is within the following range: Room temperature: 10°C to 32.5°C (50°F to 90.5°F) Relative humidity: 20% to 80% RH 20% to 50% RH when using the imprinter Use the recommended operating environment for the ink cartridge when using the imprinter. • Near electronic equipment or heavy equipment that - Canon imageFORMULA CR-50 | CR-50/80 Instruction Manual - Page 11
with any other product. • If you have any questions about the AC adapter, contact your local authorized Canon dealer or service representative for further information. Moving the Scanner When you move the CR-50/80, hold it firmly with both hands and carry it carefully. Do not hold the scanner by the - Canon imageFORMULA CR-50 | CR-50/80 Instruction Manual - Page 12
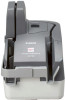
names and functions of parts on the scanner. Features of the CR-50/80 The Canon Check Reader CR-50/80 is a scanner with magnetic heads that can read checks and other documents that are printed with MICR (Magnetic Ink Character Recognition) compatible fonts, and is capable of OCR (Optical Character - Canon imageFORMULA CR-50 | CR-50/80 Instruction Manual - Page 13
items are missing, contact your local authorized Canon dealer. Setup Disc CR-50/80 Marking Labels for Thickness Adjustment Dial Power Cord*1 USB Cable AC Adapter Warranty Card*2 User Registration Card*2 Installation Guide Operation & Maintenance Guide *1 The power cord varies, according to - Canon imageFORMULA CR-50 | CR-50/80 Instruction Manual - Page 14
names and functions of each part. Before you connect the CR-50/80, familiarize yourself with its parts and their functions. ," on p. 35.) Maintenance Cover Open this cover to clear paper jams or clean the scanner. Paper Thickness Adjustment Dial Adjust the gap between the separation roller and - Canon imageFORMULA CR-50 | CR-50/80 Instruction Manual - Page 15
Lever Adjusts the print position. (See "Setting the Ink Cartridge and Adjusting the Print Position," on p. 24.) Lock Lever Locks the ink cartridge in place. Magnetic Head for MICR Reads MICR text printed in magnetic ink. (See "Cleaning the Magnetic Heads," on p. 48.) Separation Roller Separates - Canon imageFORMULA CR-50 | CR-50/80 Instruction Manual - Page 16
Rear View Connectors/ Power Switch Reading Unit (Access Hatch) Open to clear paper jams or clean the scanner. (See "Clearing Paper Jams," on p. 40.) CAUTION To avoid overheating and causing a fire, never block the air vents on the back of the - Canon imageFORMULA CR-50 | CR-50/80 Instruction Manual - Page 17
installing the device driver. (See p. 23.) The device driver is installed automatically when Windows recognizes the CR-50/80. IMPORTANT • To have the device drivers installed automatically when the computer recognizes the CR-50/80, the software needs to be installed before the CR-50/80 is connected - Canon imageFORMULA CR-50 | CR-50/80 Instruction Manual - Page 18
system requirements are recommended for using the CR-50/80. Operating Systems: • Microsoft Operating Systems • The ISIS/TWAIN driver supplied with this product supports scanning with 32-bit applications only are guaranteed. Contact your local authorized Canon dealer for more detailed information. • - Canon imageFORMULA CR-50 | CR-50/80 Instruction Manual - Page 19
Utility Canon Scanning driver so that Windows can recognize the CR-50/80. Be sure to install the Scanning Utility before connecting the CR-50/80 to the computer. • Some functions mentioned in this manual may not be operated in some applications. Installing the Scanning Utility Follow the instructions - Canon imageFORMULA CR-50 | CR-50/80 Instruction Manual - Page 20
utility will put the [Scanning Utility for CR-50&80] icon on your Windows Start menu. (See "How to Use the Scanning Utility," on p. 28.) E Enter "D:\SU80\setup.exe" in the [Open] fields, and then click [OK]. Installation starts. F Follow the instructions on the screen to complete the installation - Canon imageFORMULA CR-50 | CR-50/80 Instruction Manual - Page 21
with the length less than 5 m. • When the application is running, do not turn the scanner OFF or unplug the interface cable. • Do not connect multiple CR-50/80 scanners to one computer. CAUTION • Do not turn OFF the scanner or remove the interface cable when an application is running. • Turn OFF the - Canon imageFORMULA CR-50 | CR-50/80 Instruction Manual - Page 22
turn OFF the power switch. • Connect only to a power outlet of the rated voltage and power supply frequency (either 120V, 60 Hz or 220-240V, 50/60 Hz, depending on your region). • Do not plug the scanner into a power outlet shared with another device. If you use an extension cord, make - Canon imageFORMULA CR-50 | CR-50/80 Instruction Manual - Page 23
outlet. Contact your local authorized Canon dealer or service representative to have the scanner serviced. B Windows recognizes the CR-50/80 as new hardware, and installation starts automatically. (Windows 7) NOTE The CR-50/80 will be registered as "CANON CR-50 USB" or "CANON CR-80 USB" in the - Canon imageFORMULA CR-50 | CR-50/80 Instruction Manual - Page 24
is set, replace the Maintenance Cover, and then turn the scanner back ON. • Finish up the unpacked ink cartridge as soon as possible. More frequent cleaning of the ink cartridge is required if long time elapses after unpacking. A Hook your finger around the open lever and open the Maintenance - Canon imageFORMULA CR-50 | CR-50/80 Instruction Manual - Page 25
. This can cause a bad electrical contact and reduced print quality. D Grasp the tag and then peel off the tape covering the ink jet nozzle. E Place the ink cartridge shown in the diagram below. CAUTION Do not touch the electrical contact on the carriage. Doing so may cause a malfunction. 25 - Canon imageFORMULA CR-50 | CR-50/80 Instruction Manual - Page 26
until it clicks into place. IMPORTANT Make sure that the ink cartridge lock lever locks the ink cartridge into the correct position. G Squeeze the Print Position Adjustment Lever and move it to adjust the print position. Top: 50.5 mm (1.99") from the bottom edge of the document Middle: 47 mm - Canon imageFORMULA CR-50 | CR-50/80 Instruction Manual - Page 27
H Carefully replace the Imprinter Cover. I Gently close the Maintenance Cover until it clicks into place. 27 - Canon imageFORMULA CR-50 | CR-50/80 Instruction Manual - Page 28
using the Scanning Utility. Read the [Help] file in [Scanning Utility] for more information. A Click [Start], and then click [All Programs]. B Click [Scanning Utility for CR-50&80]. C Start the Scanning Utility. 28 - Canon imageFORMULA CR-50 | CR-50/80 Instruction Manual - Page 29
NOTE The basic operation of the Scanning Utility is noted in the Scanning Utility help file. On the [Help] menu, click [Help] to view the explanation. E Set the scan conditions and click [OK]. D Select [Scanner Setting] from the [File] menu. NOTE For information about the settings for the scan - Canon imageFORMULA CR-50 | CR-50/80 Instruction Manual - Page 30
G When scanning is finished, click [Exit] on the [File] menu to quit the Scanning Utility. Uninstalling the Software This section describes how to uninstall the Scanning Utility. IMPORTANT Be sure to log on as the Administrator. A Click [Start], and then click [Control Panel]. 30 - Canon imageFORMULA CR-50 | CR-50/80 Instruction Manual - Page 31
B Click [Programs], and then click [Programs and Features]. NOTE Depending on the status of your computer, the following screen may be displayed. In that case, double-click the [Programs and Features] icon. C Select the software that you want to remove from the list in the dialog box, and then - Canon imageFORMULA CR-50 | CR-50/80 Instruction Manual - Page 32
"Scanning Utility for CR-50/80" you also need to uninstall the "Canon Driver for CR-50/80." D The [Confirm File Deletion] dialog box appears. If you selected "Canon Driver for CR-50/80," the above dialog box appears. E Click [Yes], and the uninstaller starts. Follow the instructions on the screen - Canon imageFORMULA CR-50 | CR-50/80 Instruction Manual - Page 33
paper edges may cut your fingers. Document The CR-50/80 can feed a wide variety of document sizes. The ranges of height and length be sure to clean the scanning rollers. (See "Cleaning the Scanning Glass and Rollers," on p. 45.) • If you scan thin paper in the Duplex mode, the ink printed on the - Canon imageFORMULA CR-50 | CR-50/80 Instruction Manual - Page 34
Accompanying Scanning Utility for CR-50/80: You can disable the double feed detection function from [Scanner Setting] in the Scanning Utility. • For more details about how to configure scanning parameters, click the [Help] button in the settings dialog box to view the Canon driver help. Torn paper - Canon imageFORMULA CR-50 | CR-50/80 Instruction Manual - Page 35
Placing Documents Note the following points when placing documents on the scanner. • Place the front of the document toward you. • A maximum of 50 documents or a document stack no higher than 5 mm (0.2") can be loaded at one time. • Move the stopper to the edge of the document in the - Canon imageFORMULA CR-50 | CR-50/80 Instruction Manual - Page 36
scanning to start from the software application. NOTE • When Using the Accompanying Scanning Utility for CR-50/80: There are three scanning methods as follows. Follow the each instruction. Scan 1 page Click [Scan Page] from the [File] menu. Scan Batch to File A Click [Scan Batch to File] from - Canon imageFORMULA CR-50 | CR-50/80 Instruction Manual - Page 37
edge of the document because the documents are ejected onto the printed surface. Ink residue Printed text (back side) Confirming Proper Document Feeding Depending on the thickness of documents scanned with the CR-50/80 and the paper thickness setting, double feeds or feeding errors may occur - Canon imageFORMULA CR-50 | CR-50/80 Instruction Manual - Page 38
NOTE For instructions on using the scanning utility, see "How to Use the Scanning Utility," on p. 28. You can also refer to the scanning utility help in the [ - Canon imageFORMULA CR-50 | CR-50/80 Instruction Manual - Page 39
NOTE If the sheets do not feed properly (they double-feed or no sheets are fed), see "Adjusting the Separation Roller Gap," on p. 52 to adjust for paper thickness. F Exit the scanning utility. 39 - Canon imageFORMULA CR-50 | CR-50/80 Instruction Manual - Page 40
Troubleshooting This chapter describes the problems that might occur in the CR-50/80, and how to remedy interfaces provided as standard with personal computers are guaranteed. Contact your local authorized Canon dealer for more detailed information. (See "Checking Your Operating Environment," on - Canon imageFORMULA CR-50 | CR-50/80 Instruction Manual - Page 41
B While lowering the down the OPEN lever, open the reading unit. If the paper is jammed at any other area: Pull the paper forward and clear the jam from the nearest opening. C Remove the paper that has jammed. If the paper is jammed at the pickup area: Pull the paper forward and clear the jam from - Canon imageFORMULA CR-50 | CR-50/80 Instruction Manual - Page 42
E Gently close the Maintenance Cover until it clicks into place. The Scanner Does Not Turn ON Check the following conditions, and take the appropriate action. The power switch is not in the ON position. Turn the switch into the ON position. (See "Turning ON the Power," on p. 22.) The power cord is - Canon imageFORMULA CR-50 | CR-50/80 Instruction Manual - Page 43
also be the problem. The imprinter is not printing correctly (missing imprint dots). Ink is clogged in the ink jet nozzle. Clean the ink jet nozzle. Cleaning the ink jet nozzle is recommended before using the CR-50/80. (See "Cleaning the Ink Jet Nozzles," on p. 49.) The ink cartridge may be empty - Canon imageFORMULA CR-50 | CR-50/80 Instruction Manual - Page 44
, and the driver and the application is installed correctly, scanning may not be performed correctly. If this happens, the interface card is not compatible. Use the recommended interface card. If the above remedies do not rectify the problem, contact your local authorized Canon dealer or service - Canon imageFORMULA CR-50 | CR-50/80 Instruction Manual - Page 45
Maintenance This chapter describes how to clean and maintain the scanner. Daily Cleaning To ensure high-quality image scanning, regularly clean your CR-50/80 as described below. CAUTION • Before you clean the scanner, turn OFF the scanner and computer, and disconnect the power cord from the power - Canon imageFORMULA CR-50 | CR-50/80 Instruction Manual - Page 46
this case, wipe dirt only off of the exposed area. WARNING Do not use flammable liquids to clean the scanner, including alcohol, benzene, or paint thinner. C Spin the rollers while wiping them clean with a firmly wrung cloth dampened with water or a mild detergent. There are 18 roller positions, as - Canon imageFORMULA CR-50 | CR-50/80 Instruction Manual - Page 47
D Use cotton swabs to clean the entire scanning glass. There are two scanning glass areas, one on each side. errors. If there are scratches on the scanning glass, contact your local authorized Canon dealer or service representative. E Gently close the reading unit until it clicks into place. 47 - Canon imageFORMULA CR-50 | CR-50/80 Instruction Manual - Page 48
are dirty, then MICR characters cannot be scanned correctly. Periodically, clean the magnetic heads with a commercially available audio head cleaner. A into place. B Use a commercially available audio head cleaner to clean the magnetic heads. The magnetic head is located in the position shown in - Canon imageFORMULA CR-50 | CR-50/80 Instruction Manual - Page 49
and smudged from printing even after you clean the ink absorber, you should replace the ink absorber. Contact your local authorized Canon dealer or service representative. C Remove the ink cartridge. For more information, see "Replacing the Ink Cartridge," on p. 50. D Use a dry cotton swab to wipe - Canon imageFORMULA CR-50 | CR-50/80 Instruction Manual - Page 50
as possible. More frequent cleaning of the ink cartridge is required if long time elapses after unpacking. NOTE • Use an ink cartridge. (See "About the Ink Cartridge," on p. 24.) • Do not use more than one cartridge by rotation. If you do so, applications cannot check the ink level precisely. 50 - Canon imageFORMULA CR-50 | CR-50/80 Instruction Manual - Page 51
and open the Maintenance Cover. C Squeeze in both sides of the print position adjustment lever and move the print cartridge carriage to its lowest position. B Remove the Imprinter Cover. D Push back the ink cartridge lock lever in the direction of the arrow in the diagram below, and pull out the - Canon imageFORMULA CR-50 | CR-50/80 Instruction Manual - Page 52
. For more information, see "Setting the Ink Cartridge and Adjusting the Print Position," on p. 24. F Carefully replace the Imprinter Cover. G Gently close the Maintenance Cover until it clicks into place. Adjusting the Separation - Canon imageFORMULA CR-50 | CR-50/80 Instruction Manual - Page 53
B Pull out the document feed tray. D Slide the two sheets through between the feeding roller and the separation roller and stop at the position shown below. Two Sheets C Load two checks or check-stock paper together. Separation Roller Feeding Roller NOTE If you were unable to slide both sheets - Canon imageFORMULA CR-50 | CR-50/80 Instruction Manual - Page 54
the Maintenance Cover. H Confirm that the document feeds properly. See "Confirming Proper Document Feeding," on p. 37. If additional assistance is required, contact your local authorized Canon dealer or service representative. 54 - Canon imageFORMULA CR-50 | CR-50/80 Instruction Manual - Page 55
Scanning speed CR-50: 50 cpm (American checks) CR-80: 80 50/60Hz 53VA-72VA DC16V 1.4A Approximately 0.22 kg (0.49 lb) (excluding power cord) ■ Use the recommended operating environment for the ink cartridge when using the imprinter. ■ You can use the functions noted above if your software supports - Canon imageFORMULA CR-50 | CR-50/80 Instruction Manual - Page 56
loaded 35 C Cleaning Main unit 45 Cleaning the Inside of the Scanner 45 Connectors/Power Switch 16 D Daily Cleaning 45 Disposal 10 of the CR-50/80 12 Feeding Roller 15 Feeding Trouble 43 56 H Handling 9 I Imprinter Cover 14 Ink Absorber 15 Ink Cartridge 15, 24, 50 Ink Jet Nozzle - Canon imageFORMULA CR-50 | CR-50/80 Instruction Manual - Page 57
Roller 15 Setup Disc 13 Software How to Use the Software 28 Install 19 Uninstall 30 Specifications 55 T The Scanner Does Not Turn ON 42 Troubleshooting 40 Turning OFF the Power 23 Turning ON the Power 22 U Unpacking the scanner 13 USB Connections 21, 40 USB Connector 16 57 - Canon imageFORMULA CR-50 | CR-50/80 Instruction Manual - Page 58
INC. 1248, SHIMOKAGEMORI, CHICHIBU-SHI, SAITAMA 369-1892, JAPAN CANON U.S.A. INC. ONE CANON PLAZA, LAKE SUCCESS, NY 11042, U.S.A. CANON CANADA INC. 6390 DIXIE ROAD, MISSISSAUGA, ONTARIO L5T 1P7, CANADA CANON EUROPA N.V. BOVENKERKERWEG 59-61, P.O.BOX 2262, 1180 EG AMSTELVEEN, THE NETHERLANDS
-
 1
1 -
 2
2 -
 3
3 -
 4
4 -
 5
5 -
 6
6 -
 7
7 -
8
-
9
-
10
-
11
-
12
-
13
-
14
-
15
-
16
-
17
-
18
-
19
-
20
-
21
-
22
-
23
-
24
-
25
-
26
-
27
-
28
-
29
-
30
-
31
-
32
-
33
-
34
-
35
-
36
-
37
-
38
-
39
-
40
-
41
-
42
-
43
-
44
-
45
-
46
-
47
-
48
-
49
-
50
-
51
-
52
-
53
-
54
-
55
-
56
-
57
-
58
 |
 |

Please read this manual before operating this scanner.
Instructions